Use custom topics for communication
Learn how devices use custom topics to exchange messages with IoT Platform and business servers via MQTT publish/subscribe and AMQP server-side subscription. Topics are classified into system topics, TSL model topics, and custom topics. Custom topics must be defined in the console.
Background information
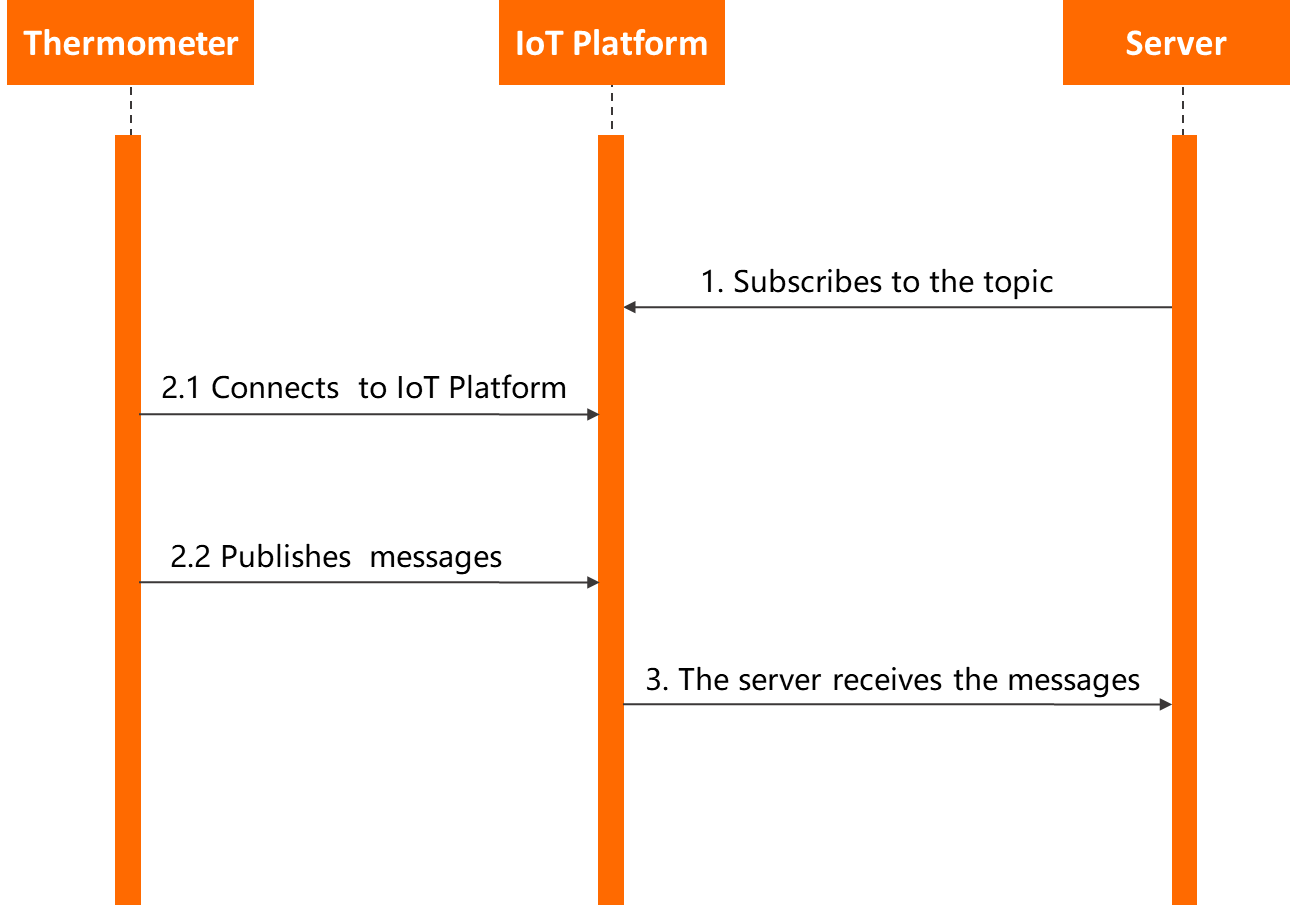
In this example, an electronic thermometer receives instructions by subscribing to a custom topic and reports temperature data by publishing to another. IoT Platform forwards the data to a user server through AMQP server-side subscription. The server calls the Pub operation to remotely configure the precision of the thermometer.

Prepare a development environment
This example uses the Java SDK. Download and install a Java development environment from the official Java website.
Required components:
Operating system: Windows 10 (64-bit)
JDK version: JDK 8
Integrated development environment (IDE): IntelliJ IDEA Community Edition
Create a product and device
Log on to the IoT Platform console.
On the Overview page, find the instance that you want to manage and click the instance ID or instance name.
In the left-side navigation pane, choose .
Click Create Product to create a thermometer product and obtain the Productkey, such as
a1uzcH0****.After the product is created, click View next to the product.
On the Product Details page, click the Topic Categories tab, and then click Custom Topic to add a custom topic category.
Use custom topics for communication.
In this example, the following topic categories are required:
Topic for the device to publish messages: /a1uzcH0****/${deviceName}/user/devmsg, with the Publish permission.
Topic for the device to subscribe to messages: /a1uzcH0****/${deviceName}/user/cloudmsg, with the Subscribe permission.
Click the Server-side Subscription tab, and then click Create Subscription to configure AMQP server-side subscription. Subscribe to Device Upstream Notification messages to the Default Consumer Group.
Device Upstream Notification includes custom topic and TSL model messages. Configure AMQP server-side subscription.
In the left-side navigation pane, choose . Then, add a device named device1 to the thermometer product that you created. Obtain the device certificate information, including ProductKey, DeviceName, and DeviceSecret.
Configure the device to send a message to the server
The following figure shows how the device sends a message to the server.
Configure the server and device as follows:
Connect your AMQP client to IoT Platform and configure it to listen for device messages. Connect an AMQP client to IoT Platform by using SDK for Java.
ImportantThe consumer group of the AMQP client must be in the same IoT Platform instance as the device.
Configure the device SDK to connect the device to IoT Platform and enable the device to send messages.
Configure the parameters to authenticate the device.
final String productKey = "a1uzcH0****";
final String deviceName = "device1";
final String deviceSecret = "uwMTmVAMnxB****";
final String region = "cn-shanghai";
final String iotInstanceId = "iot-2w****";
Configure the following parameters:
Parameter
Example
Description
productKey
a1uzcH0****
The device certificate information. You can view the information on the Device Details page in the IoT Platform console.View device details.
deviceName
device1
deviceSecret
uwMTmVAMnxB****
region
cn-shanghai
The region ID of your IoT Platform instance. Regions and zones.
iotInstanceId
iot-2w****
The ID of the instance to which the device belongs.
You can view the instance ID on the Overview page in the IoT Platform console.
If the instance ID is displayed, you must specify this parameter.
If no Overview or ID is generated for your instance, specify an empty string (
iotInstanceId = "") for the parameter.
Initialize the connection with MQTT, device, and TSL model parameters.
LinkKitInitParams params = new LinkKitInitParams();
// Configure the MQTT connection parameters. Link SDK uses the MQTT protocol.
IoTMqttClientConfig config = new IoTMqttClientConfig();
config.productKey = productKey;
config.deviceName = deviceName;
config.deviceSecret = deviceSecret;
config.channelHost = productKey + ".iot-as-mqtt." + region + ".aliyuncs.com:1883";
// Configure the device parameters.
DeviceInfo deviceInfo = new DeviceInfo();
deviceInfo.productKey = productKey;
deviceInfo.deviceName = deviceName;
deviceInfo.deviceSecret = deviceSecret;
// Specify the initial status of the device.
Map<String, ValueWrapper> propertyValues = new HashMap<String, ValueWrapper>();

params.mqttClientConfig = config;
params.deviceInfo = deviceInfo;
params.propertyValues = propertyValues;
Modify the following parameters:
Parameter
Example
Description
config.channelHost
config.channelHost = productKey + ".iot-as-mqtt." + region + ".aliyuncs.com:1883";The domain name for MQTT connections.
Old public instance:
config.channelHost = productKey + ".iot-as-mqtt." + region + ".aliyuncs.com:1883";.New public instance and Enterprise Edition instance:
config.channelHost = iotInstanceId + ".mqtt.iothub.aliyuncs.com:1883";.
Initialize the connection.
//Connect and configure the callback function that is invoked after the connection is established.
LinkKit.getInstance().init(params, new ILinkKitConnectListener() {
     @Override
     public void onError(AError aError) {
         System.out.println("Init error:" + aError);
     }

     // Implement the callback function.
     @Override
     public void onInitDone(InitResult initResult) {
         System.out.println("Init done:" + initResult);
     }
 });
Send a message from the device.
After the device connects, publish a message to the custom topic by replacing the onInitDone function:
@Override
 public void onInitDone(InitResult initResult) {
     // Specify the topic to which the message is published and the message content.
     MqttPublishRequest request = new MqttPublishRequest();
     request.topic = "/" + productKey + "/" + deviceName + "/user/devmsg";
     request.qos = 0;
     request.payloadObj = "{\"temperature\":35.0, \"time\":\"sometime\"}";
     // Publish the message and configure the callback functions that are used after the message is published.
     LinkKit.getInstance().publish(request, new IConnectSendListener() {
         @Override
         public void onResponse(ARequest aRequest, AResponse aResponse) {
             System.out.println("onResponse:" + aResponse.getData());
         }

         @Override
         public void onFailure(ARequest aRequest, AError aError) {
             System.out.println("onFailure:" + aError.getCode() + aError.getMsg());
         }
     });
 }
Configure the following parameters:
Parameter
Example
Description
request.topic
"/" + productKey + "/" + deviceName + "/user/devmsg"
The custom topic on which the device has the Publish permission.
request.payloadObj
"{\"temperature\":35.0, \"time\":\"sometime\"}"
The content of the message.
The server receives the following message:
Message
{payload={"temperature":35.0, "time":"sometime"},
topic='/a1uzcH0****/device1/user/devmsg',
messageId='1131755639450642944',
qos=0,
generateTime=1558666546105}
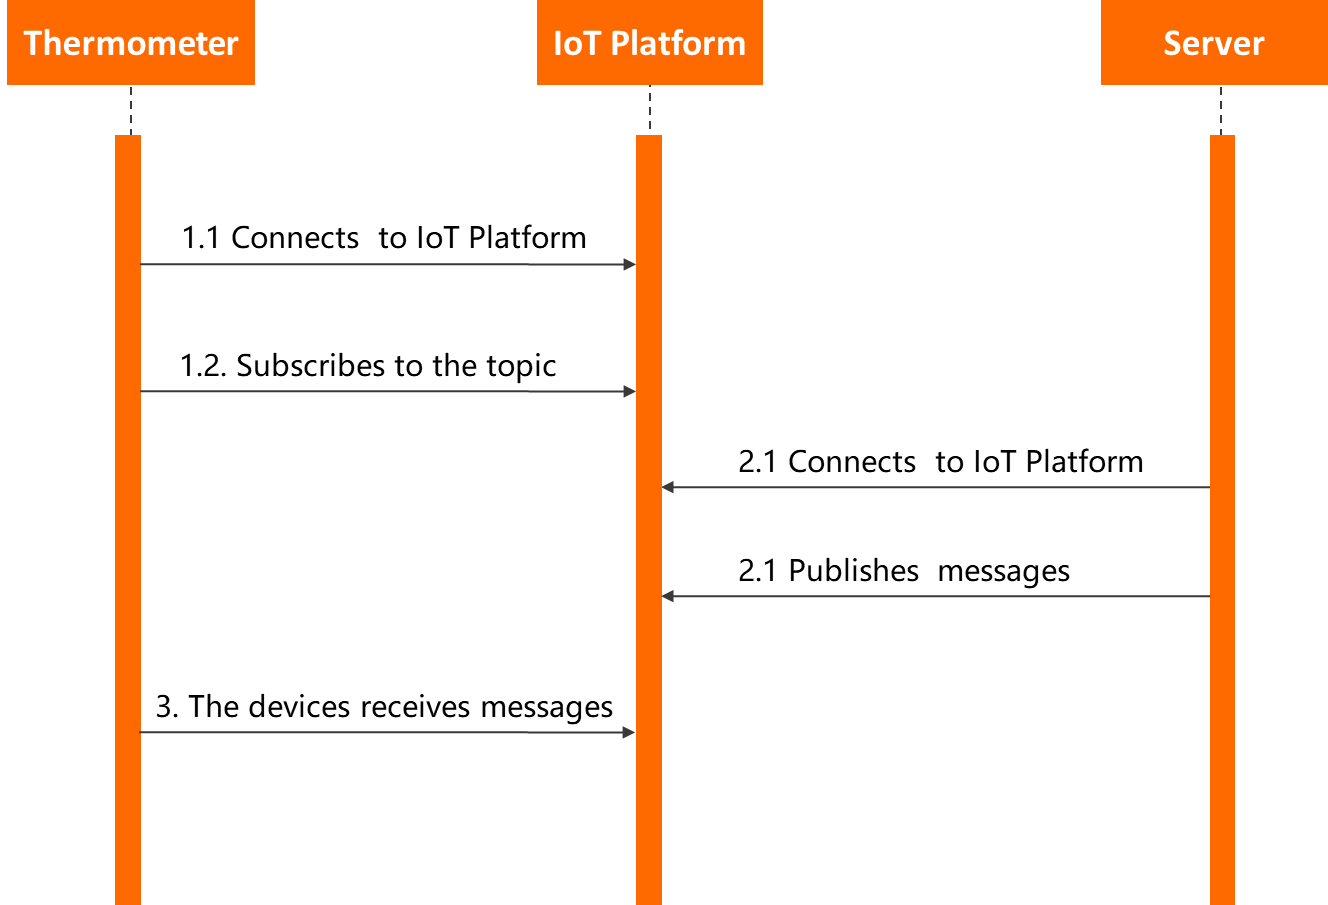
Configure the server to send a message to the device
The following figure shows how the server sends a message to the device.
Configure the device SDK to subscribe to a custom topic.
For device authentication and connection setup, reuse the code from Configure the device to send a message to the server.
Configure the device to subscribe to the custom topic:
Subscribe to a topic using the following code:
// Implement the callback function.
@Override
public void onInitDone(InitResult initResult) {
    // Specify the topic to which the device subscribes.
    MqttSubscribeRequest request = new MqttSubscribeRequest();
    request.topic = "/" + productKey + "/" + deviceName + "/user/cloudmsg";
    request.isSubscribe = true;
    // Send a subscription request and configure the callback functions that are invoked after the subscription succeeds or fails.
    LinkKit.getInstance().subscribe(request, new IConnectSubscribeListener() {
        @Override
        public void onSuccess() {
            System.out.println("");
        }

        @Override
        public void onFailure(AError aError) {

        }
    });

    // Configure a listener for downstream messages.
    IConnectNotifyListener notifyListener = new IConnectNotifyListener() {
        // Configure the callback function that is used after the downstream messages are received.
        @Override
        public void onNotify(String connectId, String topic, AMessage aMessage) {
            System.out.println(
                "received message from " + topic + ":" + new String((byte[])aMessage.getData()));
        }

        @Override
        public boolean shouldHandle(String s, String s1) {
            return false;
        }

        @Override
        public void onConnectStateChange(String s, ConnectState connectState) {

        }
    };
    LinkKit.getInstance().registerOnNotifyListener(notifyListener);
}
Set
request.topicto a custom topic with Subscribe permission.Use the cloud SDK to call the Pub operation to publish messages to the device. Pub. Use SDK for Java.
Configure the parameters to authenticate the device.
 String regionId = "cn-shanghai";
 String accessKey = "LTAI****";
 String accessSecret = "********";
 final String productKey = "a1uzcH0****";
 final String deviceName = "device1";
 final String iotInstanceId = "iot-2w****";
Modify the following parameters:
Parameter
Example
Description
accessKey
LTAI****
The AccessKey ID and AccessKey Secret of your Alibaba Cloud account.
Log on to the IoT Platform console, move the pointer over the profile picture, and then click AccessKey Management to obtain the AccessKey ID and AccessKey secret.
NoteIf you use a RAM user, you must attach the AliyunIOTFullAccess permission policy to the RAM user. The policy allows the RAM user to manage IoT Platform resources. If you do not attach the AliyunIOTFullAccess permission policy to the RAM user, the connection to IoT Platform fails. For more information about how to grant permissions to a RAM user, see RAM user access.
accessSecret
********
productKey
a1uzcH0****
The device certificate information. You can view the information on the Device Details page in the IoT Platform console.View device details.
deviceName
device1
region
cn-shanghai
The region ID of your IoT Platform instance. Regions and zones.
iotInstanceId
iot-2w****
The ID of the instance to which the device belongs.
You can view the instance ID on the Overview page in the IoT Platform console.
If the instance ID is displayed, you must specify this parameter.
If no Overview or ID is generated for your instance, specify an empty string (
iotInstanceId = "") for the parameter.
Configure connection parameters.
//Configure the client parameters.
DefaultProfile profile = DefaultProfile.getProfile(regionId, accessKey, accessSecret);
IAcsClient client = new DefaultAcsClient(profile);
Configure message publishing parameters.
PubRequest request = new PubRequest();
request.setIotInstanceId(iotInstanceId);
request.setQos(0);
// Specify the topic to which the message is published.
request.setTopicFullName("/" + productKey + "/" + deviceName + "/user/cloudmsg");
request.setProductKey(productKey);
// Configure the MessageContent parameter. The message content must be encoded in Base64. Otherwise, the message content is displayed as garbled characters.
request.setMessageContent(Base64.encode("{\"accuracy\":0.001,\"time\":now}"));
Configure the parameters based on your requirements. Pub.
Publish the message.
try {
     PubResponse response = client.getAcsResponse(request);
     System.out.println("pub success?:" + response.getSuccess());
 } catch (Exception e) {
     System.out.println(e);
 }
The device receives:
msg = [{"accuracy":0.001,"time":now}]
Appendix: Sample code
Modify the parameters to match your business requirements.
Download the Pub/Sub demo for cloud SDK and device SDK sample code.
Connect an AMQP client to IoT Platform using the following SDK guides:
Connect an AMQP client to IoT Platform by using SDK for Java
Connect an AMQP client to IoT Platform by using SDK for .NET
Connect an AMQP client to IoT Platform by using SDK for Node.js
Connect an AMQP client to IoT Platform by using SDK for Python 2.7
Connect an AMQP client to IoT Platform by using SDK for Python 3