Create and manage custom storage tables
DataService Studio in IoT Platform provides an offline data storage feature that supports custom partitioned tables, transactional tables, and time series tables. You can use custom storage tables as data sources for data parsing, SQL analysis tasks, and data visualization in DataService Studio. You can also use them as output tables for data parsing and SQL analysis tasks, to integrate time series table data into Realtime Compute for Flink, or to directly store custom field data from static imports. This topic describes how to create and manage custom storage tables and their data.
Create a custom storage table
-
Log on to the IoT Platform console.
-
On the Instance Overview page, find the target Enterprise instance and click the instance to open the Instance Details page.
-
In the navigation pane on the left, choose DataService Studio > Data Storage.
-
On the Data Storage page, click the Offline Storage tab.
On the Offline Storage tab, click Custom Storage Tables.

On the Custom Storage Tables tab, click Create Custom Storage Table.
In the Create Custom Storage Table dialog box, you can configure the following parameters.
Parameter
Example
Required
Description
Table Display Name
Daily Average Temperature Storage Table
Yes
The name of the storage table. The name cannot start with a digit or an underscore (_). It can contain Chinese characters, letters, digits, and underscores (_). The name can be up to 30 characters in length.
Table Identifier
daily_average_temperature
Yes
The identifier of the storage table. The identifier must start with a letter. It can contain letters, digits, and underscores (_). The identifier can be up to 30 characters in length.
Table Type
Partitioned table
Yes
Optional:
Partitioned table: Suitable for storing data from timed scheduling. You can create a partition every hour or every day. When the corresponding task is rerun, the data in the entire partition is overwritten.
ImportantIf your custom storage table generates more than 30 million rows of data for each scheduling, select Partitioned table to ensure query performance.
Transactional table: Similar to a table in a relational database such as MySQL. This table type is suitable for custom primary keys, where data is updated and overwritten at the row level based on the primary key granularity.
ImportantThis table can store a maximum of 30 million rows of data. Data that exceeds this limit cannot be written.
Time series table: Suitable for storing data that is continuously appended over time, such as data reported by devices or events triggered by devices.
Partition Granularity
Day
No
If you set Table Type to Partitioned table and enable automatic partitioning, you must configure the partition granularity. You can set it to Hour or Day.
ImportantThis setting must be consistent with the scheduling period in the SQL analysis task. For more information, see Set a task scheduling policy.
Description
Average temperature of the thermometer
No
The purpose of the storage table.
Data Storage Duration
More
Yes
The period for which data is stored in the table.
The system deletes data that is older than the specified period based on the time field in the table.
You can select 1 Month, 2 Months, 3 Months, 6 Months, 1 Year, Never Expire, or More.
If you select More, you must specify Time Unit and Time Value.
Time Unit
Year
No
The time unit for data storage. This parameter is required if you set Data Storage Duration to More. Valid values: Year, Month, and Day.
Time Value
10
No
The time value for data storage. This parameter is required if you set Data Storage Duration to More. The value must be a positive integer. The maximum values are:
102 (Year).
2142 (Month).
64260 (Day).
Data backflow to IoT Digital Twin

No
Select the Data backflow to IoT Digital Twin check box and then select an associated digital twin space.
You can select only Enterprise Edition or Ultimate Edition IoT Digital Twin spaces under the current instance.
ImportantIf you only have the Trial Edition of the IoT Digital Twin engine, this option is unavailable (grayed out), and you must purchase the Enterprise or Ultimate Edition of the IoT Digital Twin engine. For more information, see Purchase an Enterprise or Ultimate Edition.
Once selected, the data in this table can be used as a data source for digital twin entities in the IoT digital twin space. For more information, see Configure a data source.
The new table must contain the following columns:
value: The value is of the double type.
iot_id: The iotId of a twin node in a twin entity.
property_id: The identifier of a property in a twin node.
After the data table is created:
You cannot clear the Data backflow to IoT Digital Twin check box or change the associated digital twin space.
You cannot add new fields to the table.
Click Confirm to create the custom storage table.
After the table is created, you can use it to store parsed data.
For more information, see Data parsing overview.
Manage custom storage tables
Custom storage tables can be used for multiple features in DataService Studio. Note the following points:
When the results of an SQL analysis task are stored in a custom storage table, the fields from the task results are added to the table schema.
An empty custom storage table can be used only as an output table for a data parsing or SQL analysis task.
A custom storage table that contains data can be used as a query source for multiple SQL analysis tasks and as a data source for data APIs and visualization reports.
For more information, see Data parsing, SQL analysis, Data visualization, and Custom service API.
View table information
On the Custom Storage Tables tab, the storage list displays basic information for each storage table, including Table Display Name, Table Type, Partition Granularity, Table Identifier, Storage Usage, and Description.
Find the storage table that you created and click View in the Actions column to view its details.
System data source: The data comes from a platform system table.
Product property data source, Product event data source: The data comes from a time series table or a snapshot table.
Item | Example | Description |
Table Identifier | ${system.device_group_relation} | The identifier of the storage table. |
Table Display Name | Device Group Relation Table | The Chinese name of the storage table. |
Number of Fields | 8 | The number of items in the table header. |
Data Source | System data source | The data sources are as follows: |
Storage Duration | Never Expire | The data in the storage table never expires. |
Backflow to IoT Digital Twin | Yes | The data in the storage table flows back to the specified digital twin space in IoT Digital Twin. |
Reflowed Twin Space | Campus Digital Twin | |
Partitioned | Yes | Automatic partitioning is enabled for the storage table data. The partition granularity is Day. |
Partition Granularity | Day | |
Description | This table describes the relationship between devices and groups | The purpose of the storage table. |
Flink Task |
| This configuration item is displayed for time series tables and is disabled by default. You can enable a Flink task to integrate the time series data into Alibaba Cloud Realtime Compute for Flink for computation and analysis. For more information, see the Manage time series table data integration (Flink) section of this topic. |

Define table schema
A single storage table can contain a maximum of 100 fields.
On the Custom Storage Tables tab, find the storage table that you created and click View in the Actions column.
On the Storage Table Details page, click the Table Schema tab.
The Table Schema tab displays partition details for the storage table (such as whether it is partitioned, the partition key name, partition key type, and partition key granularity) and details for each field (such as the field name, field type, and whether it is a primary key).
Partitioned table: By default, it includes the partition_key field (a system-assigned partition key that cannot be changed) and the ts field (a system-assigned timestamp column that cannot be changed).
Transactional table: By default, it includes the ts field (a system-assigned timestamp column that cannot be changed).
Time series table: The table schema is empty by default.
Click Add Field, configure the table header fields, and then click Apply.
The following table describes the field parameters.
Repeat the previous step to add multiple fields to the storage table.
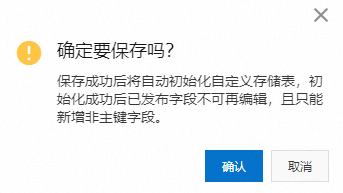
Click Save and then click Confirm in the dialog box that appears.
Parameter | Description |
Field Name | It can contain lowercase letters, digits, and underscores (_). It cannot start with a digit or an underscore (_). It can be up to 32 characters in length. |
Field Display Name | It can contain Chinese characters, letters, digits, and underscores (_). It cannot start with a digit or an underscore (_). It can be up to 64 characters in length. |
Field Type | Valid values: VARCHAR, BIGINT, BOOLEAN, TIMESTAMP, and DOUBLE. |
Is Primary Key | Specifies whether the field is a primary key. |
Remarks | The purpose of the field. |
Optional operations
On the Custom Storage Tables tab, find your storage table in the list and click an action in the Actions column.
Feature | Description |
Edit | Modify the basic information of the custom storage table. Important After a custom storage table is referenced by a data parsing or SQL analysis task, you can only modify the data storage duration of the table. You cannot perform other editing operations. |
Delete | Delete the custom storage table. Important You cannot delete a data table that is in use. You must stop the related data parsing or SQL analysis tasks before you can delete the table. For more information, see Start a data parsing task and Configure an SQL analysis task. |
Enable Archiving | Enable data archiving for an automatically partitioned storage table. For more information, see Manage offline data archiving. |
Data Preview or | After a custom storage table is used in a data parsing or SQL analysis task, you can preview the 20 latest data entries. |
You are redirected to the Local Upload tab of Data Ingestion to import a local data source. For more information, see Upload a local data source. Note If you import data to a time series table, the data must include values for the ts timestamp field. | |
Export data within a specified time range. For instructions, see Export a storage table. Important
| |
Quickly create a new table by copying the current custom storage table. Important The new table has the same table type as the current table, and the type cannot be changed. Other configurations can be customized. The schema of the current table is also copied to the new table. You must save the schema to initialize the new table. | |
|
Manage time series table data integration (Flink)
Only data in time series tables supports Flink tasks.
Enable a Flink task
You can enable a Flink task for a time series table to integrate its data into Realtime Compute for Flink. This lets you perform real-time computation and analysis to diagnose device status, detect faults, and predict product yield.
The real-time data transfer in DataService Studio consumes data processing units (DPUs). For more information, see Enterprise Edition instances (subscription). For more information about how to use this feature, see Real-time data integration (Flink).
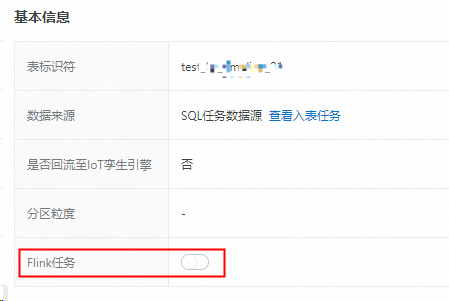
In the storage list on the Custom Storage Tables tab, find the time series table that you created and click View in the Actions column.
On the storage table details page, click the shutdown
 icon on the Flink Job switch.
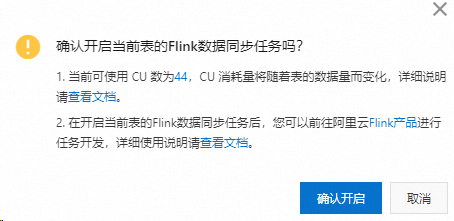
In the dialog box that appears, click Confirm to Enable.
Disable a Flink task
If you no longer need to use Realtime Compute for Flink for data stream computation and analysis, you can disable the Flink task.
On the storage table details page, turn on the Flink Job switch
.Click Confirm to Disable.

What to do next
After you create a custom storage table, you can use the table as an output table for a data parsing or SQL analysis task to populate it with data. For more information, see Data Parsing and SQL Analysis.
After data is written to the custom storage table:
You can use the table as the query source for multiple SQL analysis tasks. For more information, see SQL analysis.
You can use it as a data source for data APIs and visualization reports. For more information, see Custom Service API and Data Visualization.
You can use the table as a data source for a twin entity graph in IoT Digital Twin. For more information, see Data sources for IoT Digital Twin.
You can integrate the data into Realtime Compute for Flink for computation and analysis. For more information, see Real-time data integration (Flink).