Tutorial: Supplier product management
Suppliers provide products in the LinkedMall system. Product management is a critical module for suppliers. This tutorial describes the common procedures for managing products.
Log on to the Supplier Console. In the navigation pane on the left, choose to go to the LM Shop Management page. In the Active Shops list, select a shop and click Enter Shop Operation to go to the Supplier Workbench.
Practice 1: Product synchronization
Automatic synchronization
Click Automatic Synchronization Rule in the upper-right corner of the Base Product Library page, and then set up automatic synchronization. For more information, see Automatic synchronization rules.
Manual synchronization
Manual synchronization for a single product
In the Operation column of the product that you want to sync, click Manual Sync.
Configure the synchronization rules for each type of information, and then manually sync the product data. For more information about the rules, see Manual synchronization rule description.
Batch manual synchronization
Select the products that you want to sync and click Batch Manual Sync.
Configure the synchronization rules for each type of information, and then perform a batch manual synchronization. For more information about the rules, see Manual synchronization rule description.
Practice 2: Add and delete products
Add a product
Adding a product means importing it from the Qianniu platform to the LinkedMall platform. For the procedure, see Import incremental products. For manual imports, you can enter up to 500 platform product IDs separated by semicolons. This method is intended for urgent imports of a small number of specific products.
Add an SKU
In the Operation column of the product, click Product Configuration.
Click SKU & Tax Rate, and then click Add SKU.
Select the SKUs to add and click OK.
Delete an SKU
In the Operation column of the product, click Product Configuration.
Click SKU & Tax Rate.
To delete a single SKU: In the Operation column of the SKU that you want to delete, click Delete.
To delete SKUs in a batch: Select one or more SKUs and click Batch Delete.
ImportantIf you delete all SKUs, the product is also deleted. Proceed with caution.
Practice 3: Configure supply prices
Configure supply prices for your products. For a listed product that a channel partner has already listed, you must request a price change from the channel partner. To change prices for multiple products by uploading a file, see How to change and adjust supply prices in a batch for listed products.
Configure supply prices for products to be listed
Go to the To Be Listed product list. Select a product to change or adjust its supply price.
NoteWhen you change the price, do not set it to CNY 0 or higher than the original price on the Qianniu platform.
The base supply price is the original platform price. If you do not change the supply price, the product is supplied to channel partners at the original platform price.
Change product supply price: Click Change price. Set the price in the Change price for a single product window.
Configure supply prices for listed products
For a listed product, you may need approval from the channel partner to change the supply price:
If the channel partner has not listed the product (it is not for sale): The price does not show a lock icon. You can change the price directly without approval from the channel partner.
If the channel partner has listed the product (it is for sale): The price shows a lock icon
 . A price change request requires approval from the channel partner. Remind the channel partner to process the approval request within 48 hours. If it is not processed within 48 hours, the request is considered rejected.
For the procedure, see Set supply prices for listed products.
NoteThe default supply price for a new SKU is the original platform price. The SKU is automatically authorized for channel partners who are already authorized for the product. To adjust the price, you must change it manually.
Check the scope of products authorized for the channel partner to ensure the product is sellable after the price change.
ImportantAfter each price change, you must check the product scope authorized for the channel partner. Make sure the correct product is selected. Otherwise, the channel partner cannot sell the product.
In the Supplier Workbench, choose to go to the Cooperating Channel Partners page. Configure the authorized product scope for each channel partner. Only authorized products are visible in the channel partner's product pool and can be listed for sale.
In the channel partner management list, click View Product Scope.
In the Modify Price Policy Template window, check the authorized products. You can also configure the scope of products to sell to the service provider. You can select Add All or Individual Operation to add specific products. After you complete the configuration, click OK.
NoteA product-specific template (a price policy template for a single product) automatically grants authorization to the channel when you set the channel price. You do not need to add authorization separately.
Deleting a price policy template authorized for a buyer removes the associated products from the buyer's product pool. Proceed with caution.
Practice 4: List products
After a supplier lists a product, it becomes officially available on the LinkedMall platform. The product is then visible in the product pools of authorized channel partners, who can choose to sell it. Suppliers can list products using the standard method or by uploading a file. Choose the method that best suits your needs. We recommend uploading a file to list many products.
Regardless of the listing method, you must first configure the supply prices for the listing channels.
List products by uploading a file
A single file can contain up to 5,000 records (one record per row). If you have more than 5,000 products to list, split them into multiple files and create a separate batch listing task for each file.
Before you list products by uploading a file, make sure you have configured the product supply prices (Practice 3: Configure supply prices).
Go to the To Be Listed list in the base product library and click Batch Listing.
In the Batch Listing window, follow the steps to upload the file.
No.
Description
1
Click Download Excel Template.
2
In the downloaded Excel template, carefully read the Listing Tips. Fill in the information for the products to be listed as required by the template, and then upload the file.
NoteYou can use the Batch Export to Excel feature in the To Be Listed list to export product information and get the product IDs. The exported information is listed by SKU. Products with multiple SKUs have multiple entries. When you copy the product IDs into the listing file, remove any duplicates.
Field description:
Product ID: Enter the product ID, not the platform product ID or the LM product ID.
Channel ID: The ID of the destination channel for listing. You can find it by choosing . Do not enter the channel business ID. This field is optional. If you enter a channel ID, the product is listed to that specific channel. If you leave it blank, the product is listed to all channels for which a supply price has been configured.
Sales Model: If you have no special requirements, you can select distribution or consignment.
Payment Terms Support: Select Yes or No.
Payment Term Period/Days: If payment terms are supported, enter 90. Otherwise, leave it blank.
3
Click Confirm Listing to create the batch listing task. The task may take some time to run. Please wait for it to complete.
You can go to the Task Hub to view the progress of the Batch Product Listing (File Upload) task. If any products fail to be listed, click Details to view them.
In the pop-up window, you can view the failure reason. Click Export Failure Details to export information about the failed products and the reasons for failure.
You can download the failure details file from the Product Export Records.

For successfully listed products, go to the Listed list. In the Listing Details column, click the link (for example, Listed to 1 product pool) to view the details.
 The Listing Details page shows the following information: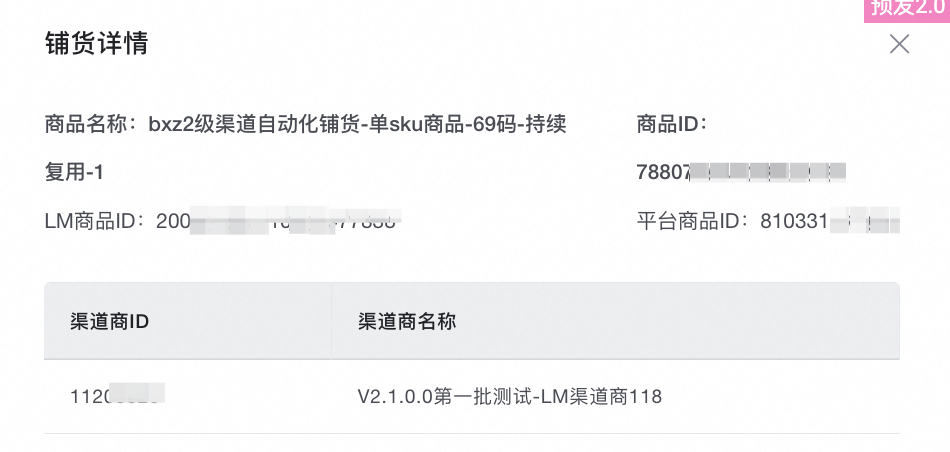
List products using the standard method
Before you list products using the standard method, make sure you have configured the sales information. This includes Practice 3: Configure supply prices (including confirming channel authorization), configuring the sales model, and checking the product configuration.
Configure the sales model
NoteWhen setting whether to support payment terms for the sales model, non-invited suppliers should select Do not support payment terms. If you have questions, contact the LinkedMall operations team.
Configure the sales model for a single product
In the To Be Listed product list, select a product and click Set Sales Model in the Operation column.
Set the product sales model: In the Set Sales Model pop-up window, select a model. After you finish, click OK.
Configure the sales model for multiple products in a batch
Go to the To Be Listed product list.
Batch set the sales model: Select multiple products and click Batch Set Sales Model. In the Set Sales Model pop-up window, select a model. After you finish, click OK.
ImportantWhile the task is running, do not perform any operations on products or channels other than filtering and viewing. Otherwise, the task result may not be as expected.
Before listing, check the product configuration. Products with incomplete configurations cannot be listed (the List button is grayed out
 ) or the listing will fail.Important
Check the following product configurations:
1. The sales model is configured.
2. A price template is associated, which means the supply price is configured.
3. The product is in a sellable state.
List the product.
List a single product
Go to the To Be Listed product list.
Select a product and click List in the Operation column.
List products in a batch
Go to the To Be Listed product list.
Batch list: Select the checkboxes for the products that you want to list and click Batch list. The listing task takes some time to complete. To view the task progress, go to the Task Hub. For more information about listing products, see Practice 4: List products.
ImportantProducts pending listing must meet the following conditions. Otherwise, the listing fails:
1. The sales method is configured.
2. A price template is associated.
3. The product is in a sellable state.
Practice 5: View products supplied to channel partners
Products that you list and authorize for a channel partner are added to that channel partner's product pool. You can use the following methods to view the products you have listed and authorized for a channel partner.
Method 1: Go to the Supplier Workbench. Choose to go to the Base Product Library page. Select the Listed tab and click Advanced Configuration, click to expand. Set the Listed to specified product pool and Channel Partner Search filter conditions, and then click Filter.
NoteYou can also set other filter conditions for a more precise search.
Method 2: Go to the Supplier Workbench. Choose to go to the Channel Partner Management page. Click the name of a cooperating channel partner.
This takes you to the Channel Partner Supply Product Pool page, where you can view the products listed for that channel partner.