When should I use lifecycle management?
-
If files in your file system are accessed one to three times per month, we recommend that you use lifecycle management to configure a policy that transitions these files to Infrequent Access (IA) storage. You are then billed based on the rates for the IA storage class.
-
If files in your file system are accessed once or twice per quarter, we recommend that you use lifecycle management to configure a policy that transitions these files to Archive storage. You are then billed based on the rates for the Archive storage class.
To further reduce storage costs, you can configure policies for both Infrequent Access (IA) storage and Archive storage for the same file system. If a file meets the conditions of multiple policies, NAS applies the policy that results in the lowest cost. For more information, see lifecycle management.
Why does my file system not support lifecycle management?
File systems with data encryption enabled do not support lifecycle management.
How do I configure a lifecycle management policy?
You can configure a lifecycle management policy in the NAS console or by calling an API operation. For more information, see Manage a lifecycle policy and Lifecycle management API reference.
How do I disable lifecycle management?
Lifecycle management allows you to transition infrequently accessed cold data in a General-purpose NAS file system to lower-cost storage classes such as Infrequent Access (IA) storage or Archive storage.
If you no longer want to use this feature, follow these steps to disable it:
-
Log on to the NAS console.
-
In the left-side navigation pane, choose .
-
In the top navigation bar, select the resource group and region where your file system resides.

-
In the policy list, find the policy you want to remove and click Delete in its Delete column. Then, follow the on-screen instructions.
After you delete the policy, files that match its criteria are no longer transitioned to Infrequent Access (IA) storage or Archive storage. However, files that were already transitioned remain in their current storage class and continue to incur storage fees for that class.
If you want to move data from Infrequent Access (IA) storage or Archive storage back to Standard storage, see Create a data retrieval task.
Choosing a policy and directory
To help you choose the right lifecycle management policy and directory, NAS provides the NAS data tiering analysis tool. You can use this tool to scan a specified directory and its subdirectories. The tool then lists subdirectories in descending order based on the amount of cold data they contain. This analysis helps you decide which directories to apply policies to based on the amount of cold data. For more information, see the User guide.
File transition eligibility
A file must meet the following three conditions to be transitioned to a lower-cost storage class:
-
A lifecycle management policy is configured for the directory where the file is stored.
-
The file size is between 64 KiB and 4.88 TiB.
-
The file's last access time meets the criteria of the lifecycle management policy.
When you create a lifecycle management policy, you can configure a rule to transition files that have not been accessed for more than 14, 30, 60, or 90 days to Infrequent Access (IA) storage. You can also configure a rule to transition files that have not been accessed for more than 14, 30, 60, 90, or 180 days to Archive storage. Lifecycle management determines this based on the file's access time (
atime).-
The
atimeis updated by the following operations:-
Reading a file
-
Writing to a file
-
-
The
atimeis not updated by the following operations:-
Renaming a file
-
Modifying file attributes, such as the user, group, or mode
-
-
Multiple policies on a single directory
If a directory has multiple lifecycle management policies and a file meets the criteria for more than one policy, NAS applies the policy that results in the lowest cost.
Policy precedence in nested directories
If a file meets the criteria of any applicable policy, NAS applies the policy that results in the lowest cost.
For example, a policy is configured for the current directory to transition files to Infrequent Access (IA) storage after 14 days of inactivity. A different policy is configured for its parent or a higher-level directory to transition files to IA storage after 60 days of inactivity. In this case, files in the current directory that have not been accessed for 14 days are transitioned to IA storage. When the parent directory's policy runs, it skips the files that have already been transitioned.
Policy scope
Yes. All files in the target directory that meet the lifecycle management policy criteria are automatically transitioned to Infrequent Access (IA) storage or Archive storage.
Transition time
The transition time depends on the size of the file system and the amount of data to be transitioned. After you enable the feature, the first transition of files that meet the policy criteria can be completed in as little as 2 hours, but typically within 24 hours. Subsequent transitions are completed on a weekly schedule.
Effect of renaming a directory
If you rename a directory that is associated with a lifecycle management policy, the policy no longer applies to the files in that directory. Files that have already been transitioned to Infrequent Access (IA) storage or Archive storage remain in their current storage class.
If you configure a new lifecycle management policy for the renamed directory, that policy takes effect. Files in the directory that meet the new policy's criteria are transitioned to the appropriate storage class.
Effect of deleting a policy
If you delete a lifecycle management policy, files in the associated directory are no longer transitioned to Infrequent Access (IA) storage or Archive storage. Files that have already been transitioned remain in their current storage class.
Re-creating a policy
No. When you re-create a lifecycle management policy, its check mechanism automatically skips files that have already been transitioned to Infrequent Access (IA) storage or Archive storage, preventing them from being transitioned again.
Read/write access to transitioned files
Yes. You can read from and write to files in Infrequent Access (IA) storage or Archive storage just like any other file in the file system. For more information about the performance of different storage classes, see Storage class comparison.
Viewing transitioned files
You can query for files stored in Infrequent Access (IA) storage or Archive storage by using the NAS console or by calling the ListDirectoriesAndFiles API operation. For more information, see View the files stored in the IA or Archive storage class and ListDirectoriesAndFiles.
Read/write latency for IA storage
The first time you read a file from Infrequent Access (IA) storage, you may experience higher latency. However, subsequent reads of that file within a short period have latency comparable to reading a file in Standard storage on a Performance, Premium, or Capacity General-purpose NAS file system.
The latency for writing to a file in IA storage is nearly identical to writing to a file in Standard storage on a Performance, Premium, or Capacity General-purpose NAS file system. For more information about the performance of different storage classes, see Storage class comparison.
Read/write latency for Archive storage
The first time you read a file from Archive storage, you may experience higher latency. However, subsequent reads of that file within a short period have latency comparable to reading a file in Standard storage on a Performance, Premium, or Capacity General-purpose NAS file system.
The latency for writing to a file in Archive storage is nearly identical to writing to a file in Standard storage on a Performance, Premium, or Capacity General-purpose NAS file system. For more information about the performance of different storage classes, see Storage class comparison.
Billing for IA storage
When files are transitioned to Infrequent Access (IA) storage, you are charged based on the billing method for the IA storage class. For more information, see Billing for General-purpose NAS.
Billing for Archive storage
When files are transitioned to Archive storage, you are charged based on the billing method for the Archive storage class. The minimum storage duration for Archive storage is 60 days. If a file is deleted, retrieved, or reduced in size before it has been stored for 60 days (1,440 hours), you are charged a storage fee for the remaining duration (1,440 hours minus the actual storage duration) based on the file's original size.
The minimum storage duration starts from the later of two timestamps: the time the file was transitioned, or the file's last modification time (mtime). Any early deletion fee is charged only once within a 24-hour period. If you modify an archived file, the 60-day minimum storage duration timer resets. For more information, see Billing for General-purpose NAS.
Data promotion from IA storage
No. Once data is transitioned to Infrequent Access (IA) storage, it remains there. Accessing this cold data incurs read/write traffic fees for IA storage. For more information, see Billing for General-purpose NAS.
If you need to frequently access data that is in IA storage, create a data retrieval task to restore the specified files or directories to Standard storage. Running a data retrieval task reads the target data and incurs read traffic fees. For more information, see Create a data retrieval task.
Creating a retrieval task for IA storage
You can create a data retrieval task by using the NAS console or by calling the CreateLifecycleRetrieveJob API operation. For more information, see Create a data retrieval task or CreateLifecycleRetrieveJob.
Effect of retrieval tasks on performance
No. You can read and write data normally while a data retrieval task is running.
Charges for data retrieval tasks
Yes. When a data retrieval task runs, it reads data from the target files. This incurs a read traffic fee based on the file size and its current storage class (Infrequent Access (IA) storage or Archive storage). After the task is complete, the files are restored to Standard storage and incur storage capacity fees for the General-purpose NAS file system. For more information, see Billing for General-purpose NAS.
Billing for backing up transitioned files
When you use Cloud Backup to back up files from the Infrequent Access (IA) storage or Archive storage of a General-purpose NAS file system, Cloud Backup charges you service fees. For more information, see Billing methods and billable items.
To back up files, the Cloud Backup service must read data from the files. This action incurs read traffic fees for IA storage or Archive storage, which appear on your NAS bill. For more information, see Billing for General-purpose NAS.
Billing for scans on infrequent and archive storage
When you use a security service, such as the anti-ransomware service in Cloud Security Center, to scan files in the infrequent access or archive storage of General-purpose NAS, the service reads the target files. This operation incurs access traffic charges from File Storage NAS at the infrequent access or archive storage rates. For more information, see Billing for General-purpose NAS.
RAM authorization for classic network mount targets
For security, NAS must verify that any ECS instance trying to access your file system is authorized. When you use a classic network mount target, NAS ensures that only an ECS instance in your account can access your file system. To do this, NAS needs permission to retrieve your list of ECS instances. You grant this permission through RAM authorization.
-
This RAM authorization grants NAS permission only to call the DescribeInstances API. NAS uses the list of ECS instances retrieved by this API solely for verification and does not log or store it.
-
After you grant RAM authorization, do not delete or modify the AliyunNASDefaultRole role in RAM. Deleting or modifying this role can cause mount failures or other file system errors.
RAM user error when viewing file system list
-
Symptom
A RAM User has full control over a file system. However, when the user opens the File System List page in the NAS console, an error appears:
The user is not authorized to operate on the specified resource.The error code isNoPermission.Operator. -
Cause
The required tag permission is missing. You must also grant the
tag:ListTagKeyspermission. -
Solution
Add the required tag permission to the custom policy for the target file system. For more information, see Control access to NAS resources by using a RAM permission policy.
{
    "Statement": [
        {
            "Effect": "Allow",
            "Action": "nas:*",
            "Resource": "acs:nas:*:*:filesystem/0ddaf487b2"
        },
        {
            "Effect": "Allow",
            "Action": "nas:CreateMountTarget",
            "Resource": "acs:vpc:*:*:vswitch/*"
        },
        {
            "Effect": "Allow",
            "Action": "cms:Describe*",
            "Resource": "*"
        },
        {
            "Effect": "Allow",
            "Action": "nas:DescribeFileSystems",
            "Resource": "*"
        },
        {
            "Effect": "Allow",
            "Action": "tag:ListTagKeys",
            "Resource": "*"
        }
    ],
    "Version": "1"
}
Slow permission granting for SMB directories
When you configure permissions for a new user, Windows traverses all files in the directory to apply the permissions. If this process is slow, the cause is often network latency. To accelerate this task, use a command-line script such as icacls or the PowerShell command Set-Acl. For more information, see icacls or Set-Acl.
Verify a keytab file
Before you begin, regenerate a keytab file and enable the -mapuser parameter.
Enabling the -mapuser option overwrites any existing mappings for that user on other file system mount points. For example, if you map a user to mount point 1 and then map the same user to mount point 2, the user can only access mount point 2. Therefore, for verification, we recommend mapping to a different user.
Example
ktpass -princ cifs/file-system-id.region.nas.aliyuncs.com@EXAMPLE.COM -ptype KRB5_NT_PRINCIPAL -mapuser alinas@example.com -crypto All -out c:\nas-mount-target.keytab -pass tHeP****d123-
example.com: The AD domain name. Replace this with your domain name in lowercase. -
EXAMPLE.COM: The AD domain name. Replace this with your domain name in uppercase.
Procedure
-
Log on to a Linux client that has the kinit tool installed.
NoteThe client must be able to access the AD domain and have its DNS configured to point to the AD server. For more information about how to configure the Linux client environment, see Mount and use an SMB file system as an AD domain user on a Linux client.
-
Add the following content to the /etc/krb5.conf file.
 [realms]
 EXAMPLE.COM = {
     kdc = iZisovkei9i*****.example.com
     admin_server = iZisovkei9i****.example.com
 }
[domain_realm]
 .example.com = EXAMPLE.COM
 example.com = EXAMPLE.COM
Replace
iZisovkei9i*****.example.comwith your AD server.NoteIf your client uses the CentOS operating system, you must also add the following configuration.
default_tgs_enctypes = aes256-cts-hmac-sha1-96 rc4-hmac des-cbc-crc des-cbc-md5 default_tkt_enctypes = aes256-cts-hmac-sha1-96 rc4-hmac des-cbc-crc des-cbc-md5 permitted_enctypes = aes256-cts-hmac-sha1-96 rc4-hmac des-cbc-crc des-cbc-md5 -
Verify that the client can connect to the AD server.
kinit aliyun.nas@example.com-
If the output includes account information, the kerberos configuration on the client is correct.
-
If you receive the
KDC replay did not match expectations while getting initial credentialserror, replace all instances of the AD domain name in/etc/krb5.confwith the uppercase version.
-
-
Optional: Confirm that the mount point in the keytab file is the target file system mount point.
klist -k -t <keytab_file_name>.keytab -
Verify the keytab file.
kinit -k -t <keytab_file_name>.keytab cifs/file-system-id.region.nas.aliyuncs.com@EXAMPLE.COMReplace
file-system-id.region.nas.aliyuncs.comwith your file system mount point andEXAMPLE.COMwith your AD domain name in uppercase.If the command runs without errors, the keytab file is correct.
Obtain an AccessKey
-
Log on to the console by using your Alibaba Cloud account.
-
In the upper-right corner of the page, hover over your profile icon and click AccessKey.
-
In the We recommend that you do not use the AccessKey of an Alibaba Cloud account dialog box, select Continue to Use AccessKey or Use RAM user's AccessKey.
-
Use the AccessKey of an Alibaba Cloud account
-
Select I am aware of the security risks of using the AccessKey of the Alibaba Cloud account, and then click Continue to Use AccessKey.
-
Click Create AccessKey.
-
In the Create Main Account AccessKey dialog box, read the risks and limitations again. If you are sure you want to create an AccessKey pair for your Alibaba Cloud account, select I am aware of the security risks of using a main account AccessKey., and then click Use Cloud Account AccessKey.

-
In the Create AccessKey dialog box, save the AccessKey ID and AccessKey secret, select I have saved the AccessKey Secret, and then click OK.
Configure a network access control policy for the AccessKey pair (Recommended): Restrict source IP addresses for OpenAPI requests to confine calls to trusted networks. Click Configure network access policy to set up restrictions. Configure an AccessKey-level network access control policy for an Alibaba Cloud account.
 Important
To reduce the risk of compromise, the AccessKey secret for an Alibaba Cloud account is displayed only when you create it. You cannot retrieve it later. Be sure to store it securely.
-
-
Use the AccessKey of a RAM user
-
Click Use RAM user's AccessKey.
-
You are redirected to the RAM console. On the Users page, find the relevant RAM user.
Note-
If you do not have a RAM user, create one first. For more information, see Create a RAM user.
-
The AccessKey secret for a RAM user appears only upon creation and cannot be retrieved later. Make sure to store it securely.
-
If your AccessKey is leaked or lost, create a new AccessKey. You can create up to two AccessKeys for each RAM user.
-
-
Click the user logon name.
-
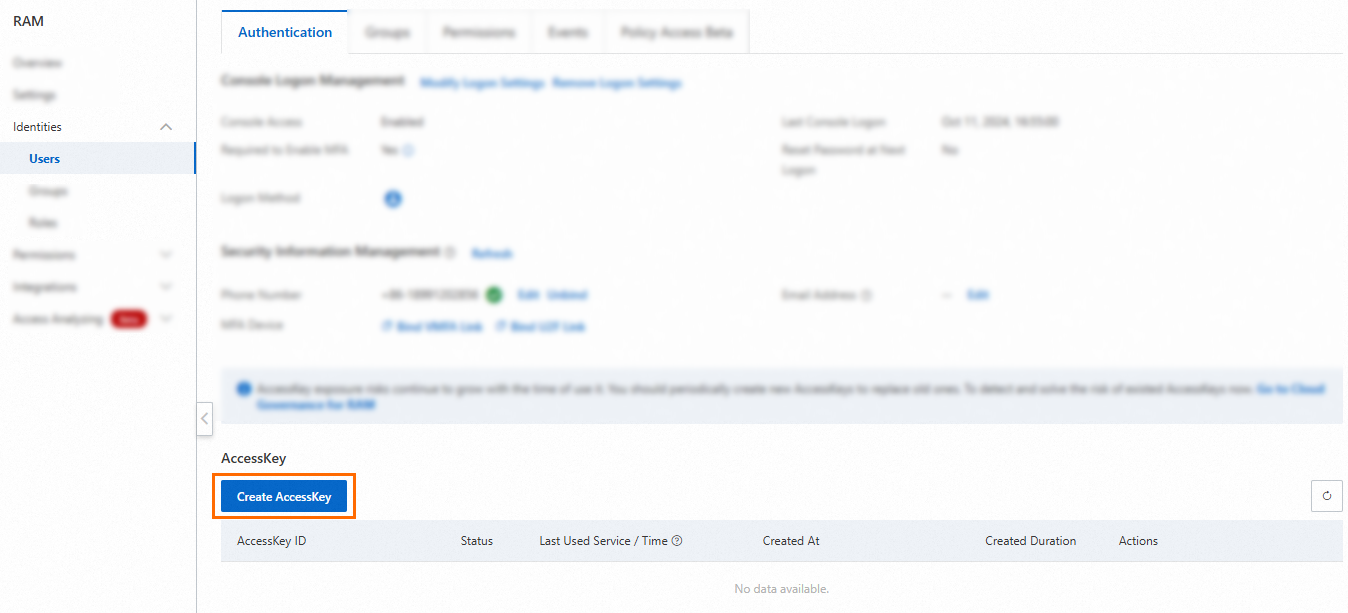
In the AccessKey section of the Authentication tab, click Create AccessKey.
-
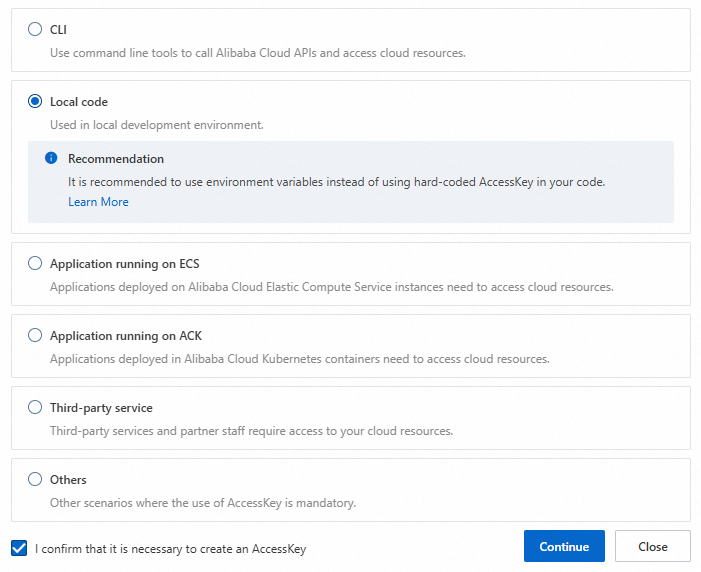
Read the suggestion for each scenario and select a credential solution based on your business requirements. If you must create an AccessKey pair, select a scenario, select I confirm that it is necessary to create an AccessKey, and then click Continue. The created AccessKey pair can be used in all scenarios.
-
根据界面提示完成安全验证。
-
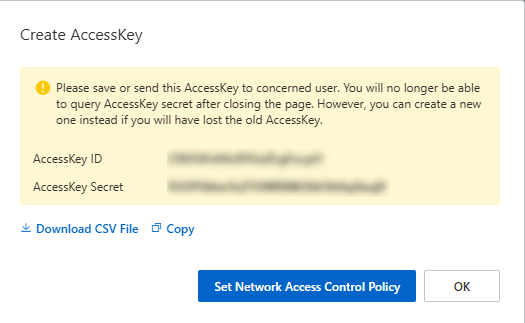
In the Create AccessKey dialog box, save the AccessKey ID and AccessKey secret, and click OK.

-
-
NAS server-side encryption
To enable server-side encryption when you create a file system, select either a NAS-managed Key or a customer-managed key. For detailed instructions, see Create a General-purpose NAS file system and Create an Extreme NAS file system.
Server-side encryption for existing file systems
No. You can only enable server-side encryption when you create a file system.
Disabling server-side encryption
No. Once enabled, server-side encryption takes effect immediately and is irreversible.
Changing the encryption key
No. A key is permanently bound to a file system during creation.
NAS-managed and customer-managed keys
Both methods store keys in Key Management Service (KMS) and use envelope encryption to prevent unauthorized data access.
Use a customer-managed key to bring your own key (BYOK) if you have specific security requirements. Use a NAS-managed key for all other scenarios.
If you use a customer-managed key and the key is disabled or deleted, the NAS file system encrypted with that key becomes inaccessible.
Support for the SM4 algorithm
No. NAS uses the industry-standard AES-256 encryption algorithm to protect file system data at rest. It uses envelope encryption to prevent unauthorized data access. The KMS service generates and manages the server-side encryption keys, ensuring their confidentiality, integrity, and availability. For more information about encryption, see Use KMS envelope encryption to encrypt and decrypt data locally.
Recover NAS access from CMK issues
-
If a CMK is disabled, re-enable it.
-
If a CMK is scheduled for deletion, cancel the deletion request. For more information, see Schedule Key Deletion.
-
If the key material for a BYOK key is deleted, re-import the original key material. For more information, see Import Key Material.
-
If a CMK is permanently deleted, it cannot be recovered, and the data in the file system will become permanently inaccessible.
Application-side data decryption
No. The NAS service automatically encrypts and decrypts data. You do not need to modify your application.
Server-side encryption performance
When you enable server-side encryption, NAS encrypts data as it is written to the file system and automatically decrypts it when it is read. A file system's read/write performance primarily depends on the size of the read/write block in each operation. Enabling server-side encryption reduces performance by approximately 5% to 25% compared to a file system without encryption. For more information, see What Affects File System Read/Write Performance.
Server-side encryption and storage capacity
No. Server-side encryption does not reduce a file system's effective storage capacity. AES is a block cipher that uses an automatic padding mechanism. Padding data for encryption at rest does not count toward the file system instance's effective storage capacity.
Inotify support on File Storage NAS
Using inotify with rsync is a common approach for real-time data backup and synchronization. However, due to the implementation of inotify, the inotifywait command does not work as expected on a File Storage NAS file system.
-
How
inotifywaitworksThe
inotifywaitcommand is the user space interface forinotify, a Linux kernel subsystem that operates at the Virtual File System (VFS) layer. When a file operation reaches the VFS layer, theinotifymodule reports the operation type (such as create, delete, or attribute change) and the target object (file name) to the user space. Theinotifywaitcommand then outputs this information. -
Issues with using
inotifywaiton File Storage NASBecause
inotifyis implemented at the kernel's VFS layer, the local kernel cannot detect file operations initiated by a remote client on an NFS file system. As a result,inotifycannot detect file modification operations by remote clients. For example, if you mount the same File Storage NAS file system on two clients, client A and client B, and then runinotifywaiton client A to monitor the mount directory, you will observe the following behavior:-
inotifywaitdetects file operations performed on the mount directory by client A. -
inotifywaitdoes not detect file operations performed on the mount directory by client B.
-
-
Alternative solution
An alternative is to use the File Alteration Monitor (FAM). FAM is a library for monitoring files and directories. It is implemented entirely in the user space. It works by running a daemon in the background that periodically scans directories to detect file changes. However, this approach has the following drawbacks:
-
You must write a client-side program that calls the FAM API.
-
In scenarios with a large number of files, this solution may perform poorly, consume significant resources, and suffer from poor real-time performance.
-
File retention for canceled backup jobs
If you cancel a file backup job in progress, any files the job has already backed up are deleted from the backup vault. If you need to back up these files, run the file backup job again.
Backed up files from completed jobs are not affected.
File retention for canceled restore tasks
When you cancel a file restore task, any files already restored remain in the specified directory. The task stops, and no more files are restored.
Free trial calculation
Each NAS file system includes a 30-day free trial of NAS file backup. The trial begins when you create its first backup plan.
For example, if you create a backup plan named backup01 for file system A on May 1, 2021, the free trial for NAS file backup lasts until May 30, 2021. After the trial expires, you can either upgrade to a paid plan or delete the backup plan. For more information, see Hybrid Backup Recovery pricing.
Files moved to the recycle bin
After the recycle bin is enabled, deleted files or directories are temporarily stored in the recycle bin. This includes the following:
-
NAS files that you manually delete on a compute node, such as an ECS instance or a container. For example, if you run the
rm -f test01.textcommand to delete the file test01.text, the file test01.text moves to the recycle bin. -
NAS files or directories that are automatically deleted by an application on a compute node. For example, if a Python application uses
os.remove("test02.text")to delete the file test02.text, the file test02.text moves to the recycle bin. -
Files or directories deleted by a POSIX rename operation. For example, if a directory contains both test_a.txt and test_b.txt, and you run the
mv test_a.txt test_b.txtcommand, the original test_b.txt moves to the recycle bin. -
Temporary files generated by applications that use NAS files. For example, when you use the vim editor, temporary files such as those with
.swpand.swpxextensions move to the recycle bin when deleted. -
Log files that are automatically rotated by an application. For example, if Nginx is configured to automatically rotate logs and keep a maximum of 20 log files, when the log file test.log.19 is rotated to test.log.20, the original test.log.20 moves to the recycle bin.
Overwriting the content of a file without deleting the file itself does not move it to the recycle bin. For example, if you call the open() function in w+ mode to open and write to a file, the original file does not move to the recycle bin.
Restoring files to a renamed directory
Yes. Because file restoration uses a directory's FileId (not its name) as the identifier, the file can be restored to the correct path even after the directory is renamed. For example, suppose you enable the recycle bin, delete file1.txt from directorydir1, and then renamedir1 todir2. The recycle bin in the NAS console will show that file1.txt is in directorydir2. After you restore the file, you will findfile1.txt in directorydir2 on your compute node.
Recycle bin vs. Cloud Backup: Restore speed
Restoring files from the recycle bin is significantly faster than from Cloud Backup because Apsara File Storage NAS migrates only metadata, not the data itself.
Recycle bin charges
Using the recycle bin is free. However, files in the recycle bin still incur storage fees based on their original storage type. For example, if you delete a file from a capacity file system, it is billed at the capacity storage rate. If you delete a file from infrequent access storage, it is billed at the infrequent access storage rate. For more information, see General purpose NAS billing.
View files in the recycle bin
Use the NAS console to view files in the recycle bin and related information, such as their deletion times. For more information, see Query files in the recycle bin.
Access files in the recycle bin
No. You can query for files and directories in the recycle bin, but you cannot directly read or write to them. To regain access, you must restore the items. For instructions, see Restore files from the recycle bin.
Impact of the recycle bin on resource quotas
No. Files temporarily stored in the recycle bin do not count toward the file count or storage capacity of your NAS file system. They will not cause your instance to reach its limits prematurely. For details about the storage capacity and file count supported by each storage type, see product specifications.
Files temporarily stored in the recycle bin are billed based on their original storage type. For more information, see General-purpose NAS billing.
Error querying NAS monitoring data by using the Cloud Monitor API
This error occurs if you specify an incorrect value for the MetricName parameter. Cloud Monitor monitors the real-time performance and capacity of a NAS file system instance. For more information on querying NAS monitoring data using the Cloud Monitor API, see Query monitoring data by using the Cloud Monitor API.
-
Capacity monitoring
File system type
MetricName
Metric
Unit
Description
General-purpose NAS
AlignedSize
Data usage of General-purpose NAS (excluding infrequent access storage)
Bytes
The amount of data used by the file system. This metric excludes data in infrequent access storage.
SecondaryAlignedSize
Infrequent access storage usage
Bytes
The amount of data stored in the file system's infrequent access storage after you enable lifecycle management.
FileCount
File count
Count
The number of files (excluding directories) in the file system.
OfflineReadQuantity
Infrequent access storage read traffic
Bytes
The read traffic from accessing data in infrequent access storage after you enable lifecycle management.
OfflineWriteQuantity
Infrequent access storage write traffic
Bytes
The write traffic from accessing data in infrequent access storage after you enable lifecycle management.
ArReadQuantity
Archive storage read traffic
Bytes
The read traffic from accessing data in archive storage after you enable lifecycle management.
ArWriteQuantity
Archive storage write traffic
Bytes
The write traffic from accessing data in archive storage after you enable lifecycle management.
ArDeletePenaltyOpCount
Number of archive file deletion operations that trigger an early deletion penalty
Count
After you enable lifecycle management, this is the number of delete operations on files in archive storage that trigger an early deletion penalty. The penalty is triggered if files are deleted before the 60-day minimum storage duration.
ArTruncatePenaltyOpCount
Number of archive file truncate operations that trigger an early deletion penalty
Count
After you enable lifecycle management, this is the number of truncate operations on files in archive storage that trigger an early deletion penalty. The penalty is triggered if files are truncated before the 60-day minimum storage duration.
ArRetrievePenaltyOpCount
Number of archive file retrieval operations that trigger an early retrieval penalty
Count
After you enable lifecycle management, this is the number of retrieval operations on files in archive storage that trigger an early retrieval penalty. The penalty is triggered if files are retrieved before the 60-day minimum storage duration.
Extreme NAS
ExtremeCapacity
Total storage capacity of Extreme NAS
Bytes
The total storage capacity of the file system.
ExtremeCapacityUsed
Used storage capacity of Extreme NAS
Bytes
The amount of storage capacity used by the file system.
ExtremeInodeLimit
Maximum file count for Extreme NAS
Count
The maximum number of files that the file system can contain.
ExtremeInodeUsed
Used file count for Extreme NAS
Count
The number of files created in the file system.
-
Performance monitoring
MetricName
Metric
Unit
Description
IopsRead
Read IOPS
requests/s
The average read IOPS of a file system within a specified period of time.
IopsWrite
Write IOPS
requests/s
The average write IOPS of a file system within a specified period of time.
ThruputRead
Read throughput
bytes/s
The average read throughput per second of a file system within a specified period of time.
ThruputWrite
Write throughput
bytes/s
The average write throughput per second of a file system within a specified period of time.
LatencyRead
Read latency
ms
The average read latency per millisecond of a file system within a specified period of time.
LatencyWrite
Write latency
ms
The average write latency per millisecond of a file system within a specified period of time.
QpsMeta
Metadata QPS
requests/s
The average number of times that a file system requests metadata per second within a specified period of time.
Relationship between access point and system policies
|
Policy |
Description |
|
access point policy |
An An
|
|
AliyunNASReadOnlyAccess |
This A |
|
AliyunNASFullAccess |
This A |
Java/Tomcat accessing NAS SMB
-
Cause:
By default, Windows services like Tomcat run under the local system account. This account cannot access NAS SMB network paths mounted by the current user, which prevents the application from connecting.
-
Solution:
-
Open the services manager as an administrator.
-
In the services list, find your Tomcat service (which might be named Apache Tomcat or have a custom name).
-
Right-click the service and select Properties.
-
Go to the Log On tab.
-
Select the This account option and enter the credentials for the current administrator account.
-
Click Apply, and then click OK.
-
Right-click the Tomcat service and select Restart to apply the change.
-