Feishu configuration
This article describes how to create a Feishu custom app bot, enable app permissions, obtain application credentials, and configure the Feishu channel in the Quick BI AIPro management center. For the overall process of channel integration, see Channel Management.
Prerequisites
-
You must have a Feishu account with permissions to create apps in the Feishu Developer Console.
Create Feishu app
-
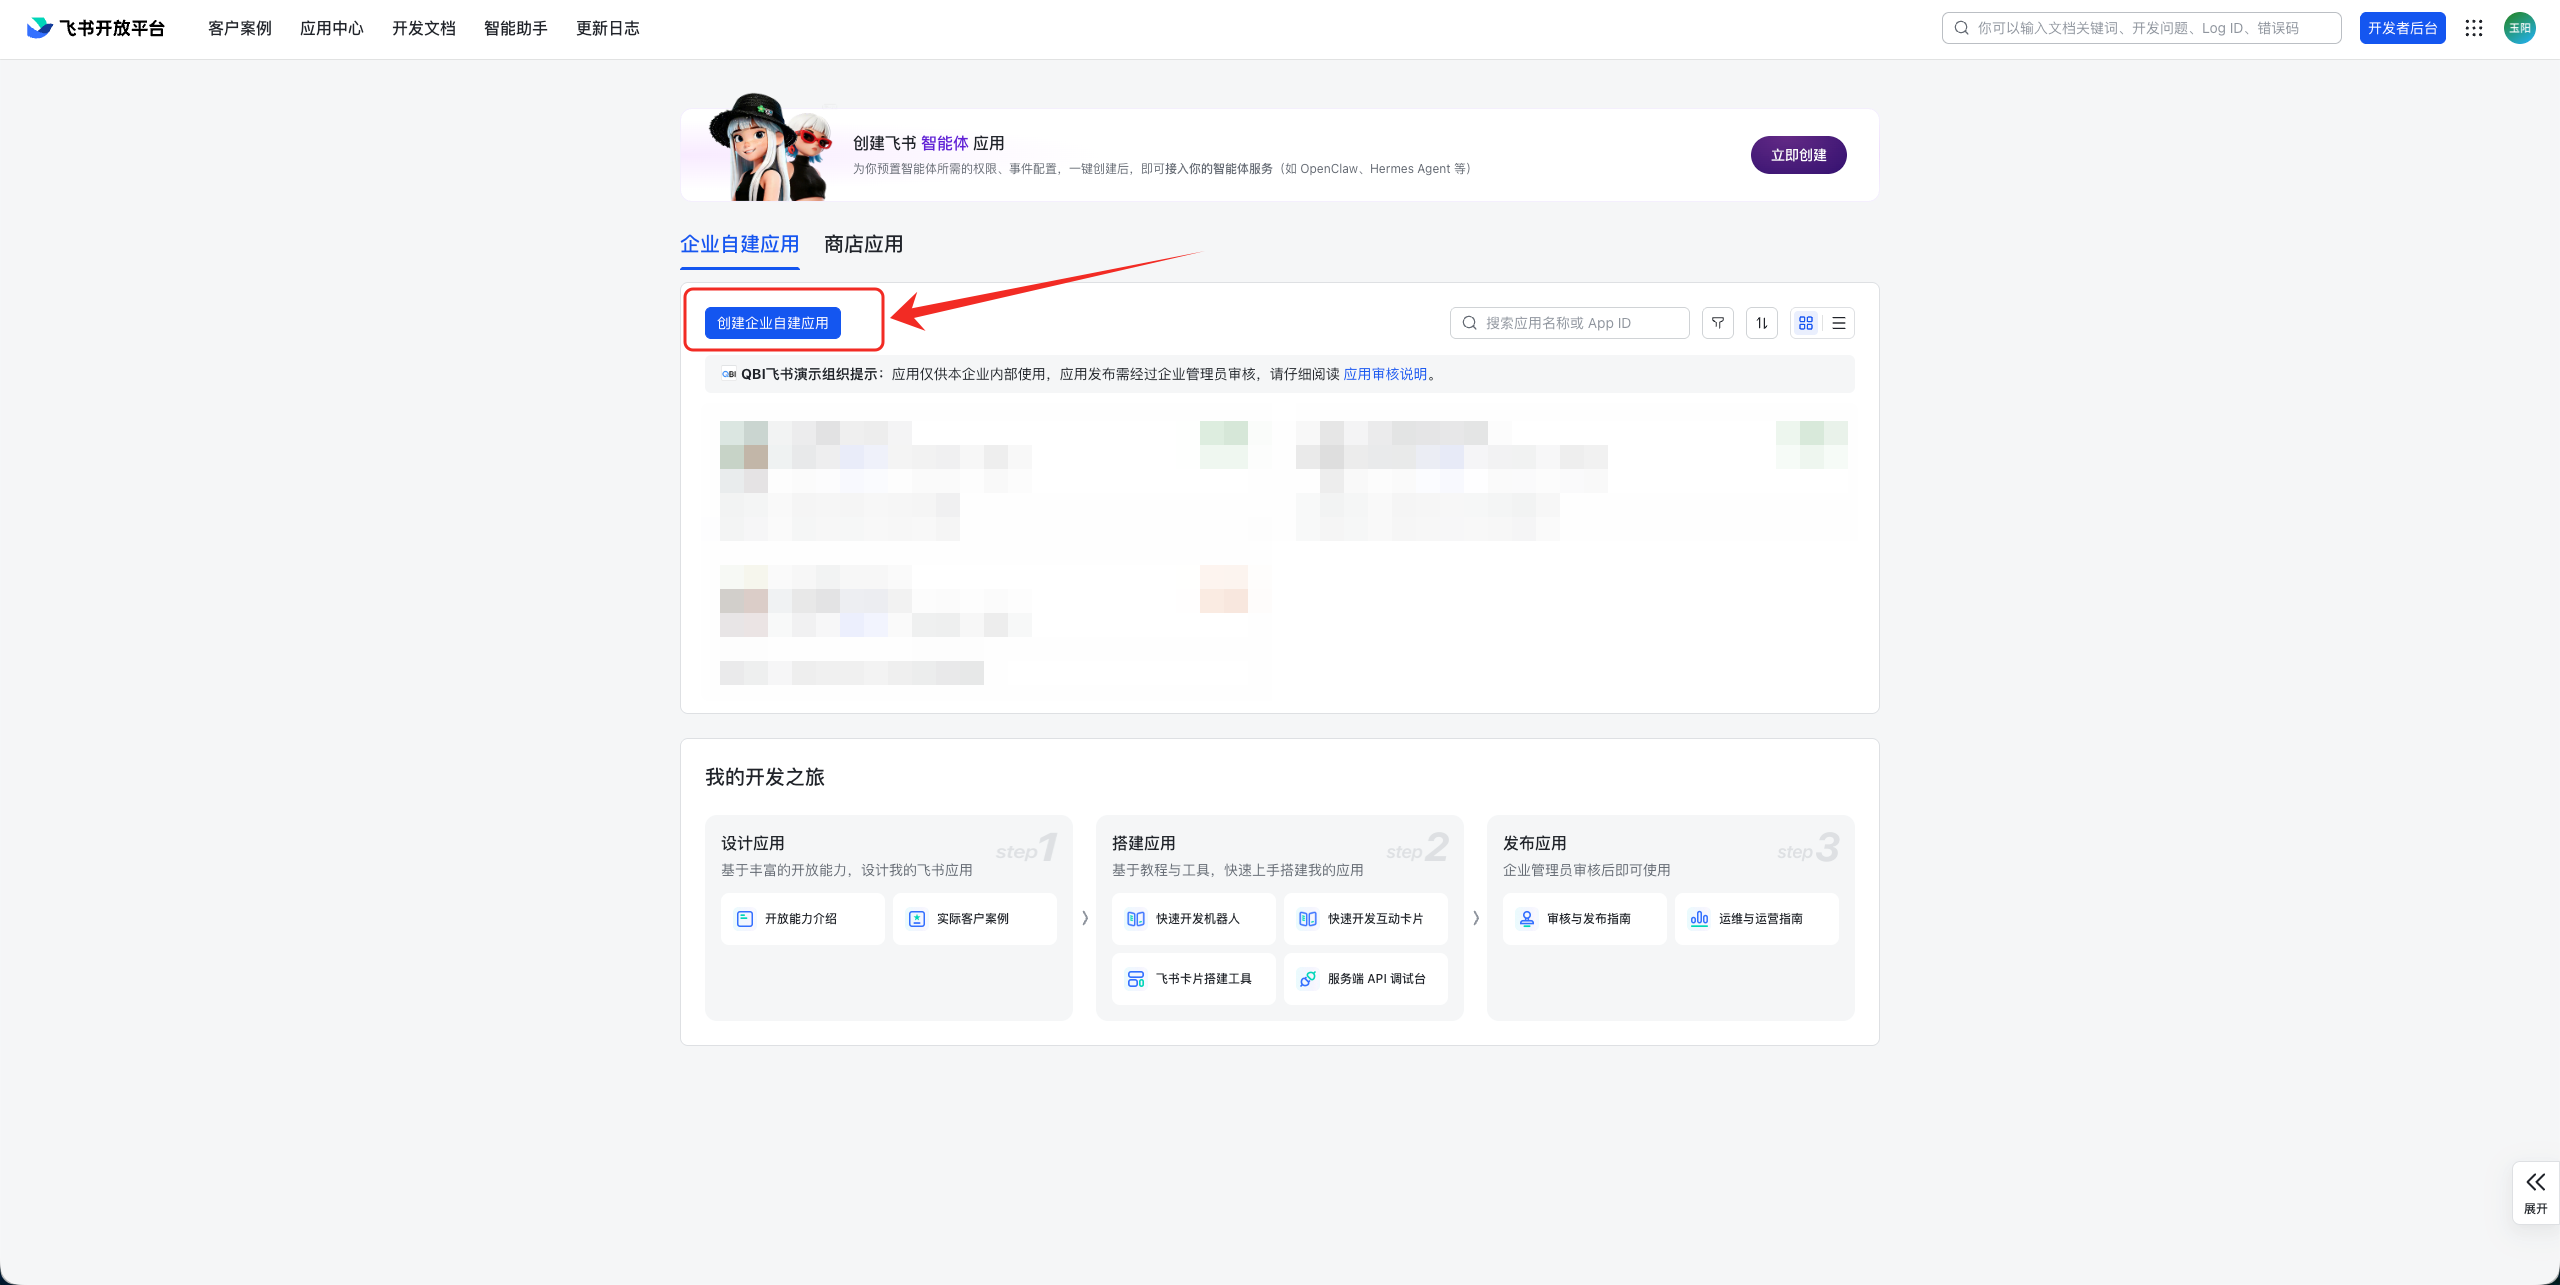
Go to the Feishu Developer Console at https://open.feishu.cn/app and sign in with a Feishu account that has app creation permissions.
-
Click Create Custom App.
-
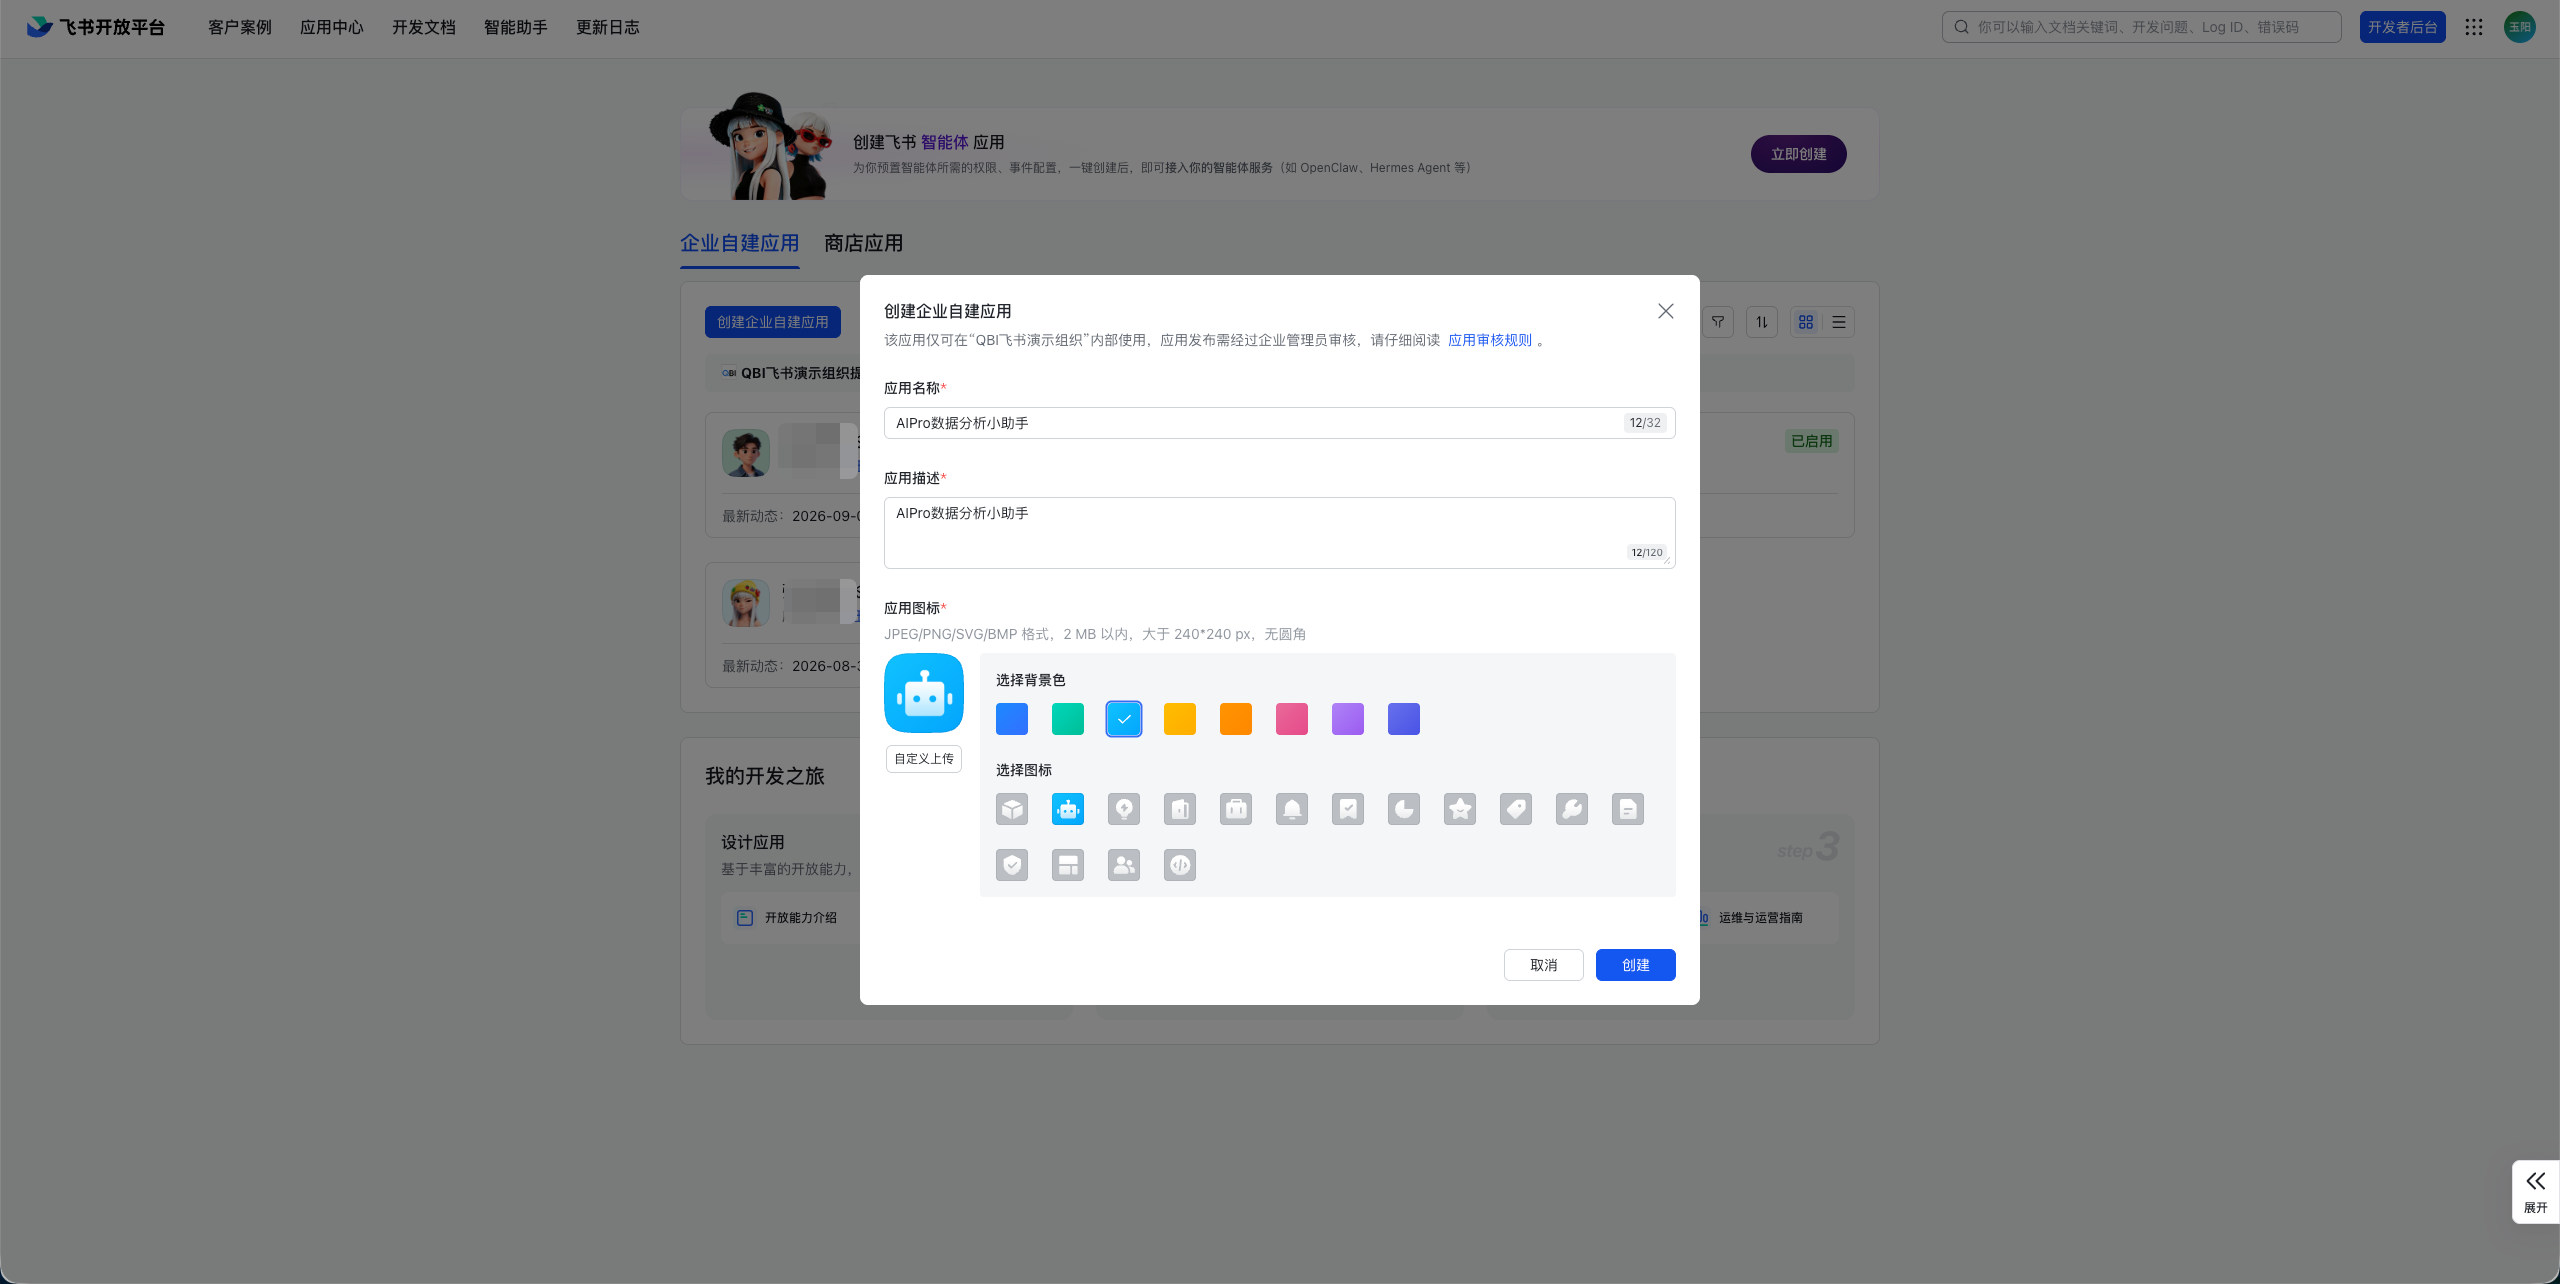
Enter the following information.
Parameter
Value
Description
App name
A custom name
For example: AIPro Data Analyst
App description
A brief description of the app's purpose
—
App icon
Upload an icon as needed
—
-
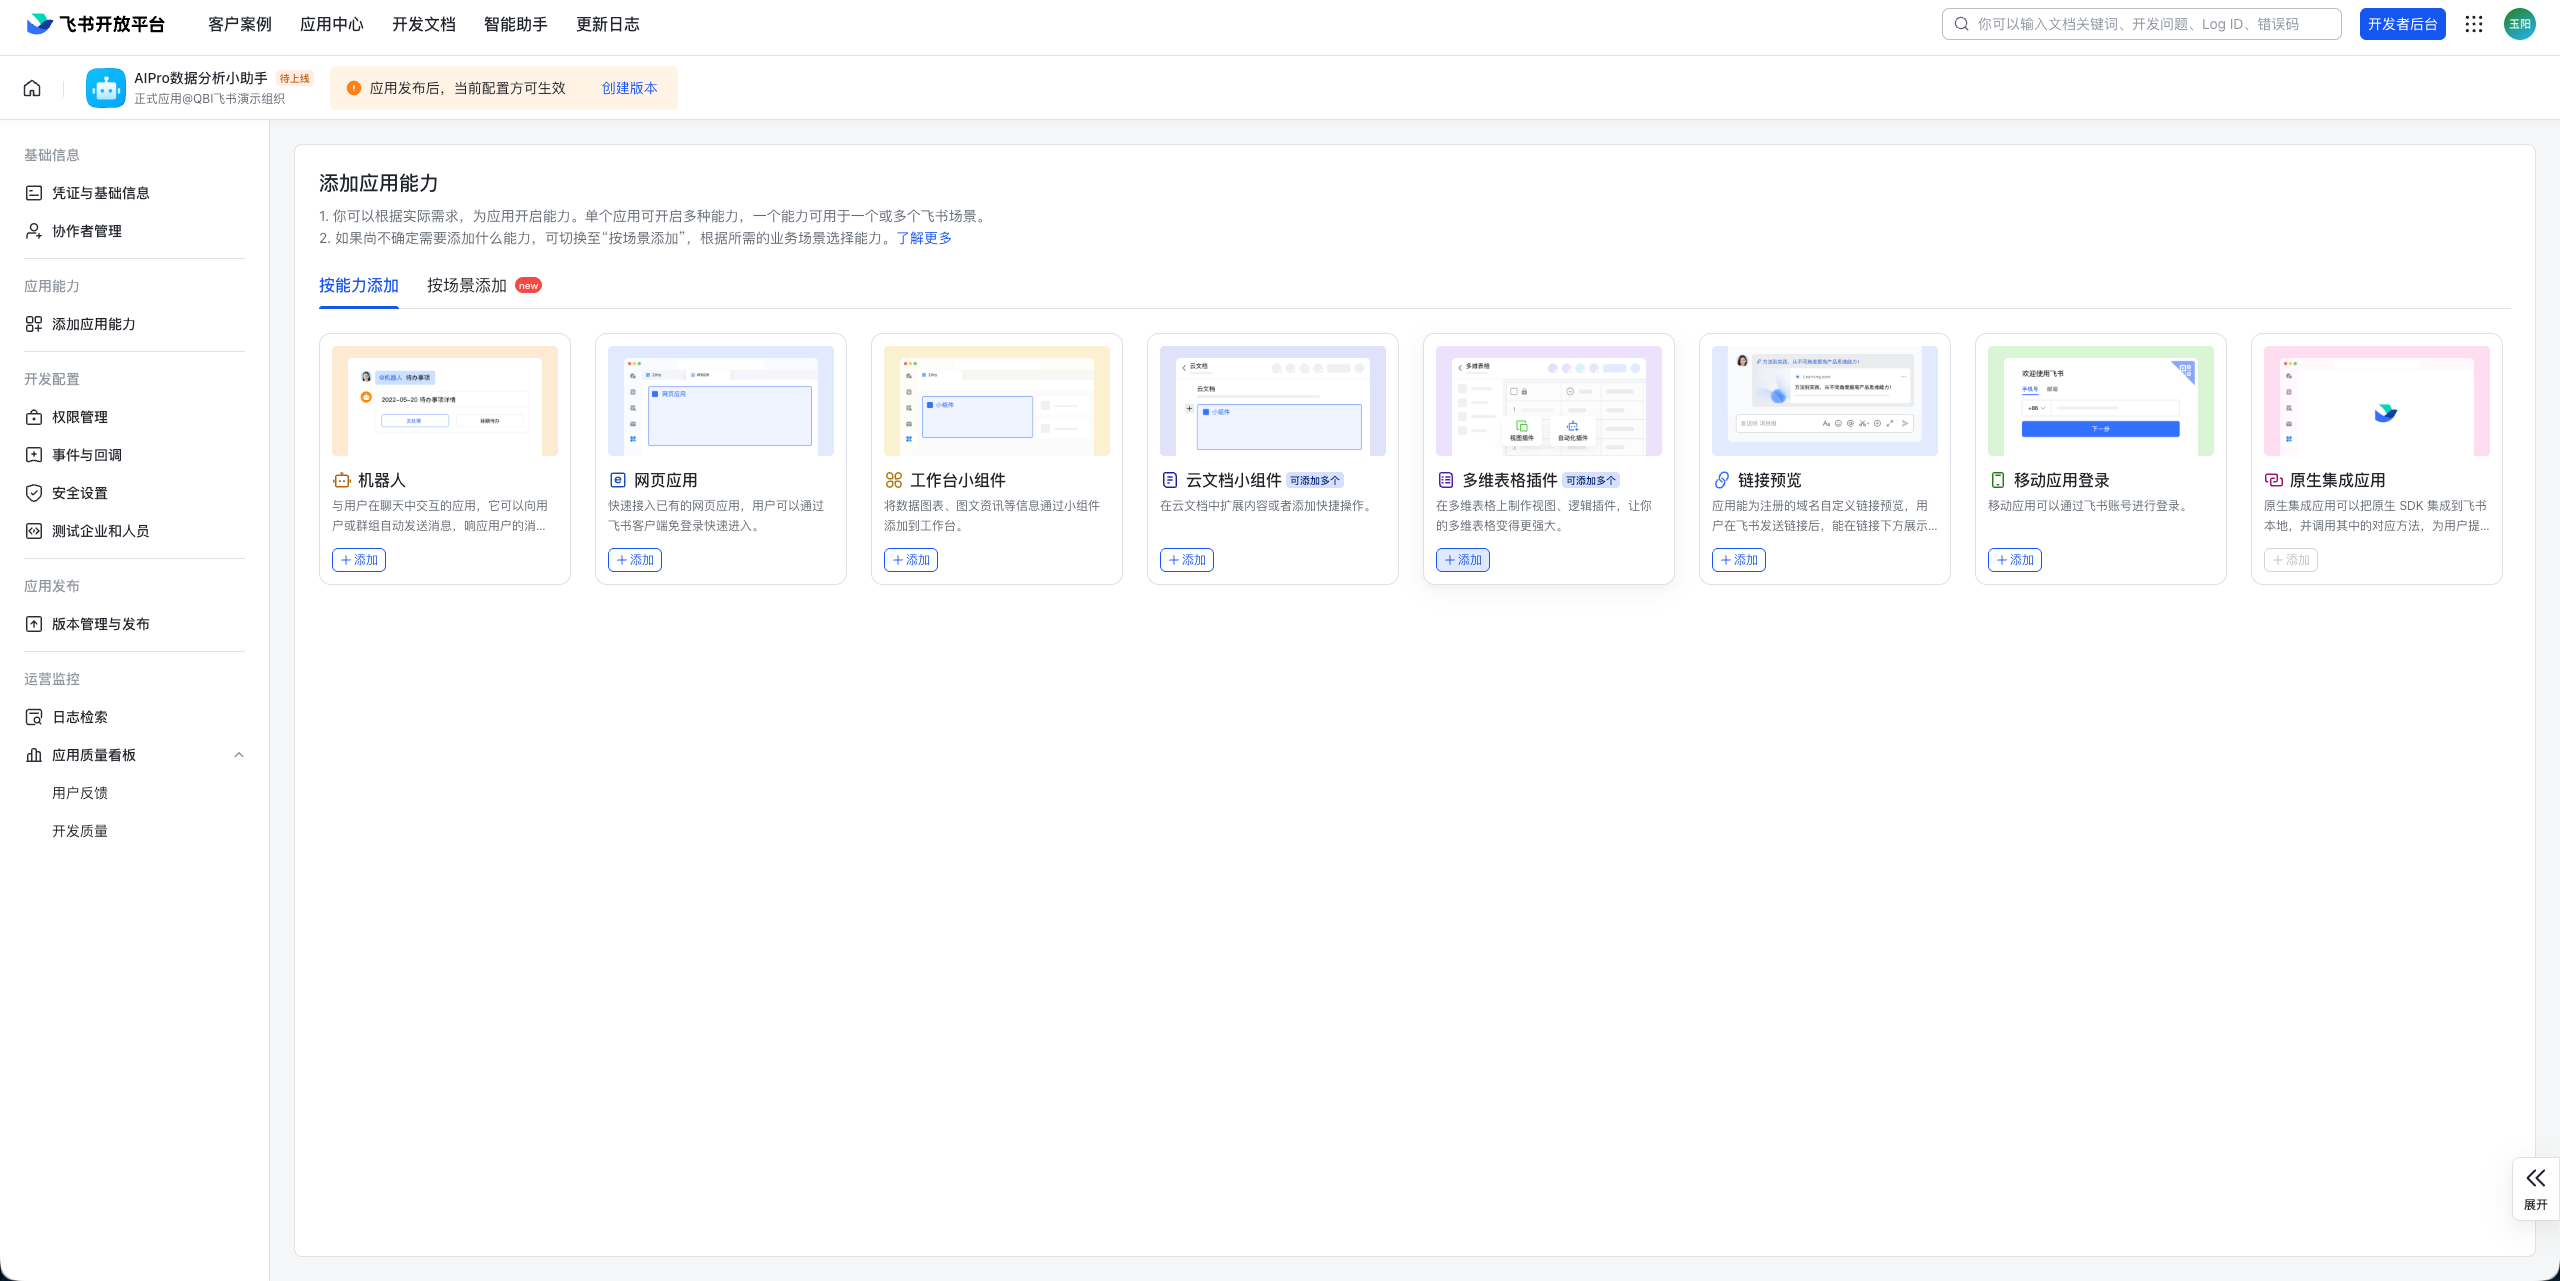
After you enter the information, click Create. Feishu then directs you to the app details page.
Add bot
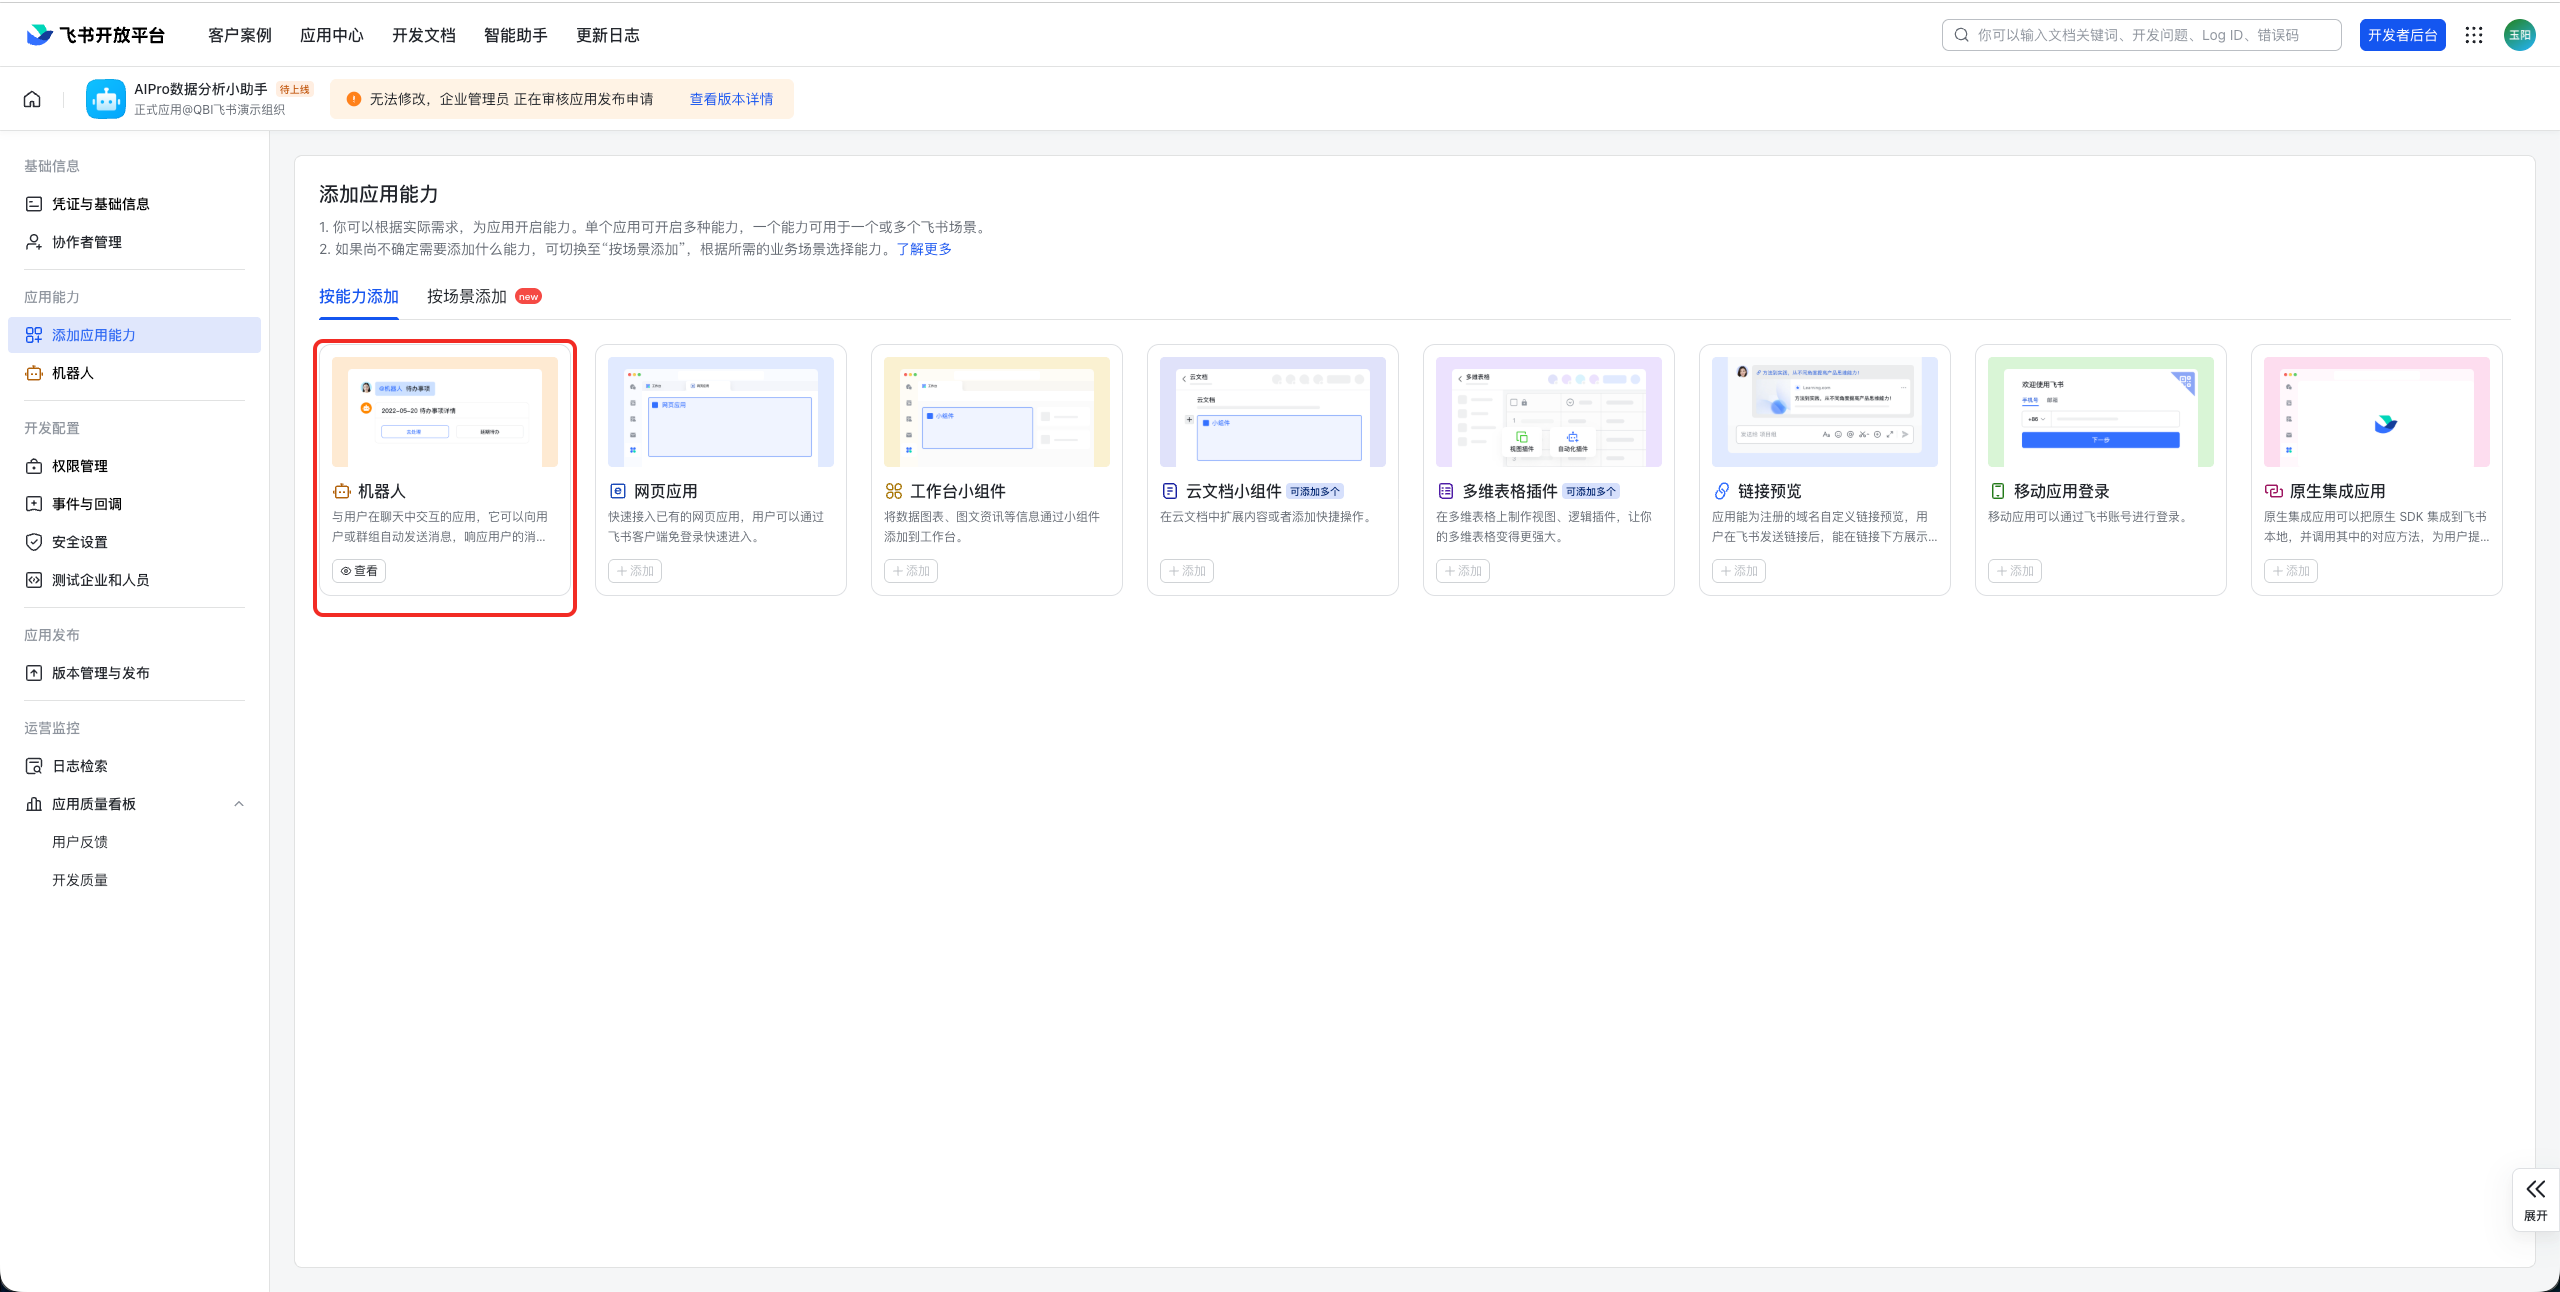
On the app details page, in the Add Features section, find the Bot card and click Add.
Configure app permissions
To allow the bot to send and receive messages and process conversations, you must import the following permissions for the app.
-
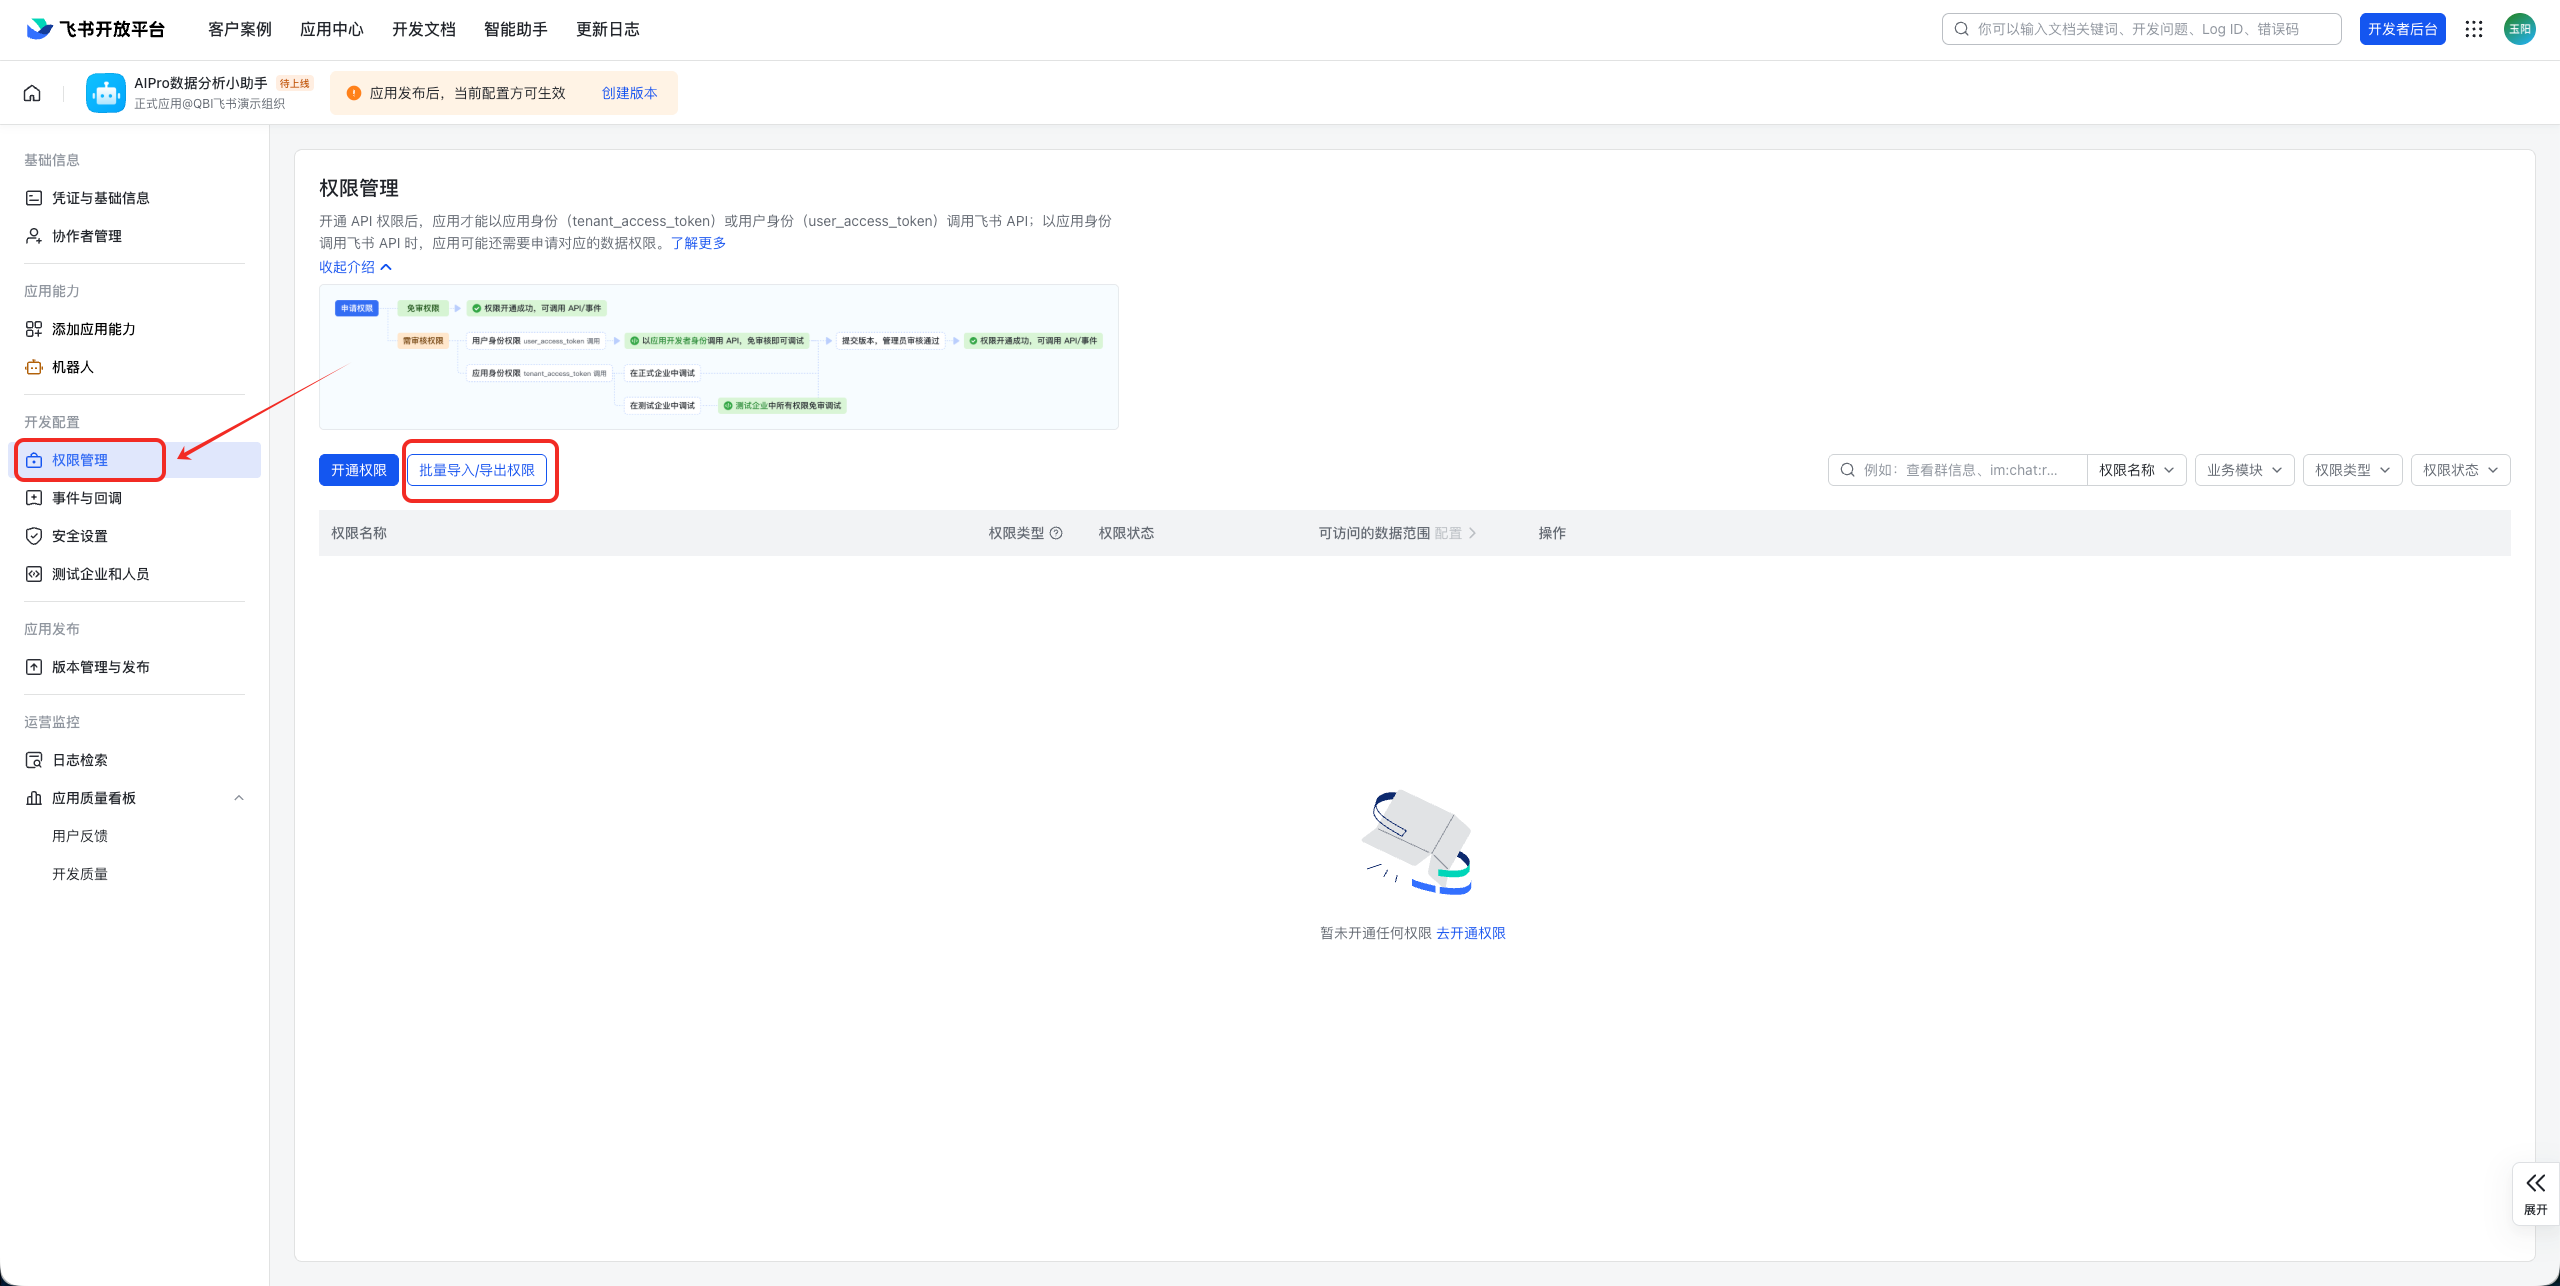
In the left navigation pane of the app details page, click Permissions & Scopes to open the permissions page.
-
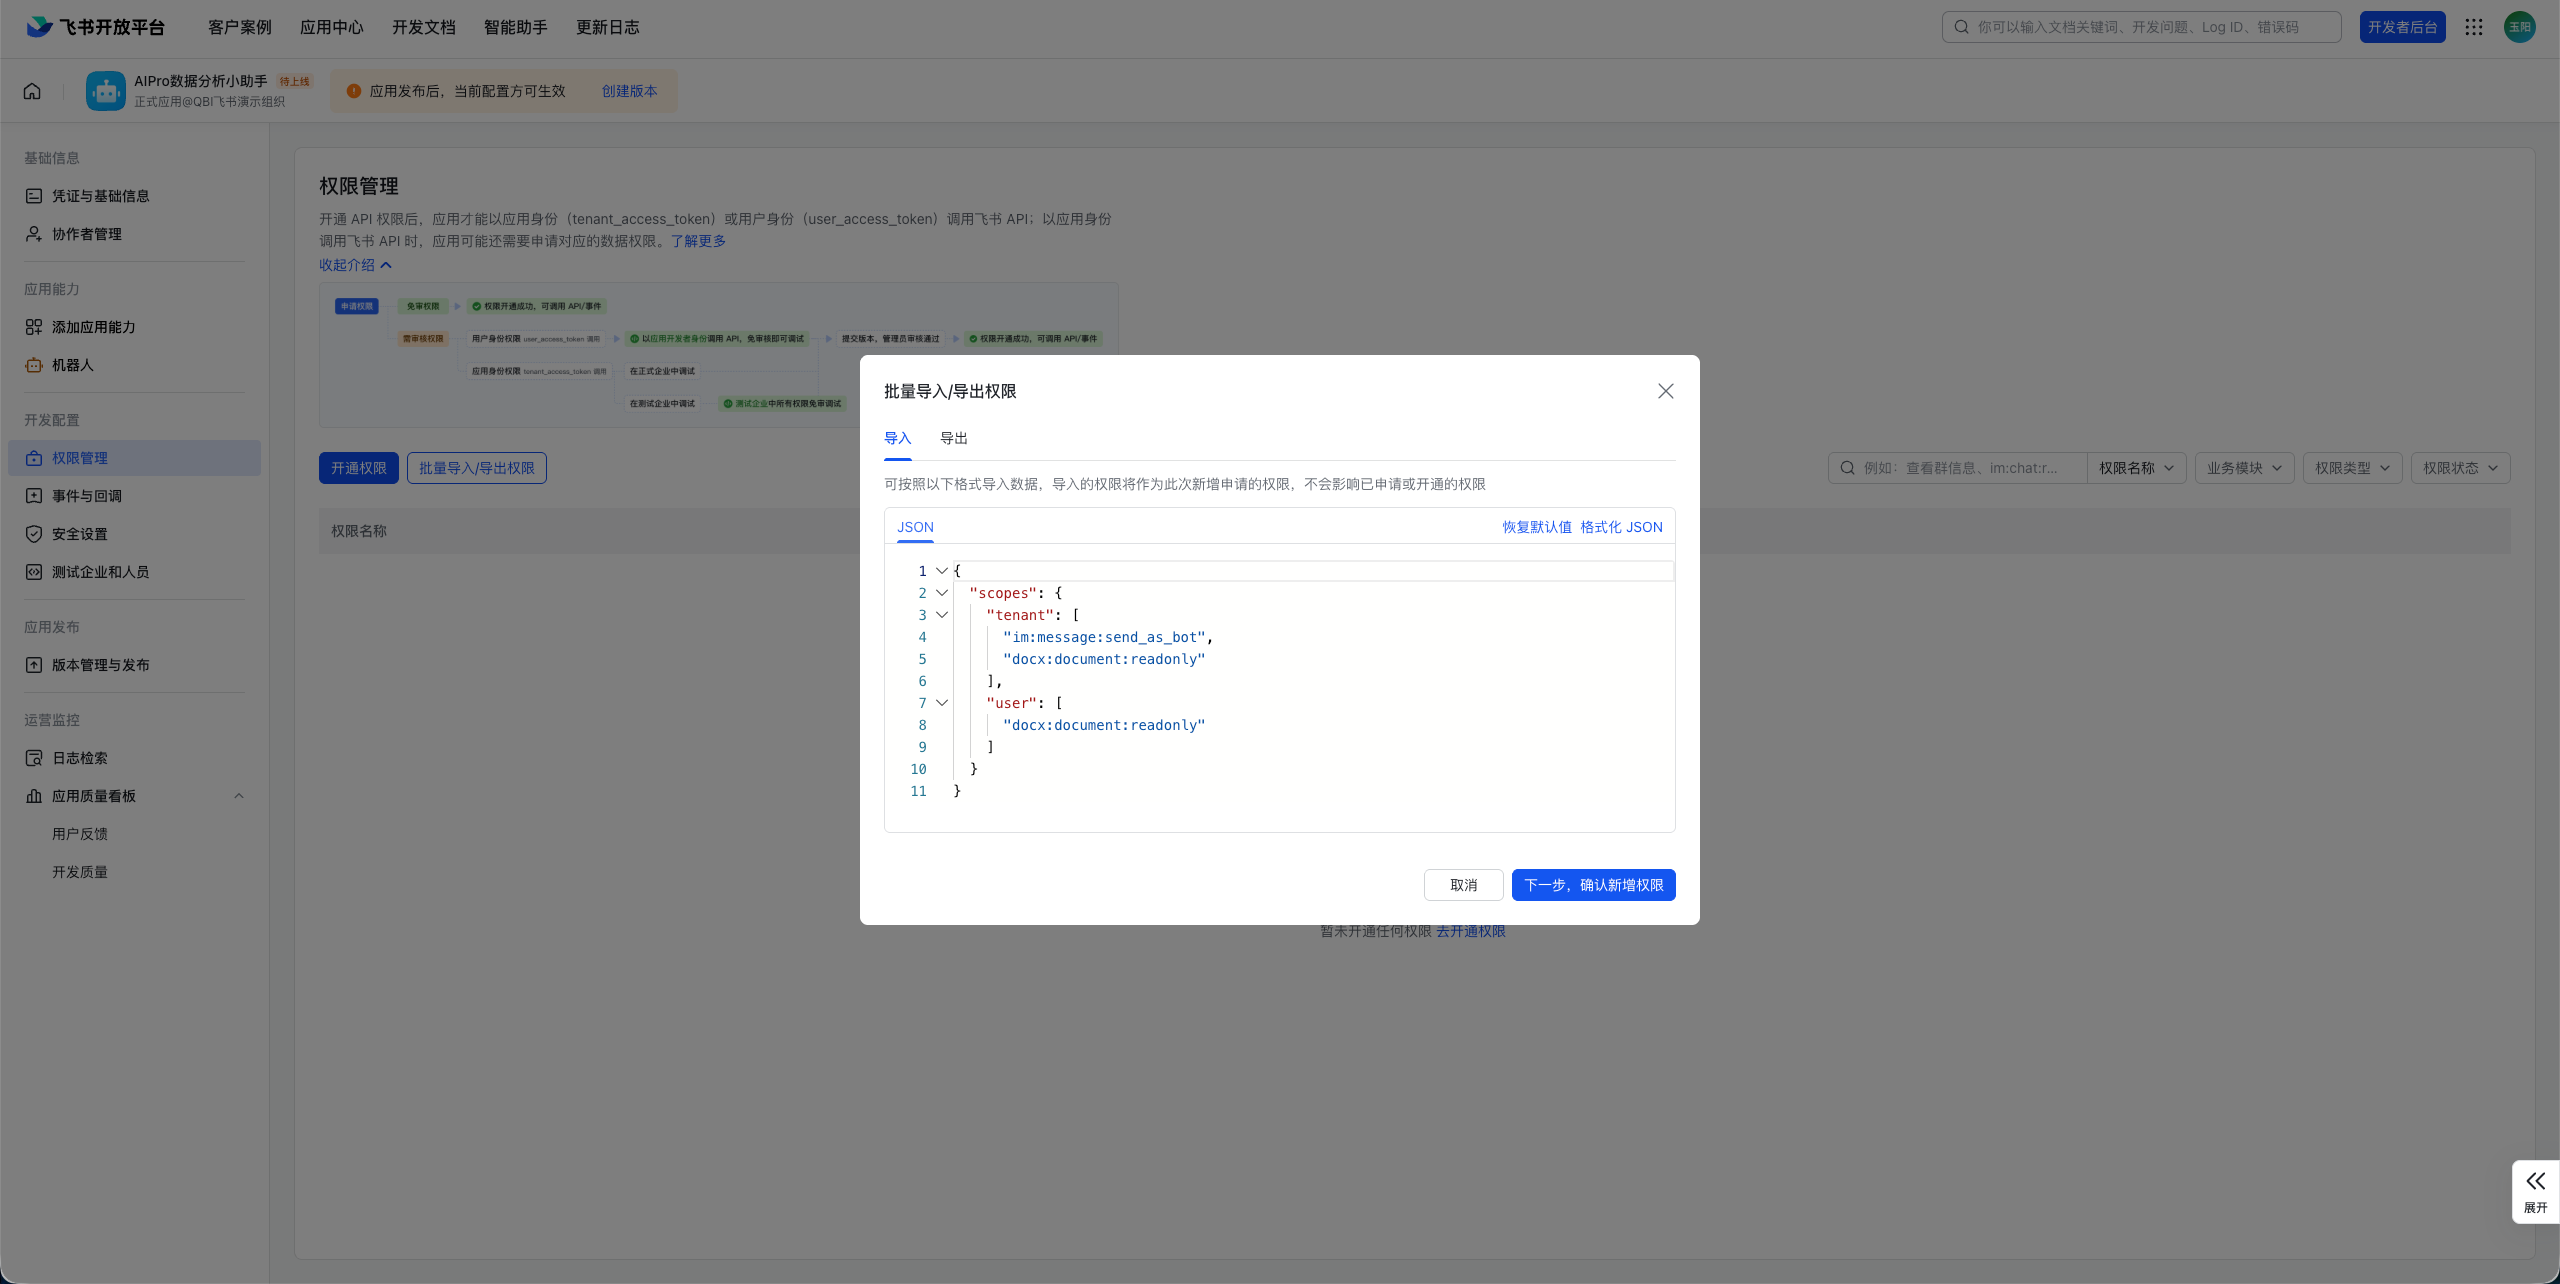
Click Bulk-import/export permissions. In the dialog box that appears, clear the sample content from the input field, and then copy and paste the entire list of permissions below.
{
  "scopes": {
    "tenant": [
      "contact:contact.base:readonly",
      "docx:document:readonly",
      "im:chat:read",
      "im:chat:update",
      "im:message.group_at_msg:readonly",
      "im:message.p2p_msg:readonly",
      "im:message.pins:read",
      "im:message.pins:write_only",
      "im:message.reactions:read",
      "im:message.reactions:write_only",
      "im:message:readonly",
      "im:message:recall",
      "im:message:send_as_bot",
      "im:message:send_multi_users",
      "im:message:send_sys_msg",
      "im:message:update",
      "im:resource",
      "application:application:self_manage",
      "cardkit:card:write",
      "cardkit:card:read"
    ],
    "user": [
      "contact:user.employee_id:readonly",
      "offline_access",
      "base:app:copy",
      "base:field:create",
      "base:field:delete",
      "base:field:read",
      "base:field:update",
      "base:record:create",
      "base:record:delete",
      "base:record:retrieve",
      "base:record:update",
      "base:table:create",
      "base:table:delete",
      "base:table:read",
      "base:table:update",
      "base:view:read",
      "base:view:write_only",
      "base:app:create",
      "base:app:update",
      "base:app:read",
      "board:whiteboard:node:create",
      "board:whiteboard:node:read",
      "calendar:calendar:read",
      "calendar:calendar.event:create",
      "calendar:calendar.event:delete",
      "calendar:calendar.event:read",
      "calendar:calendar.event:reply",
      "calendar:calendar.event:update",
      "calendar:calendar.free_busy:read",
      "contact:contact.base:readonly",
      "contact:user.base:readonly",
      "contact:user:search",
      "docs:document.comment:create",
      "docs:document.comment:read",
      "docs:document.comment:update",
      "docs:document.media:download",
      "docs:document:copy",
      "docx:document:create",
      "docx:document:readonly",
      "docx:document:write_only",
      "drive:drive.metadata:readonly",
      "drive:file:download",
      "drive:file:upload",
      "im:chat.members:read",
      "im:chat:read",
      "im:message",
      "im:message.group_msg:get_as_user",
      "im:message.p2p_msg:get_as_user",
      "im:message:readonly",
      "search:docs:read",
      "search:message",
      "space:document:delete",
      "space:document:move",
      "space:document:retrieve",
      "task:comment:read",
      "task:comment:write",
      "task:task:read",
      "task:task:write",
      "task:task:writeonly",
      "task:tasklist:read",
      "task:tasklist:write",
      "wiki:node:copy",
      "wiki:node:create",
      "wiki:node:move",
      "wiki:node:read",
      "wiki:node:retrieve",
      "wiki:space:read",
      "wiki:space:retrieve",
      "wiki:space:write_only"
    ]
  }
}
-
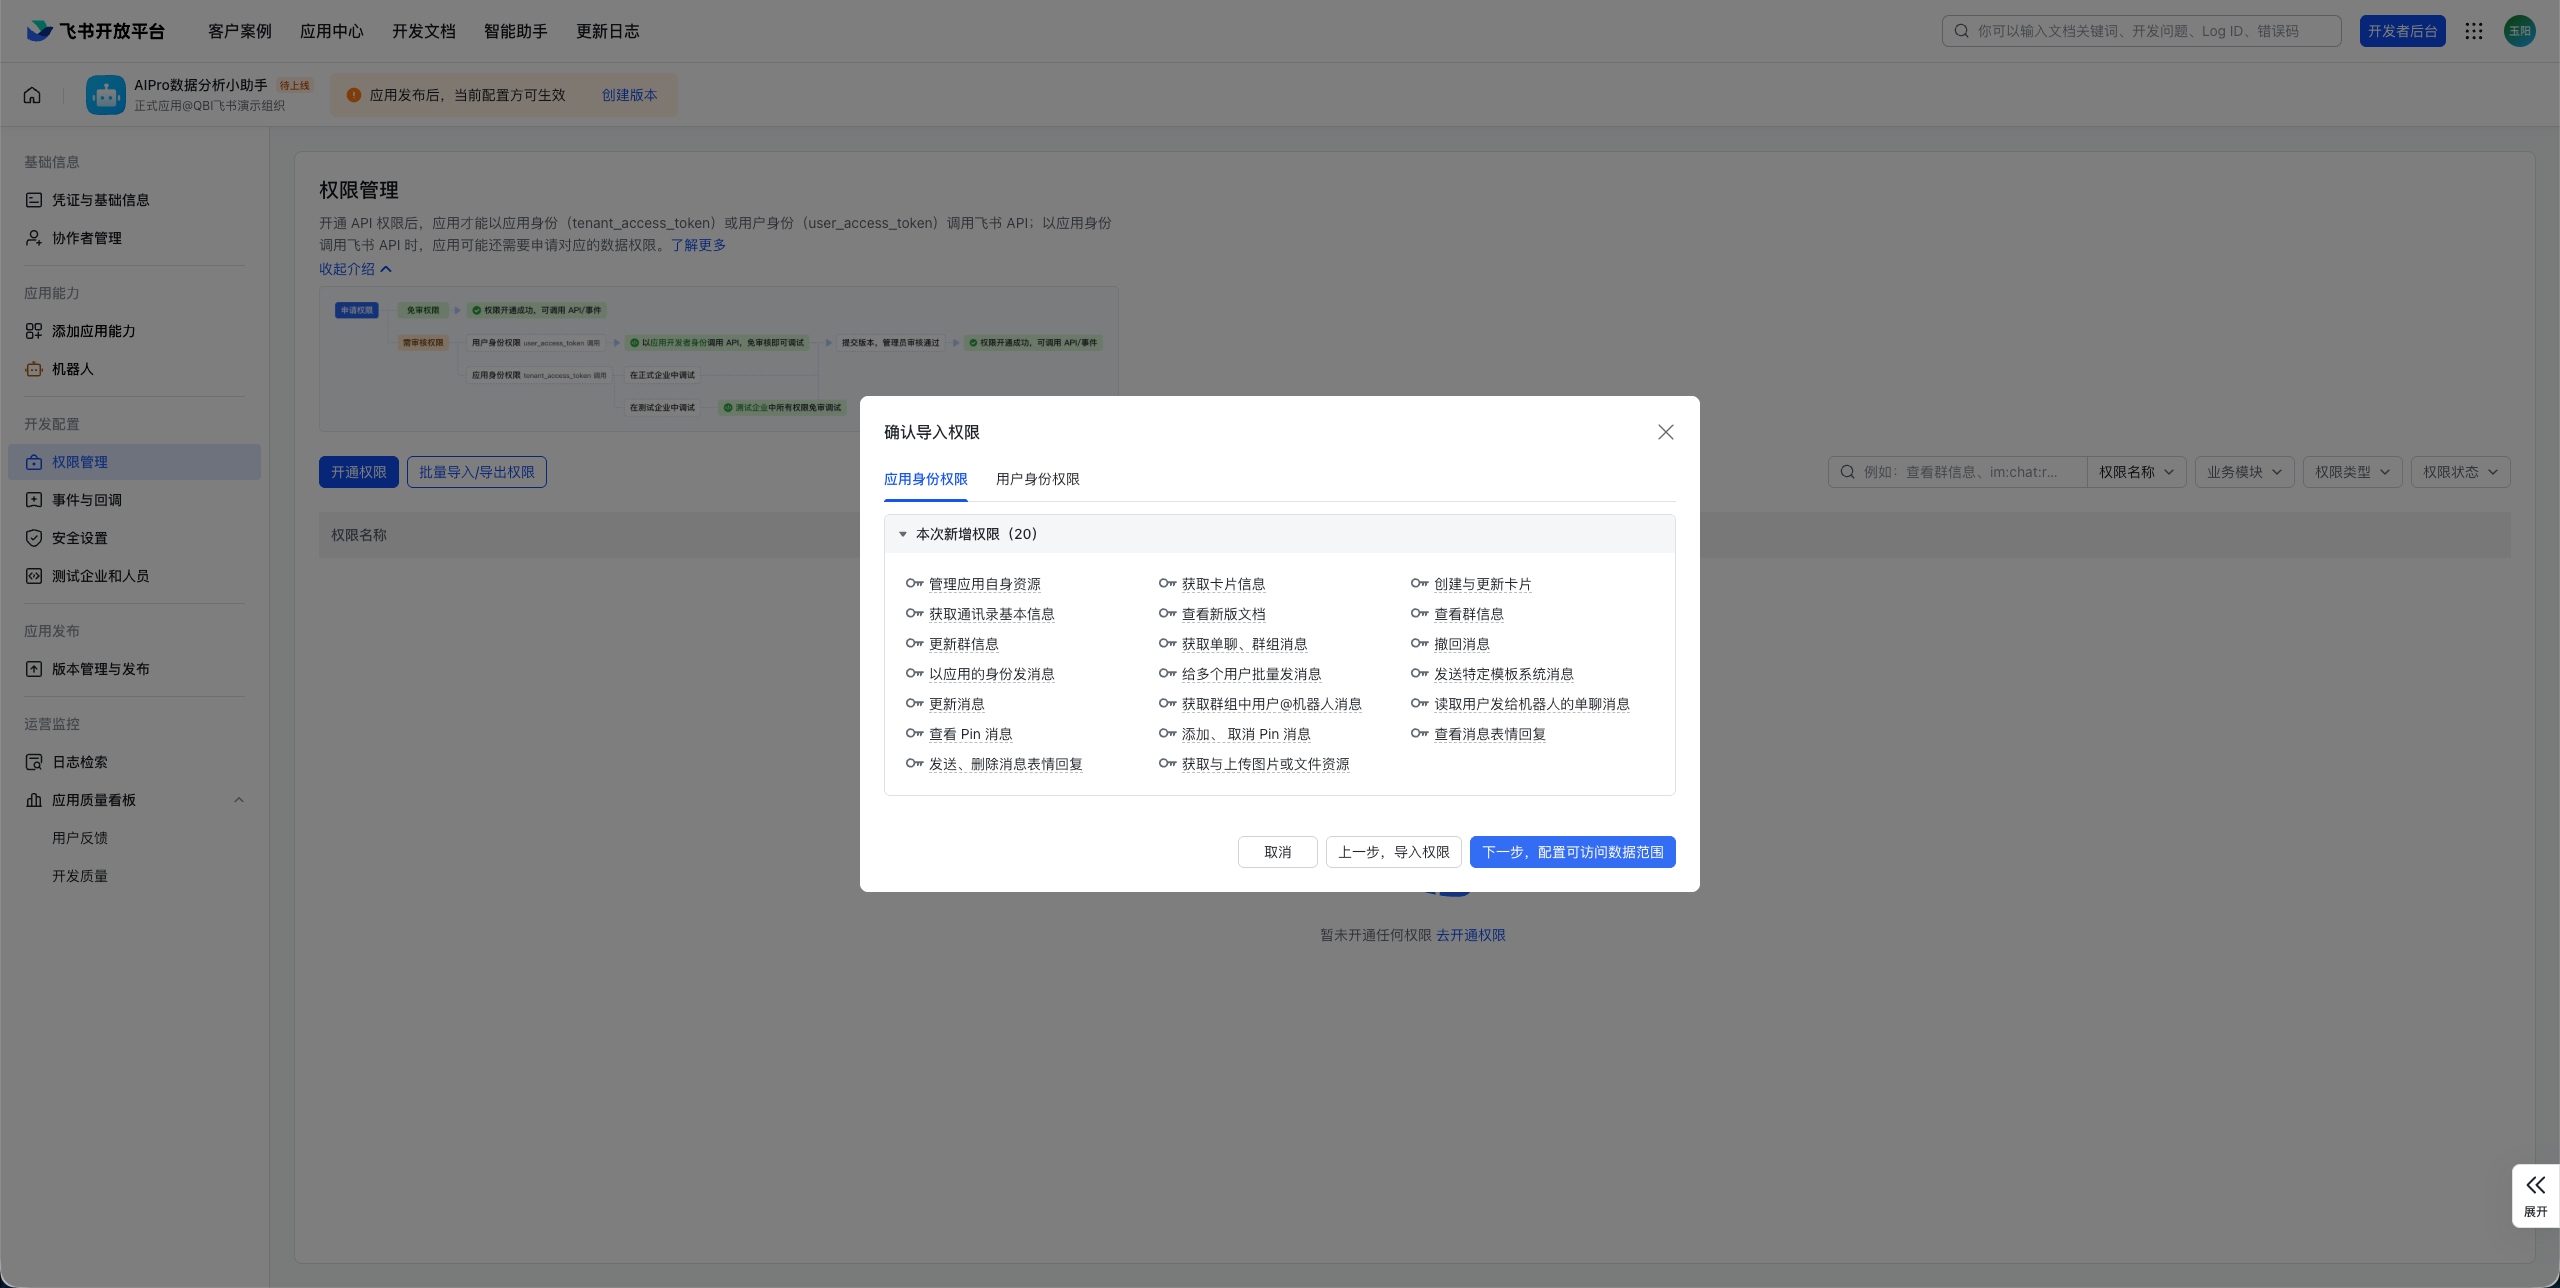
Click Next, confirm the new permissions.
-
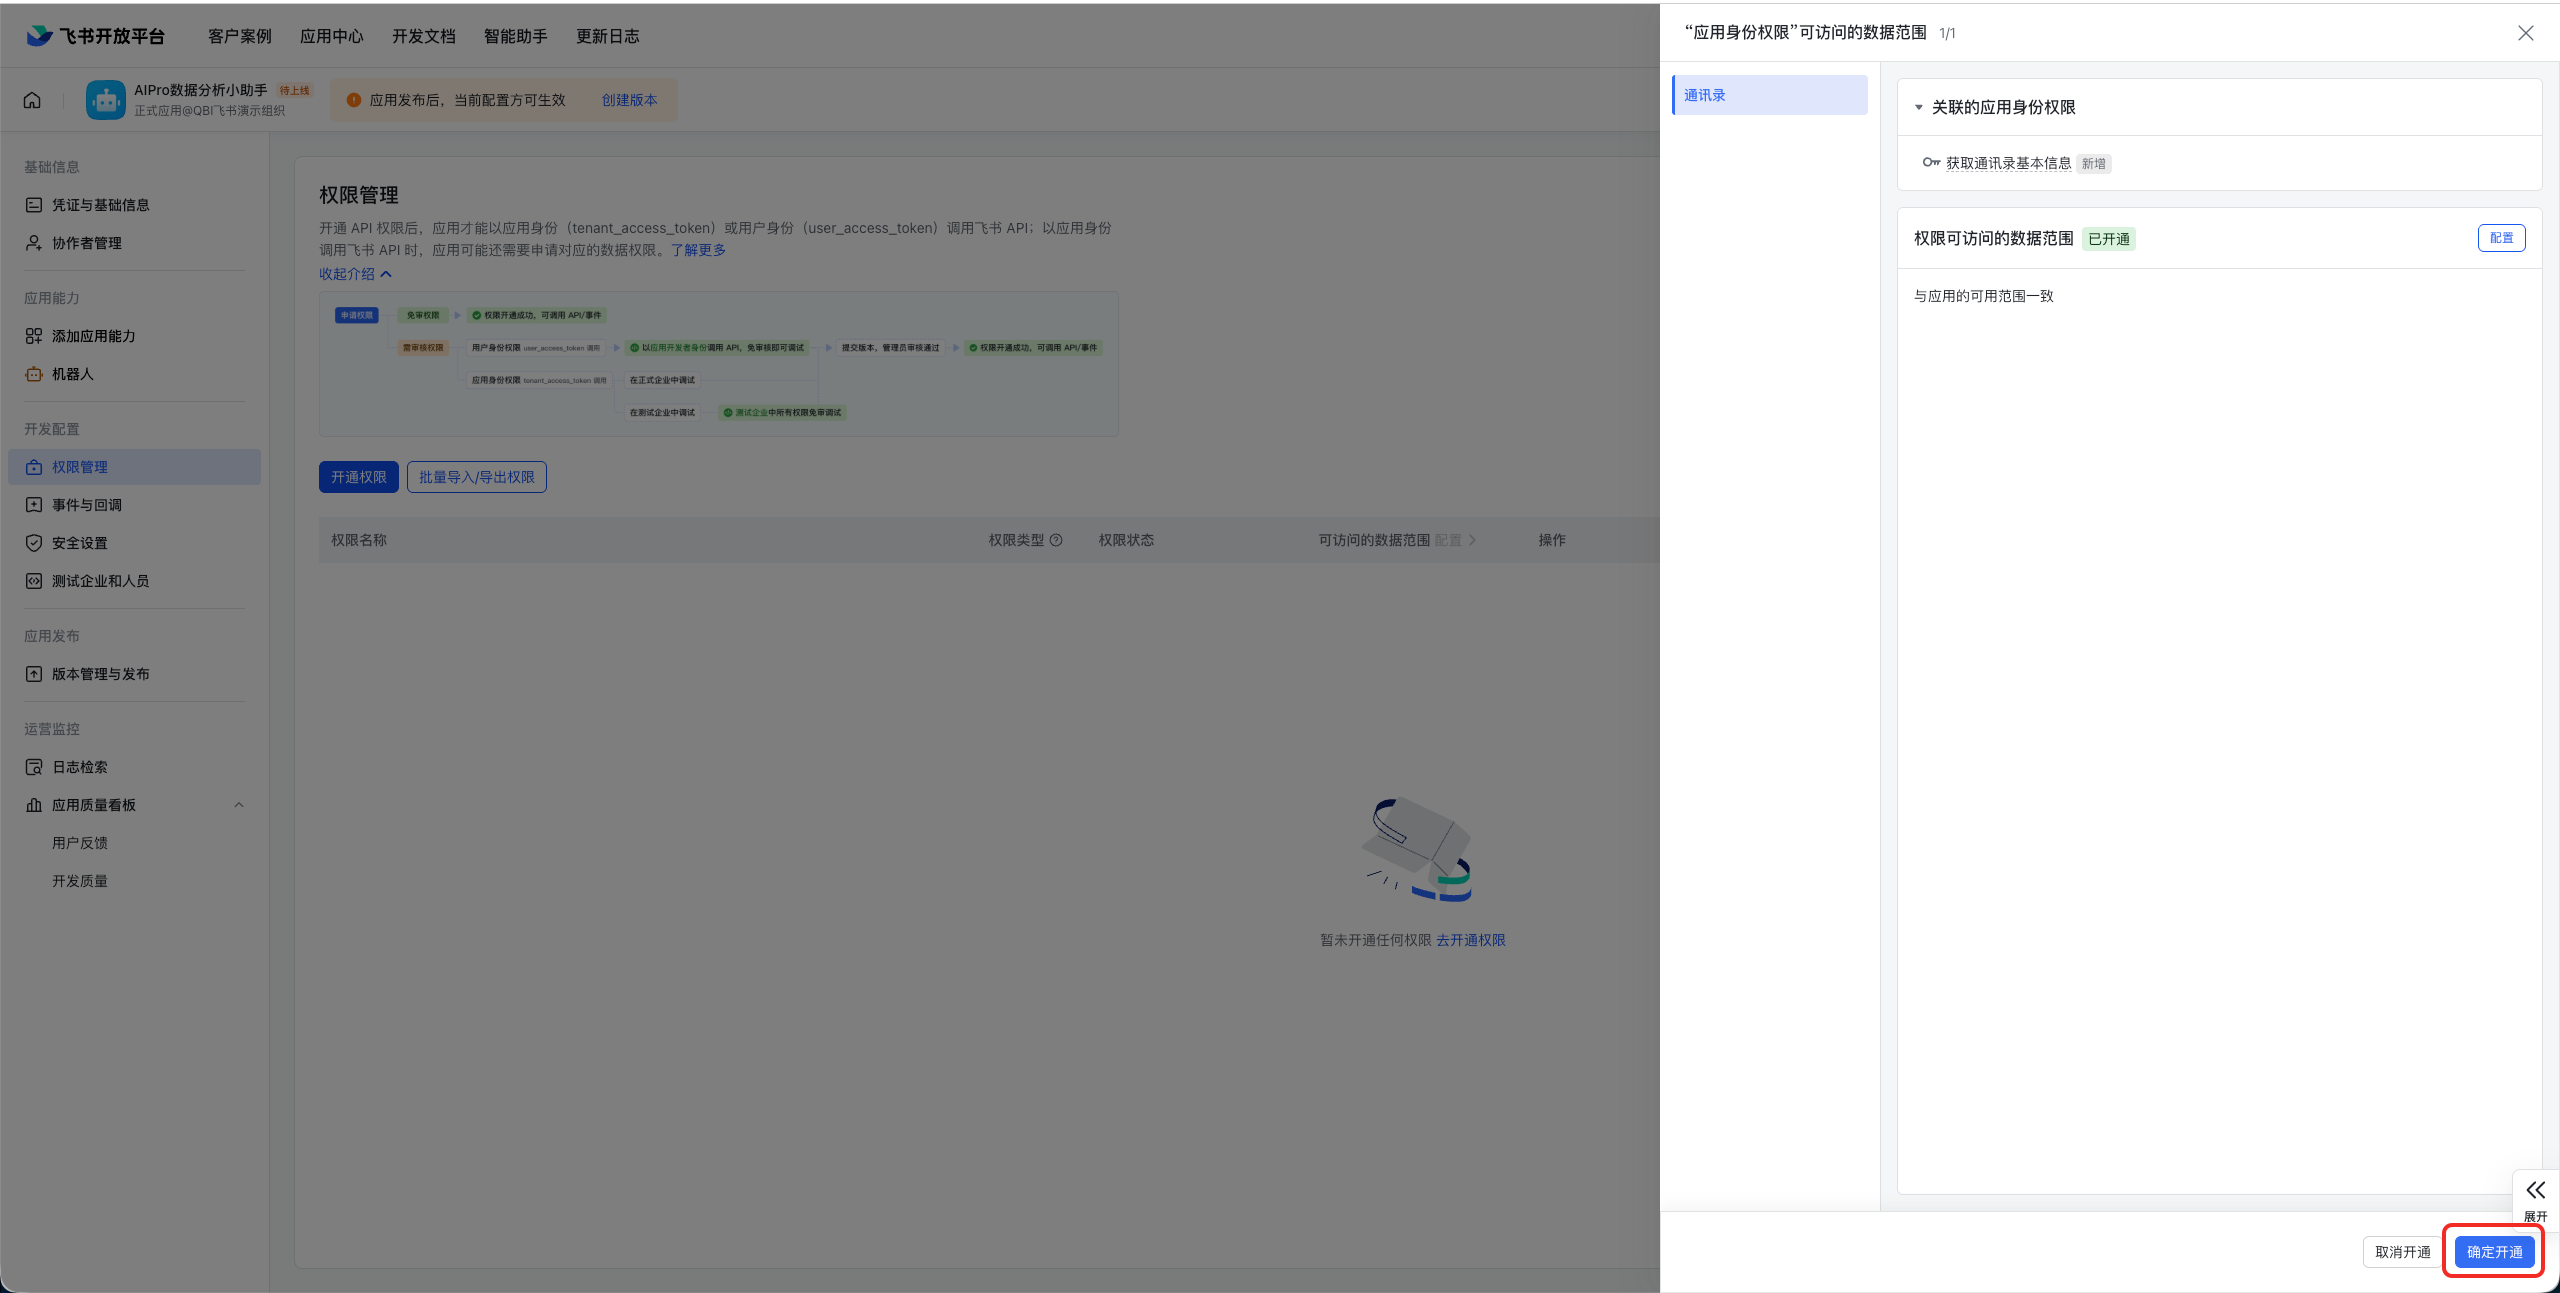
Click Next, configure the accessible range.
-
Click Confirm and activate.
Application credentials
-
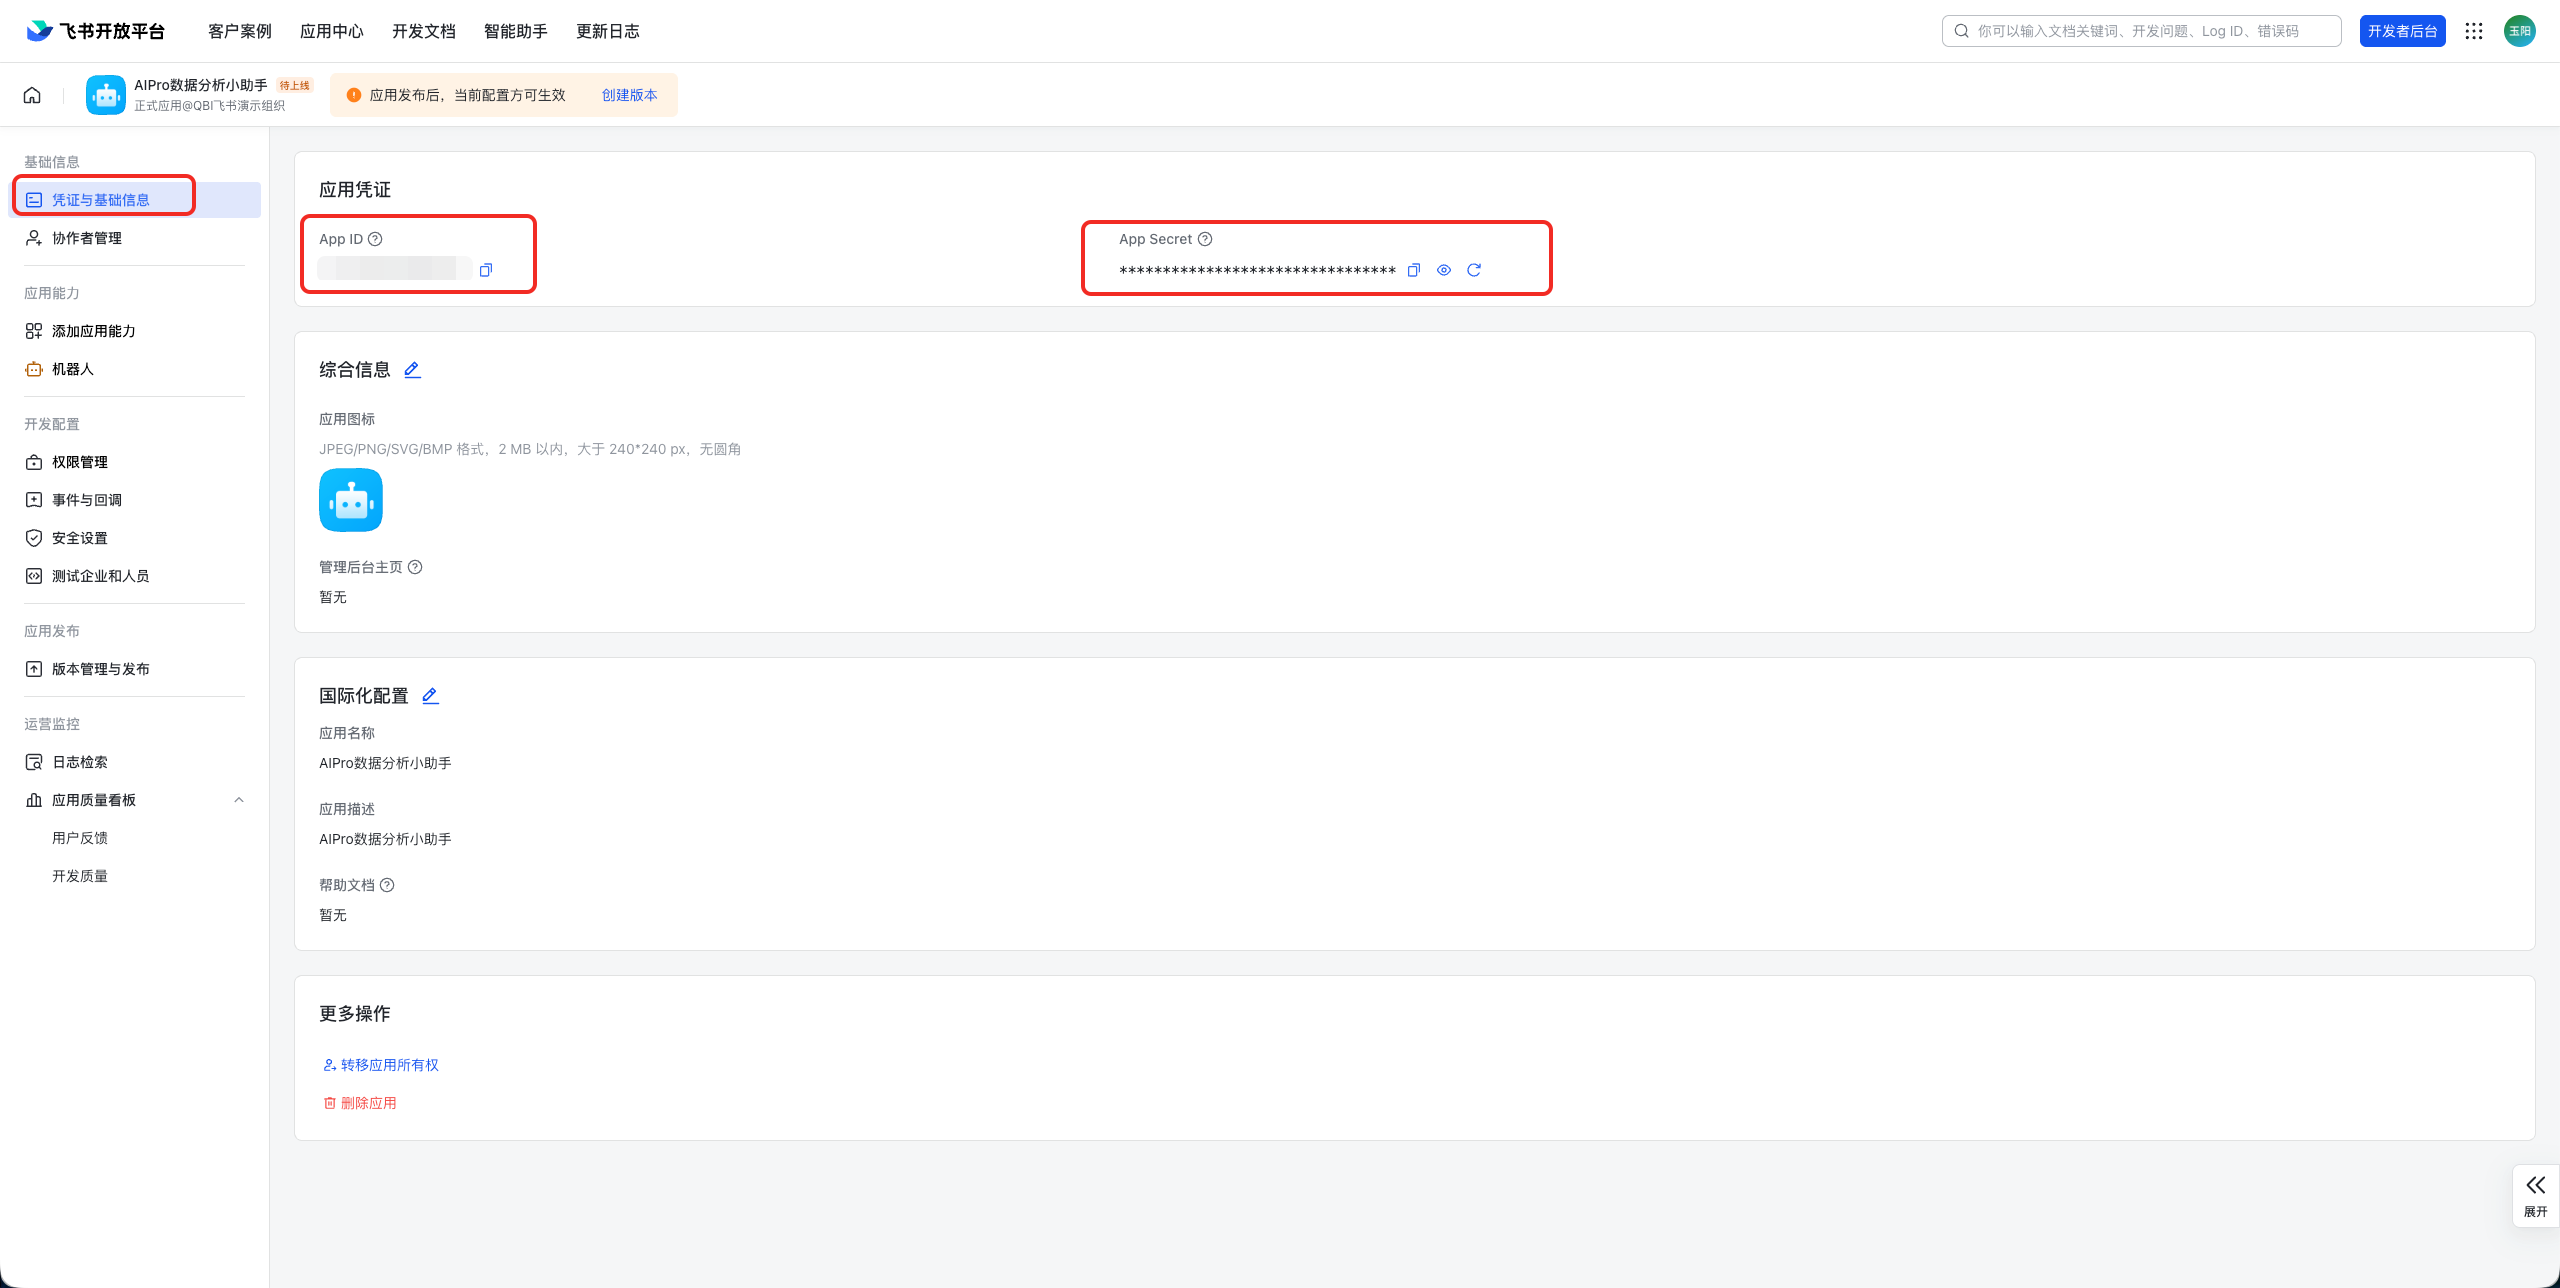
In the left navigation pane of the app details page, click Credentials & Basic Info.
-
Note the following credentials. You will need them later when you configure the Feishu channel in AIPro.
Credential
Description
App ID
The Feishu app's credential ID.
App Secret
The secret paired with the App ID.
-
The App Secret is sensitive information. Do not share it in chats or public channels.
-
Keep this page open. You must return to the Feishu Developer Console later to configure events and callbacks.
Configure the Feishu channel
-
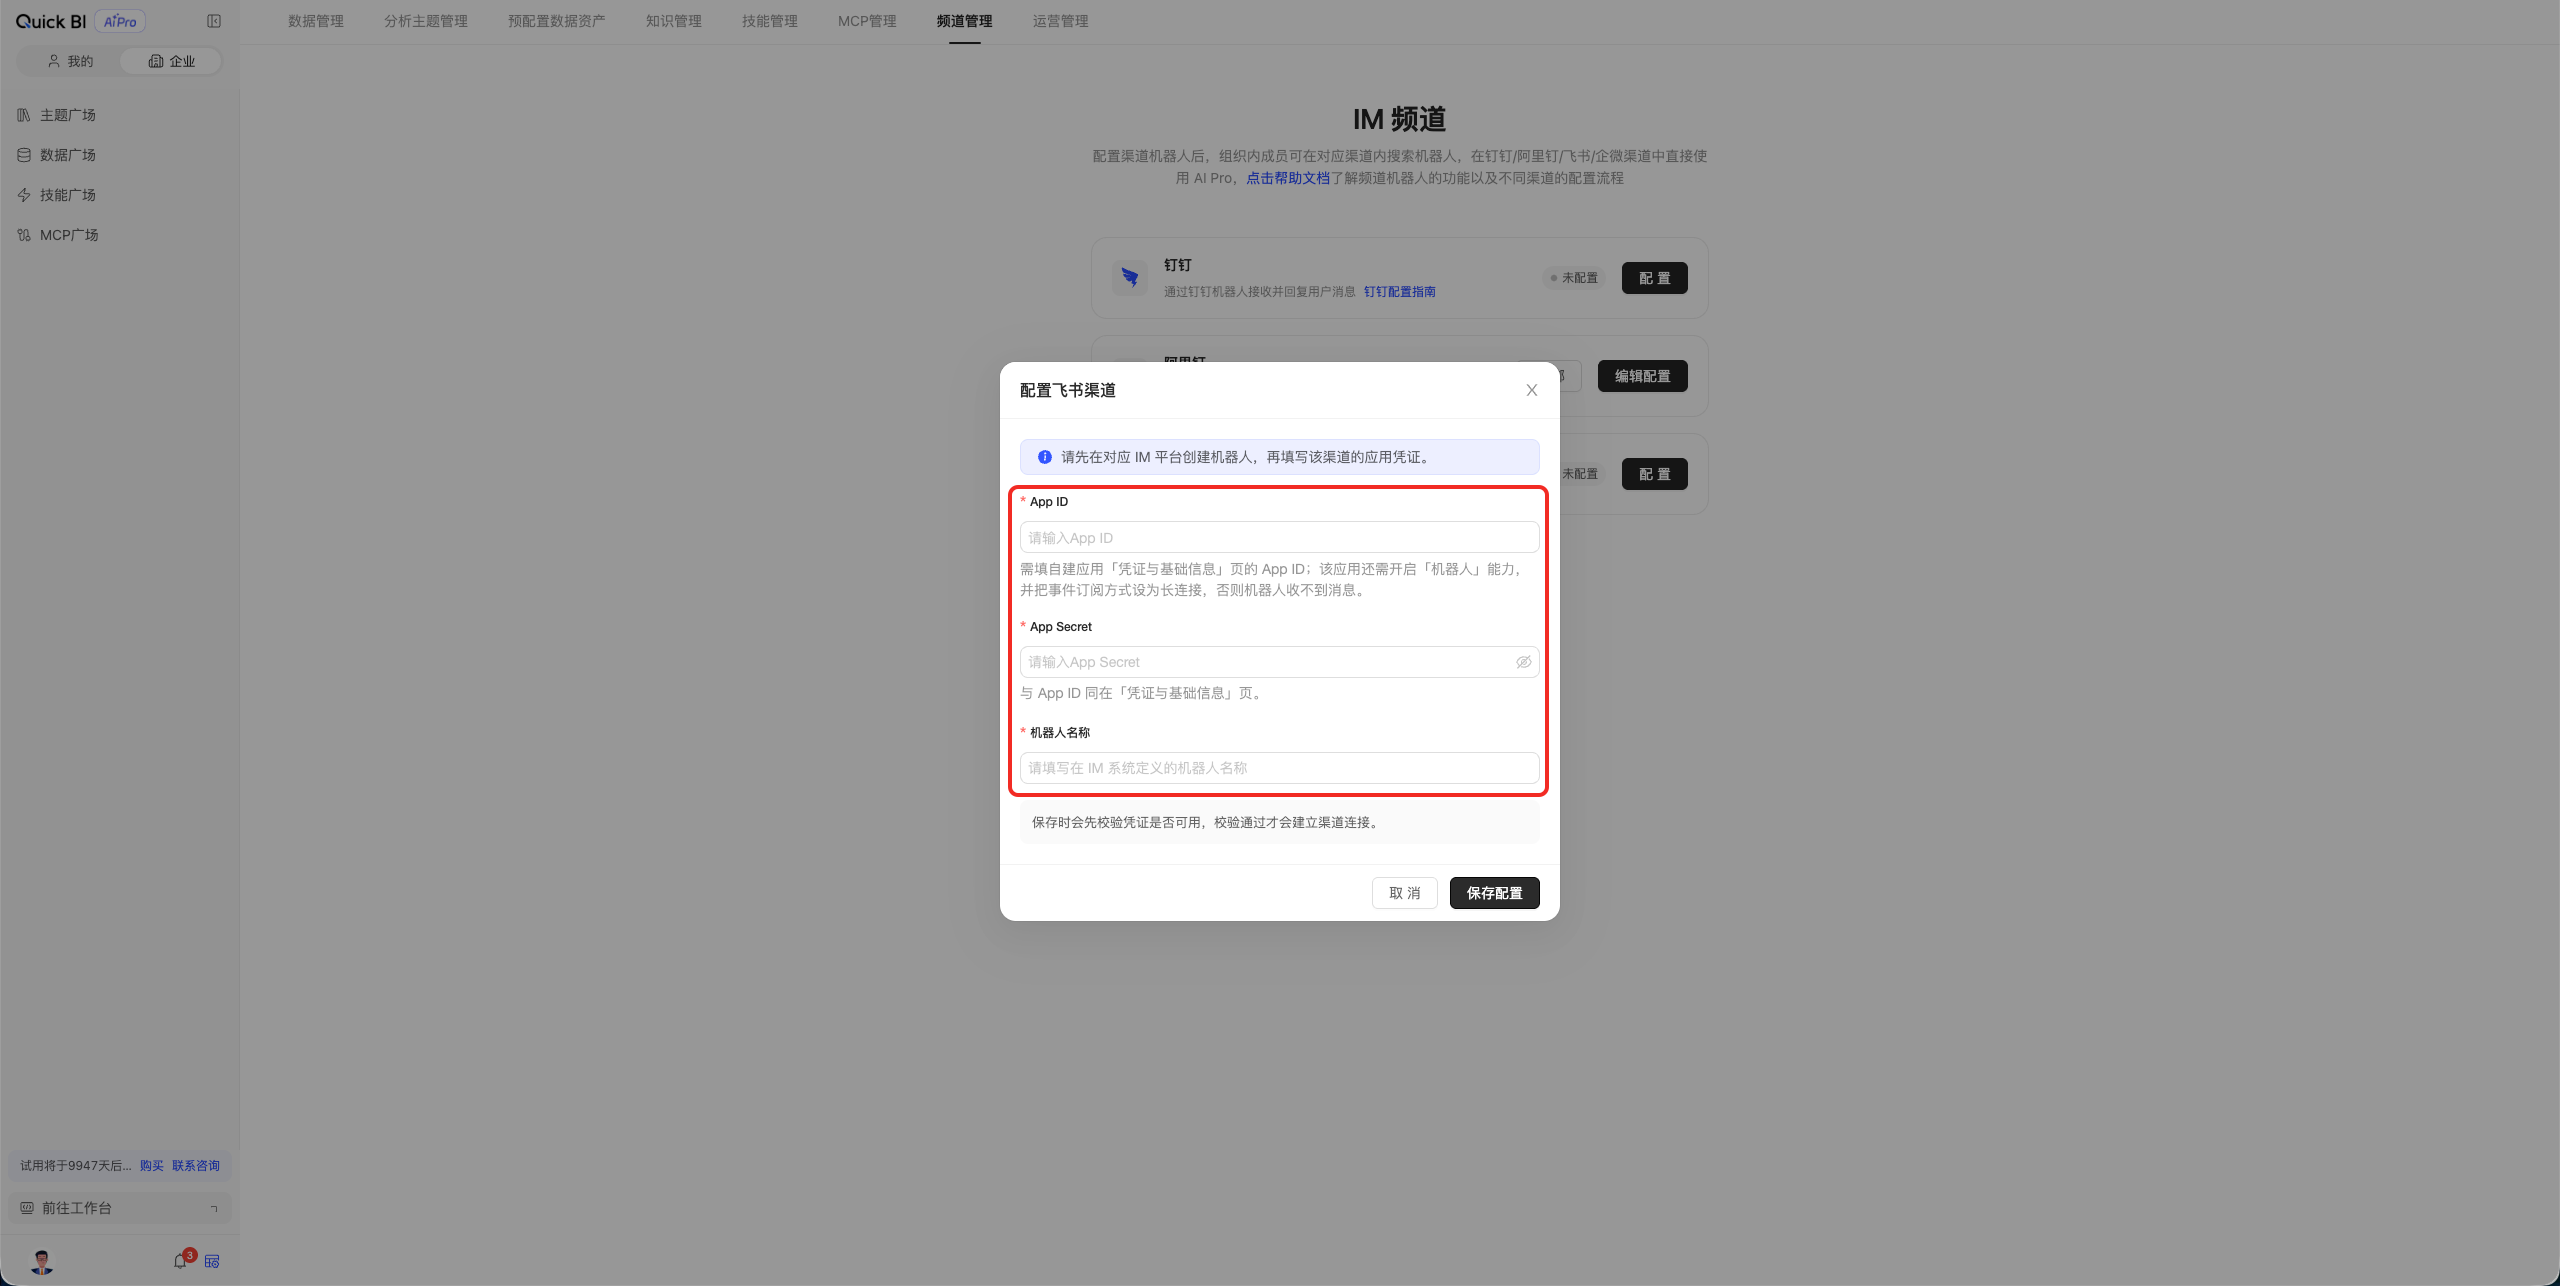
Go to the Quick BI AIPro management center, and click Channel Management at the top.
-
Find the Feishu channel and click it.
-
Enter the App ID and App Secret that you obtained in the previous step.
Configure event subscription
-
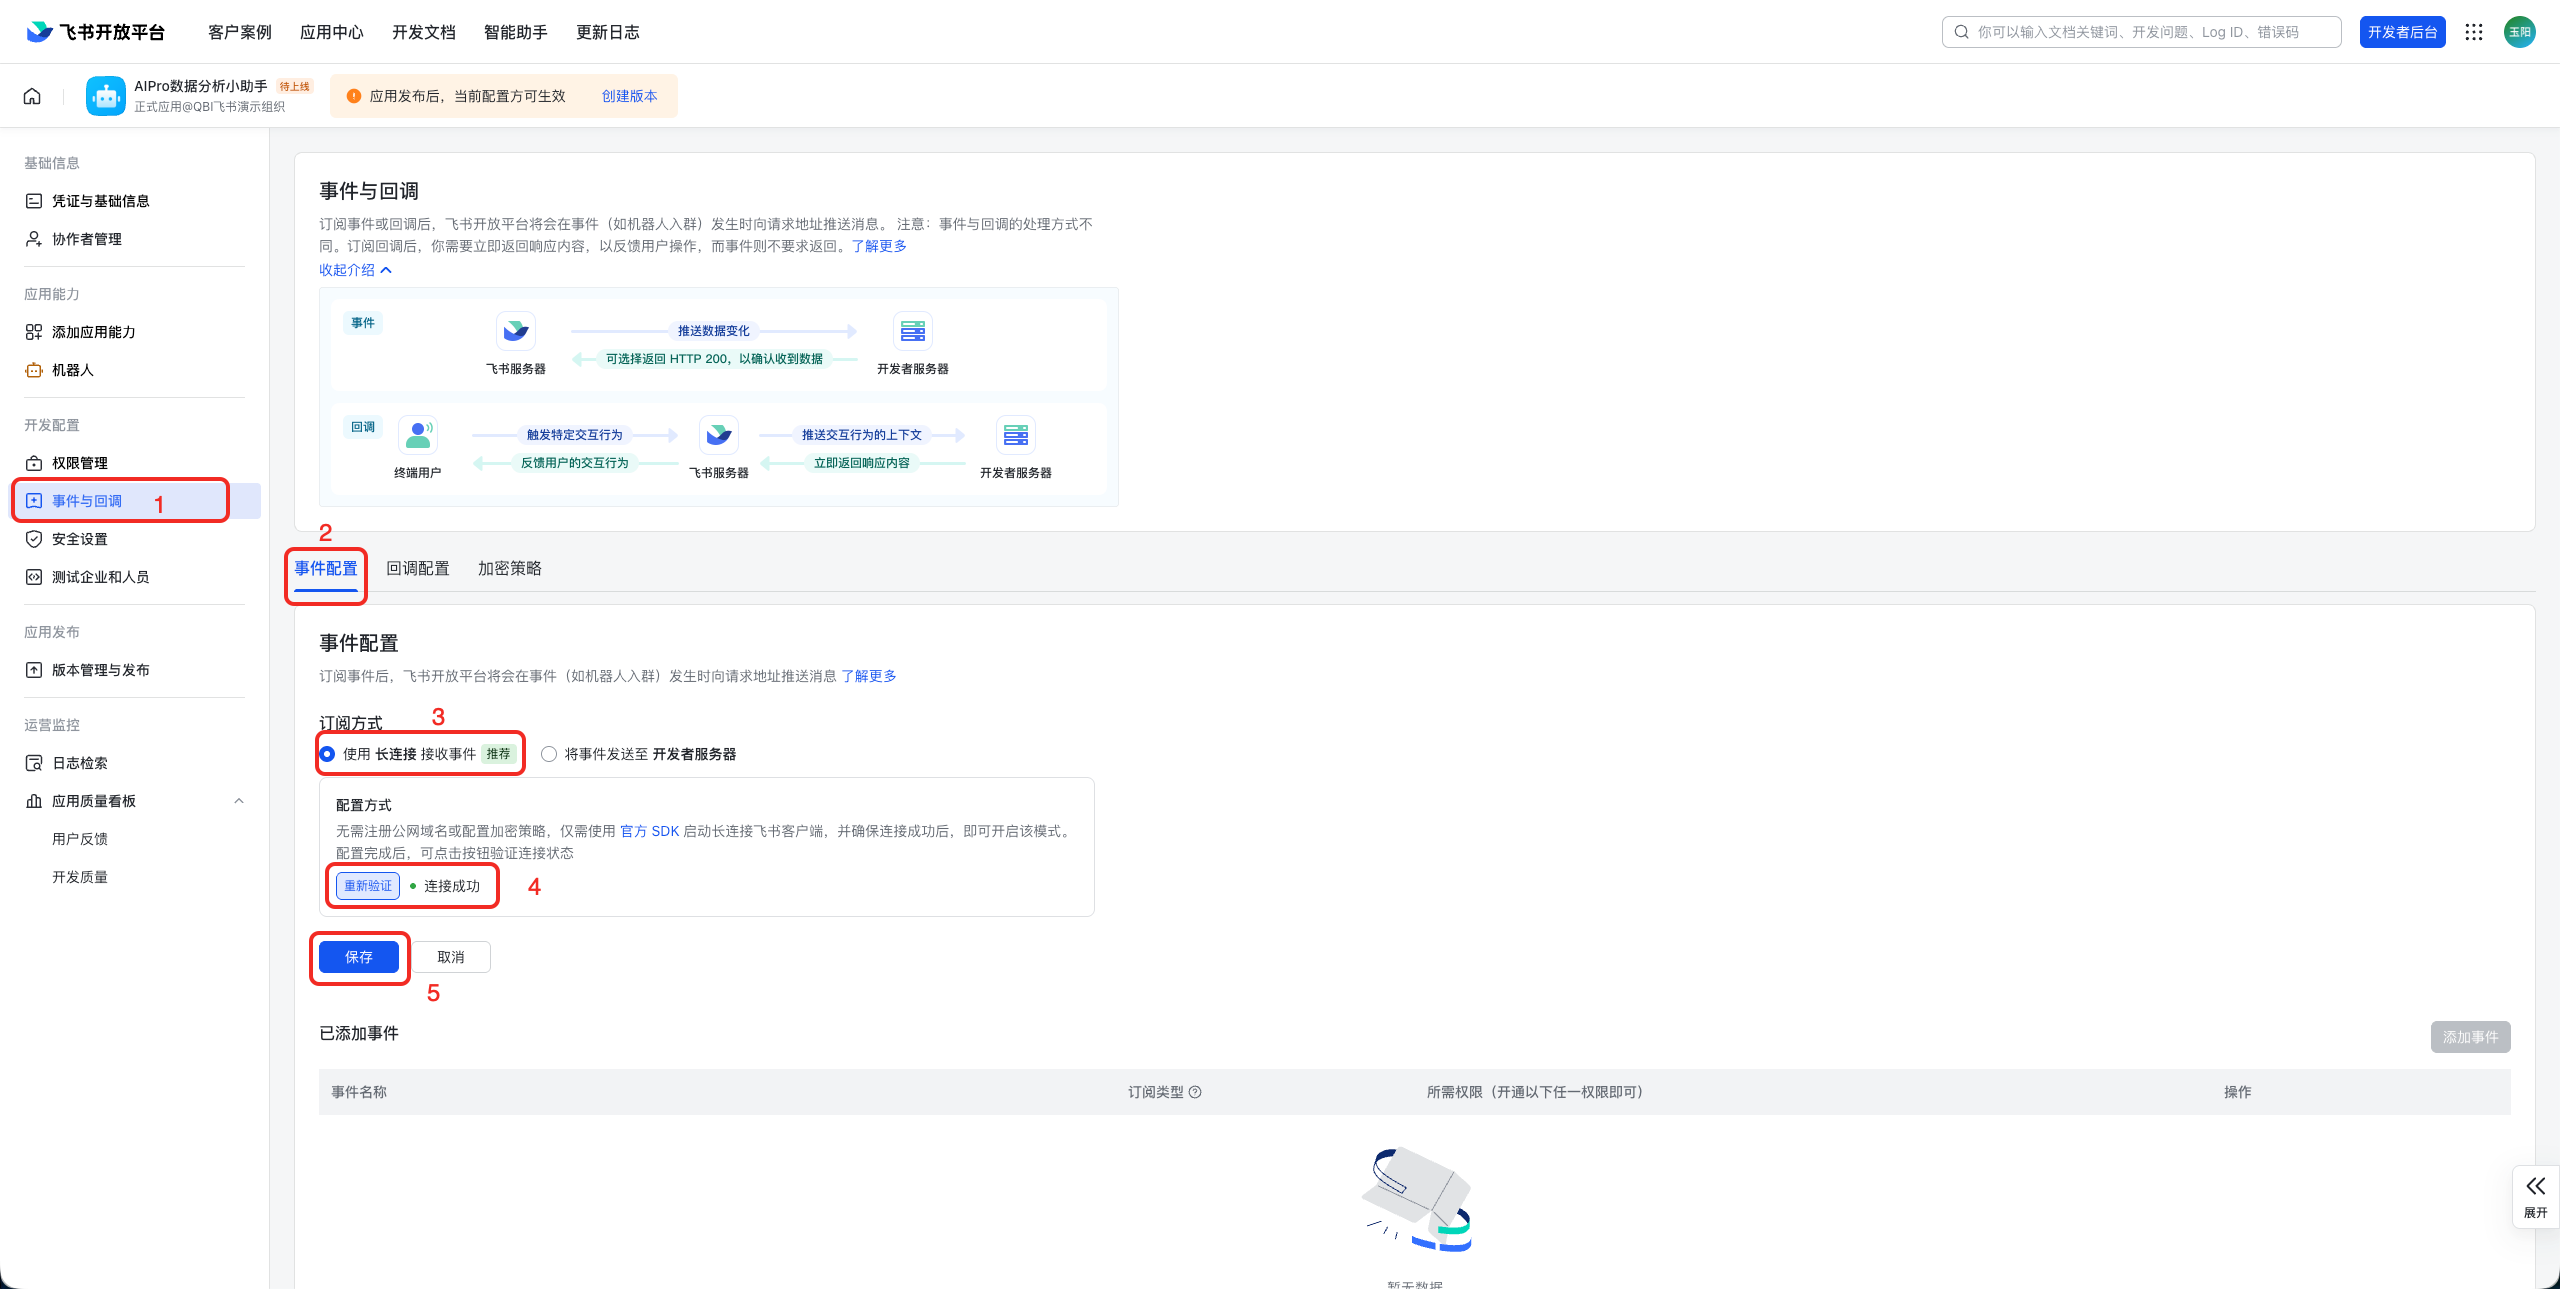
Return to the app details page in the Feishu Developer Console, and in the left navigation pane, click Events & Callbacks.
-
Click Event Configuration and edit the Subscription Method.
-
Select Use WebSocket to receive events and click Verify. After the connection succeeds, click Save.
-
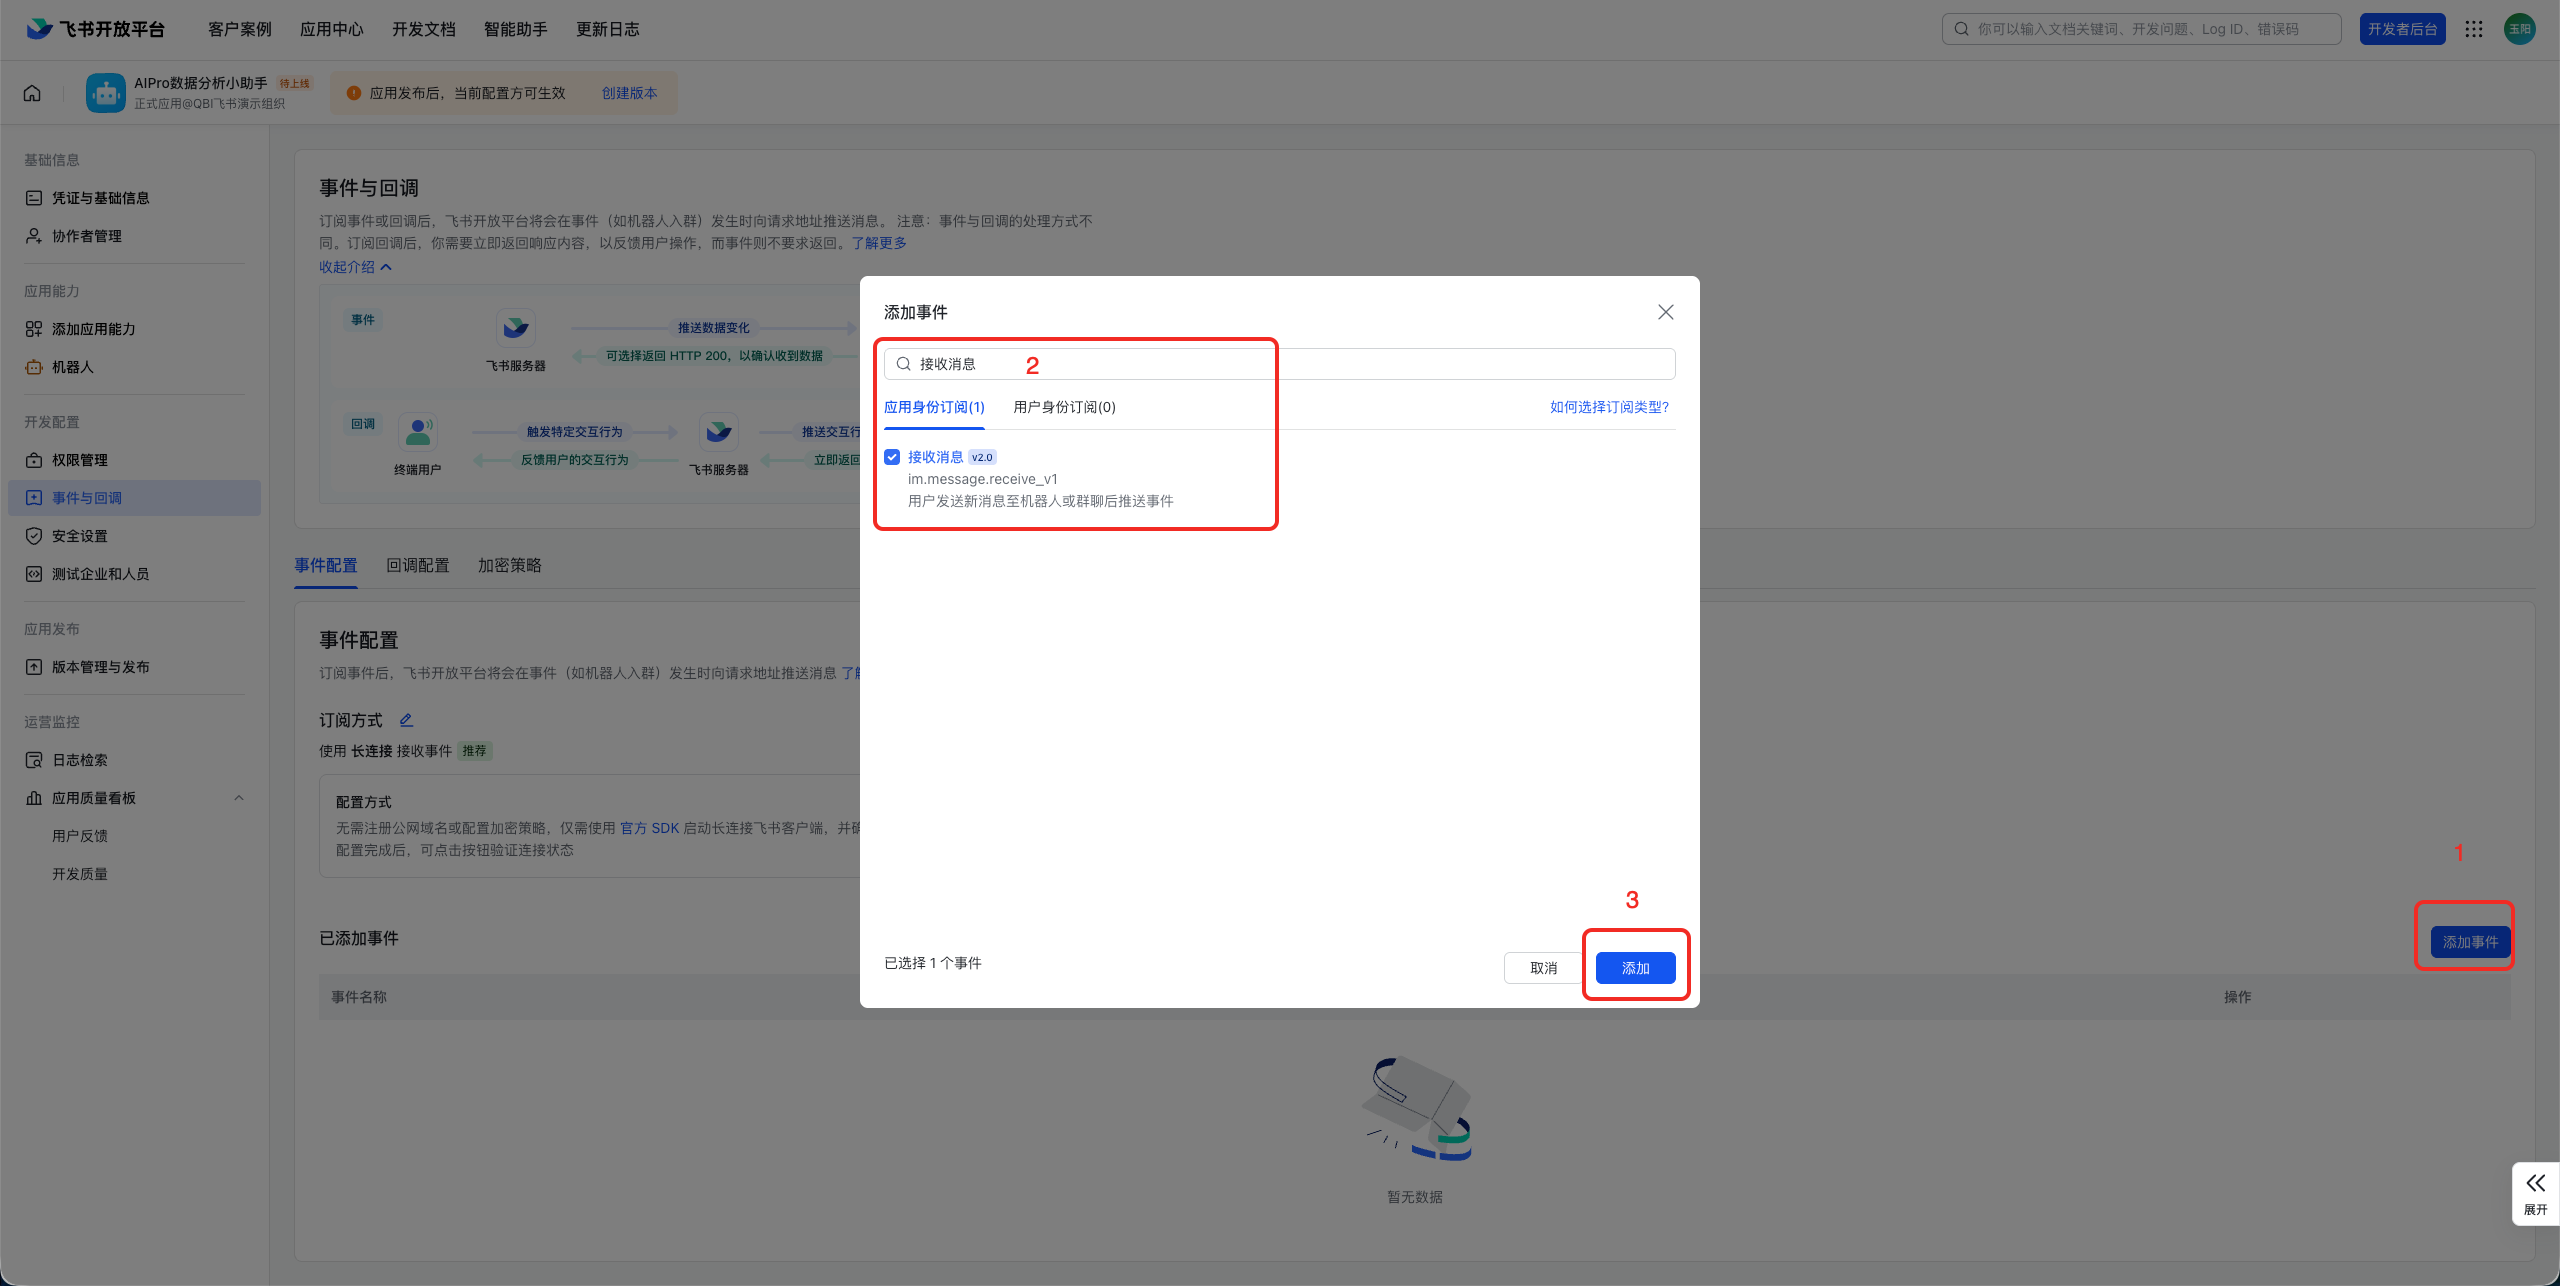
After you save, click Add Event in the lower-left corner. Search for the Receive Message event and add it.
Configure callback settings
-
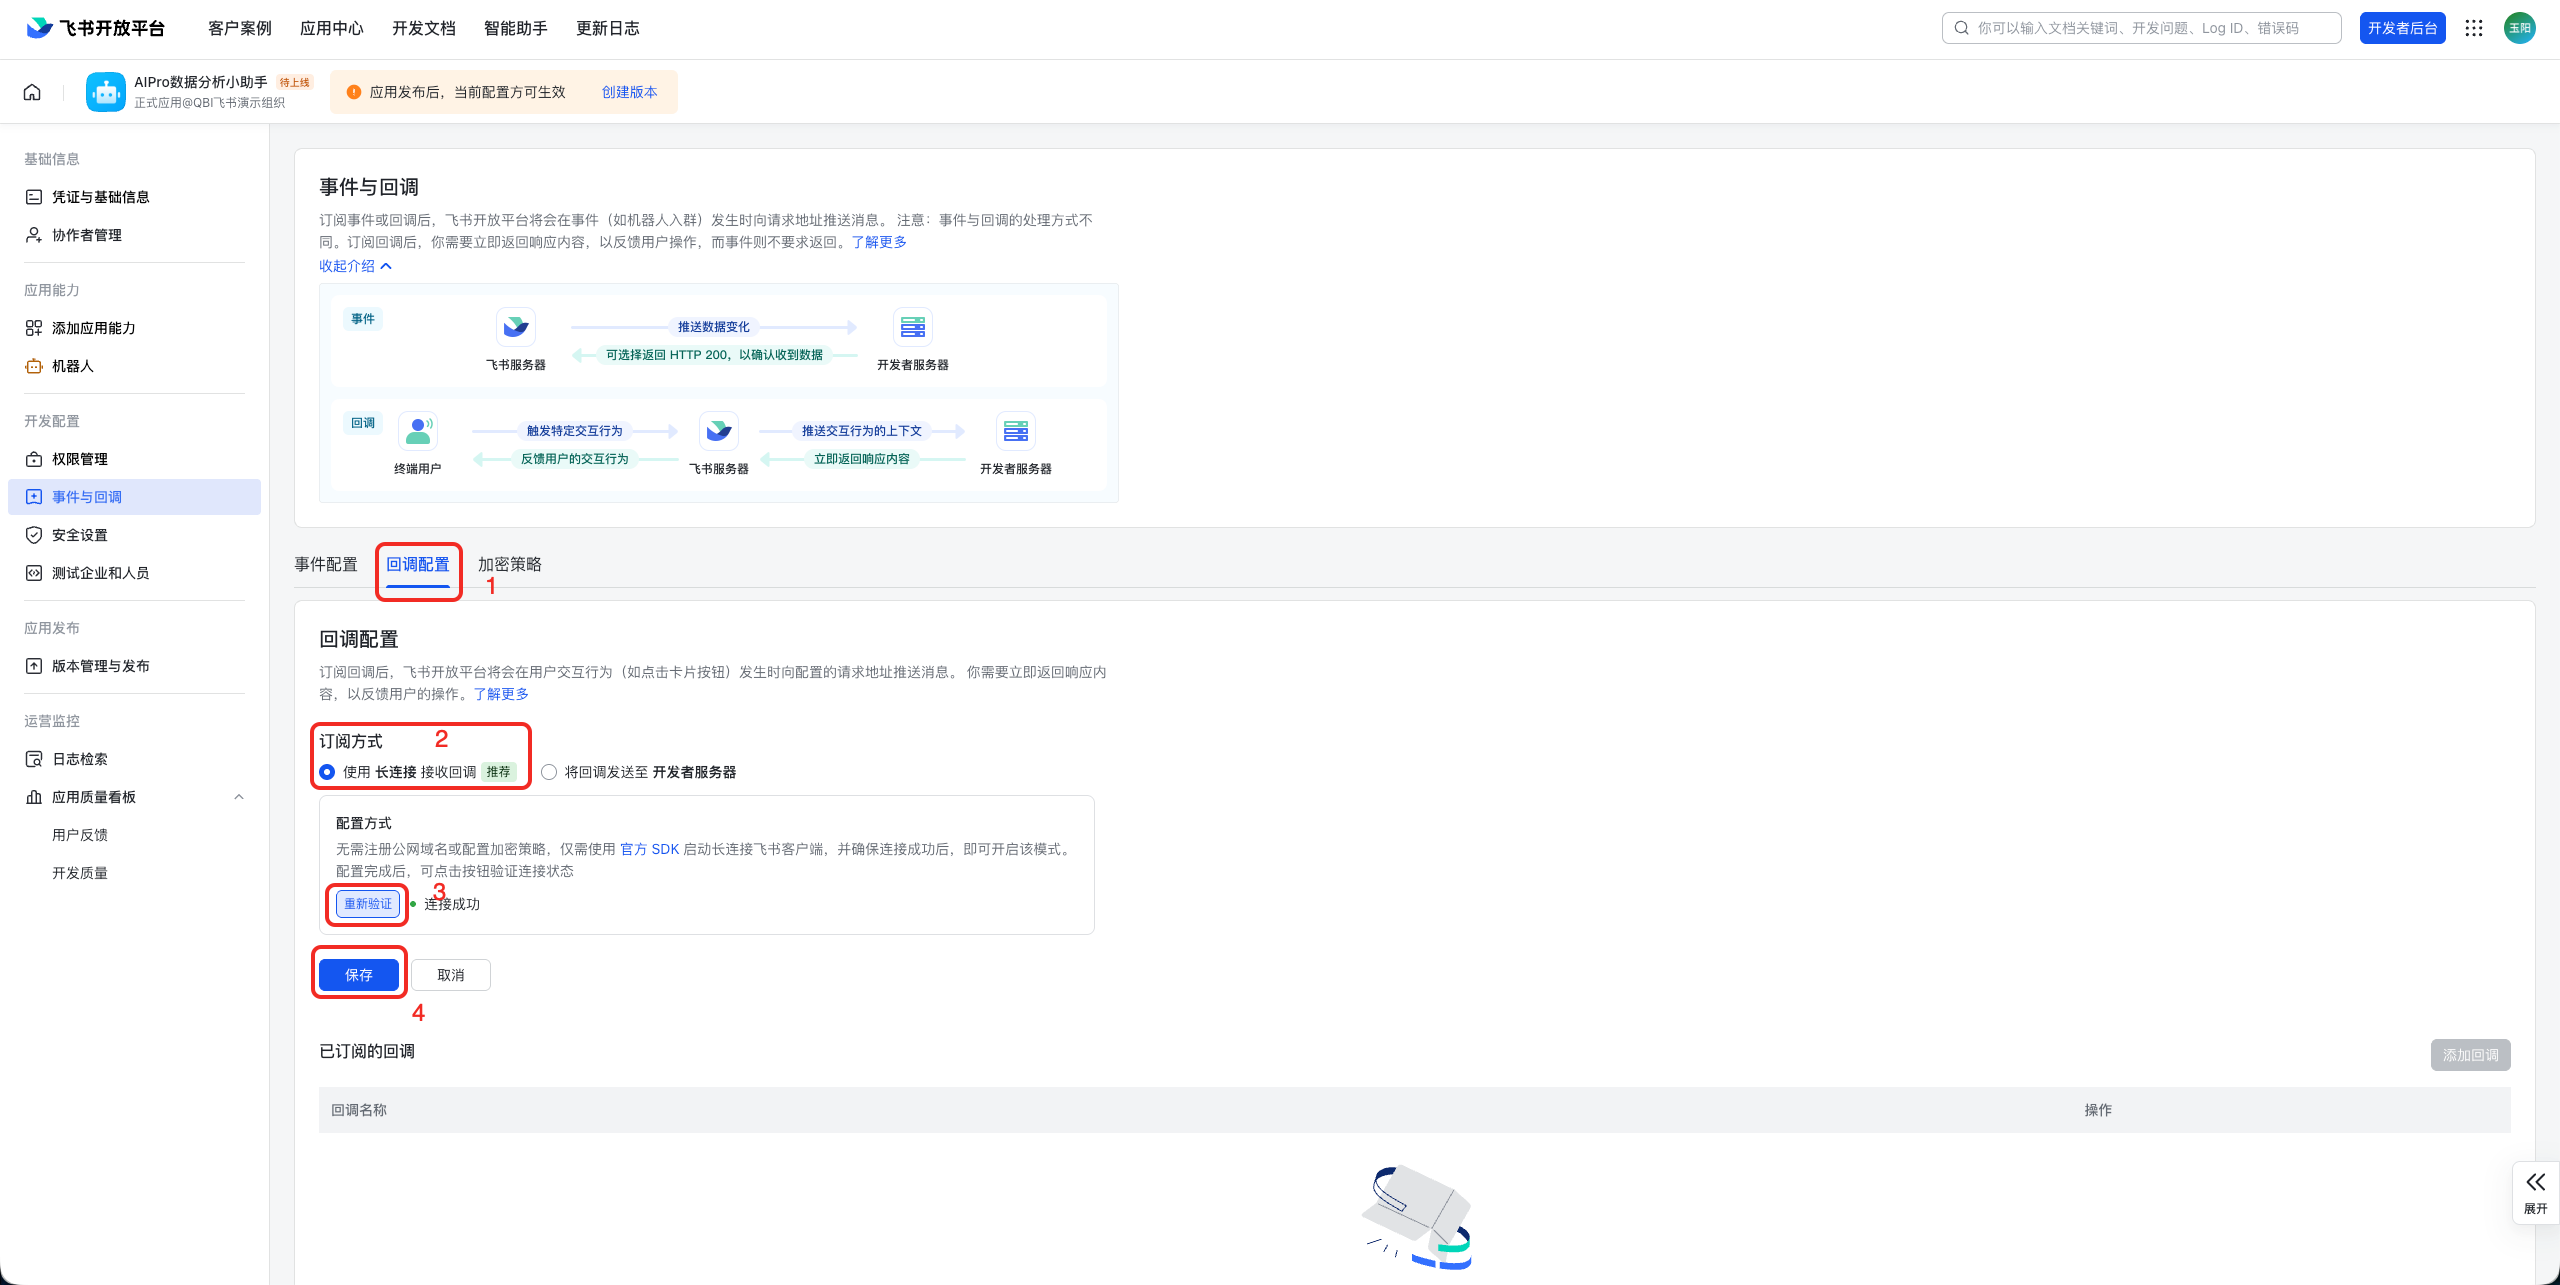
On the Events & Callbacks page, click Callback Configuration and edit the subscription method.
-
Select Use WebSocket to receive callbacks and click Verify Link. After the connection succeeds, click Save.
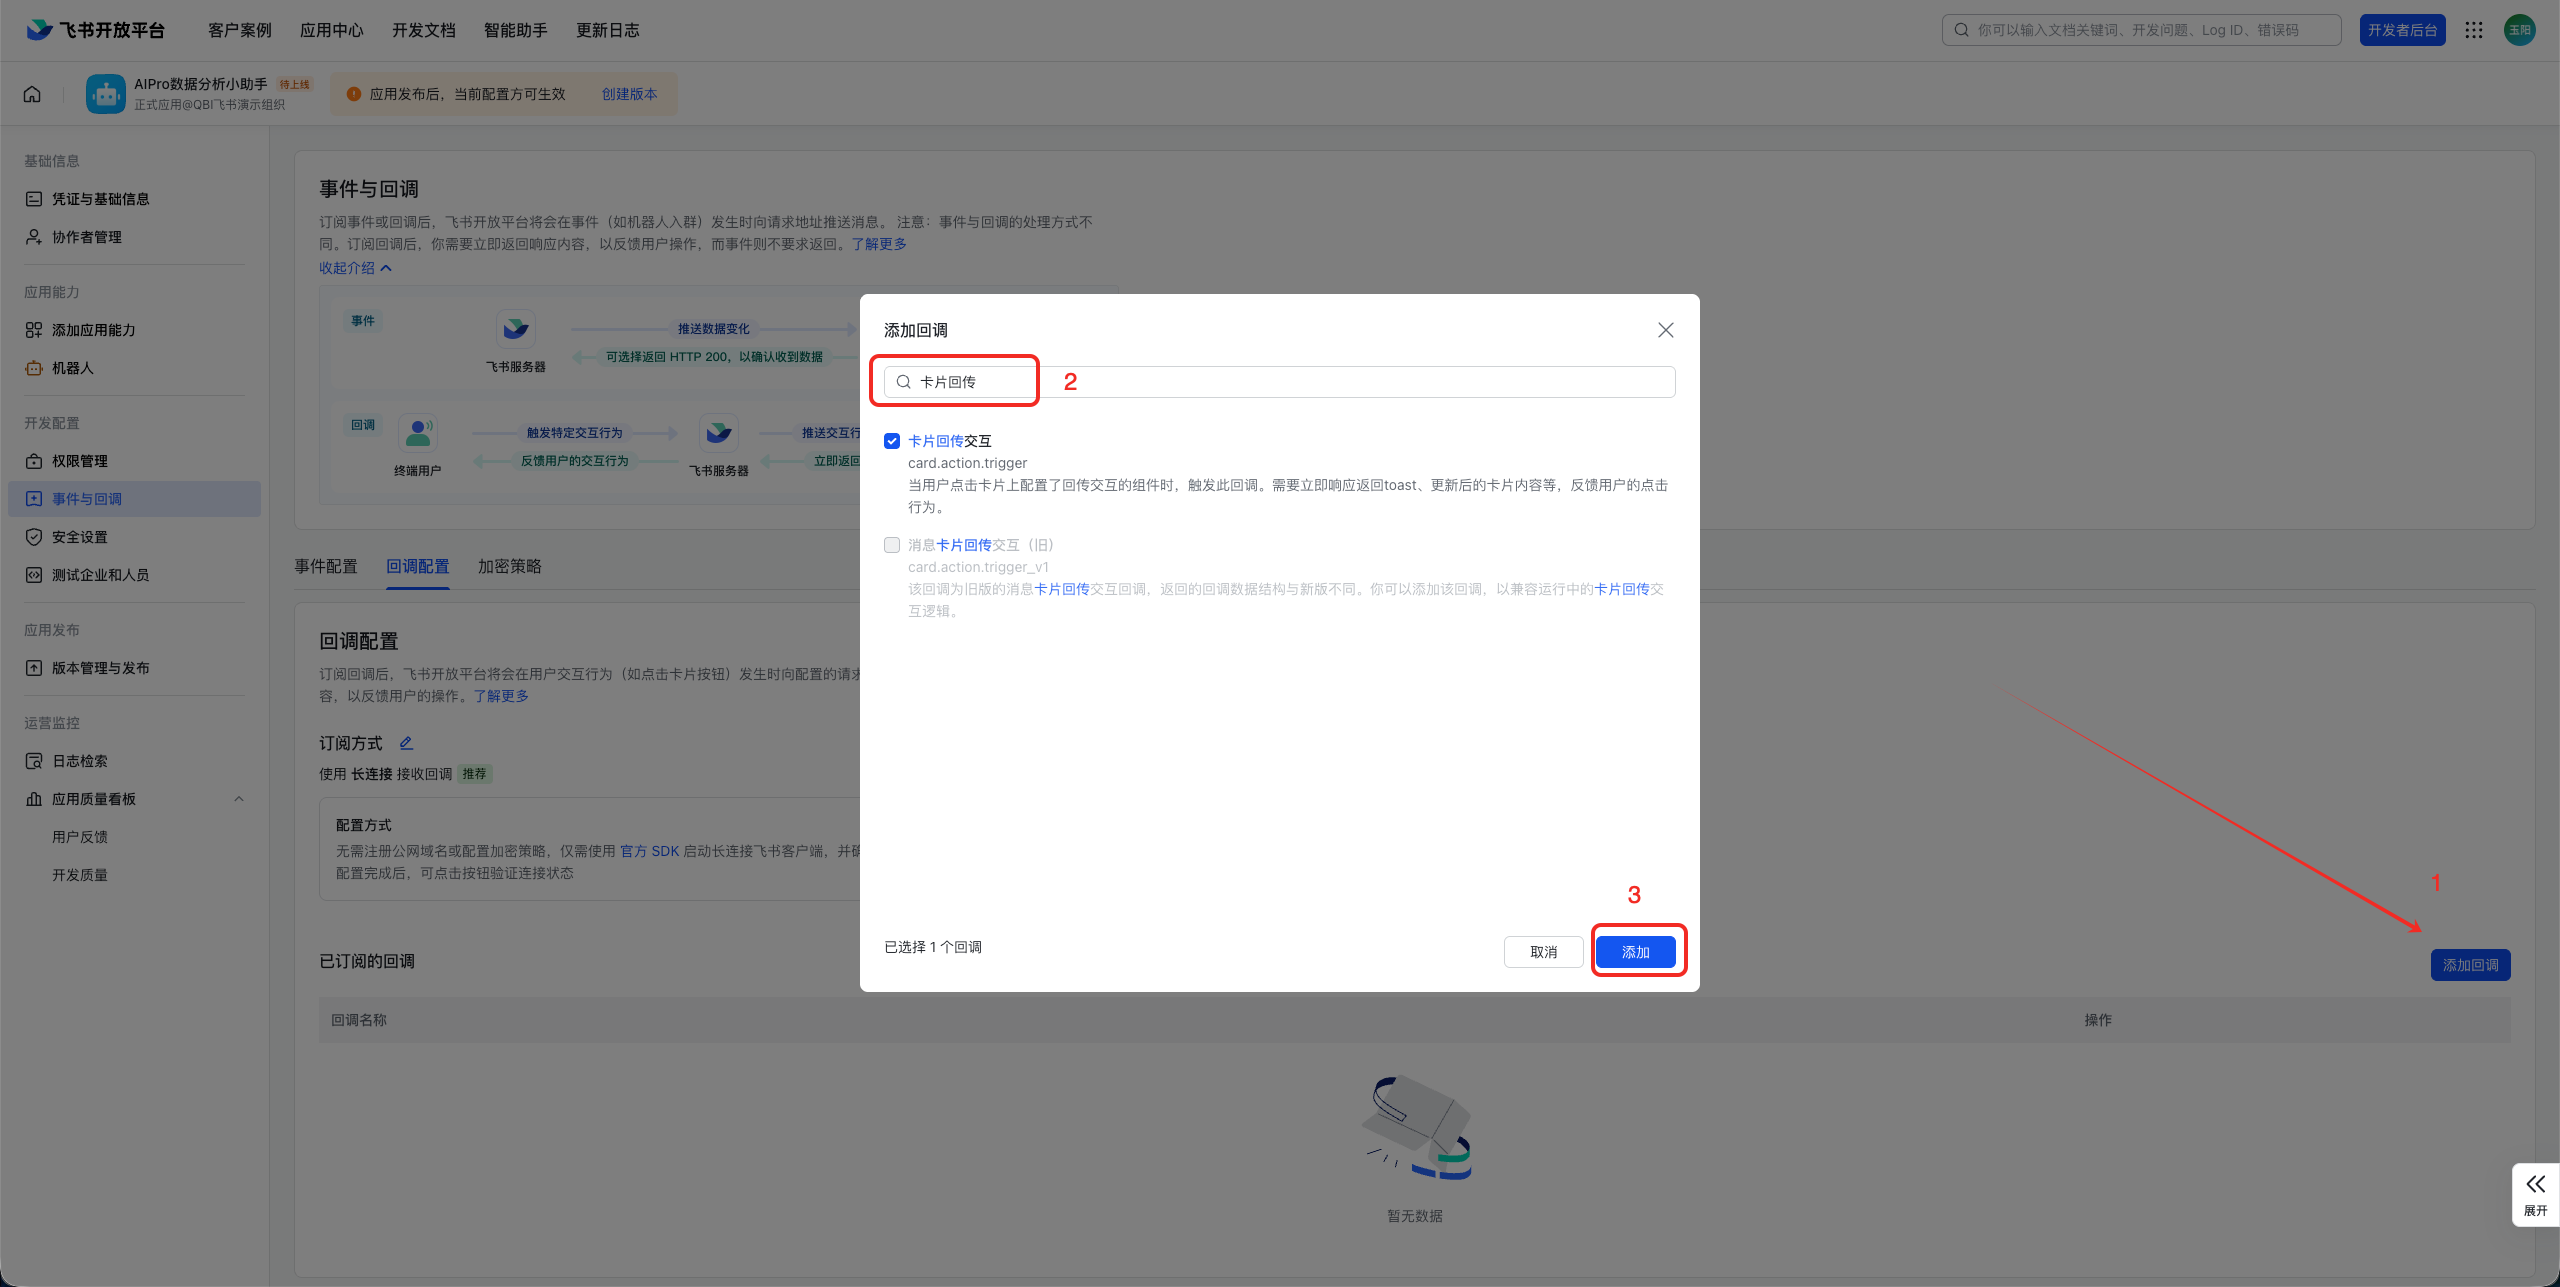
-
After you save, click Add Callback. In the configuration panel that appears, search for card callback and click Add.
Release app
You must release the app before the bot can be used.
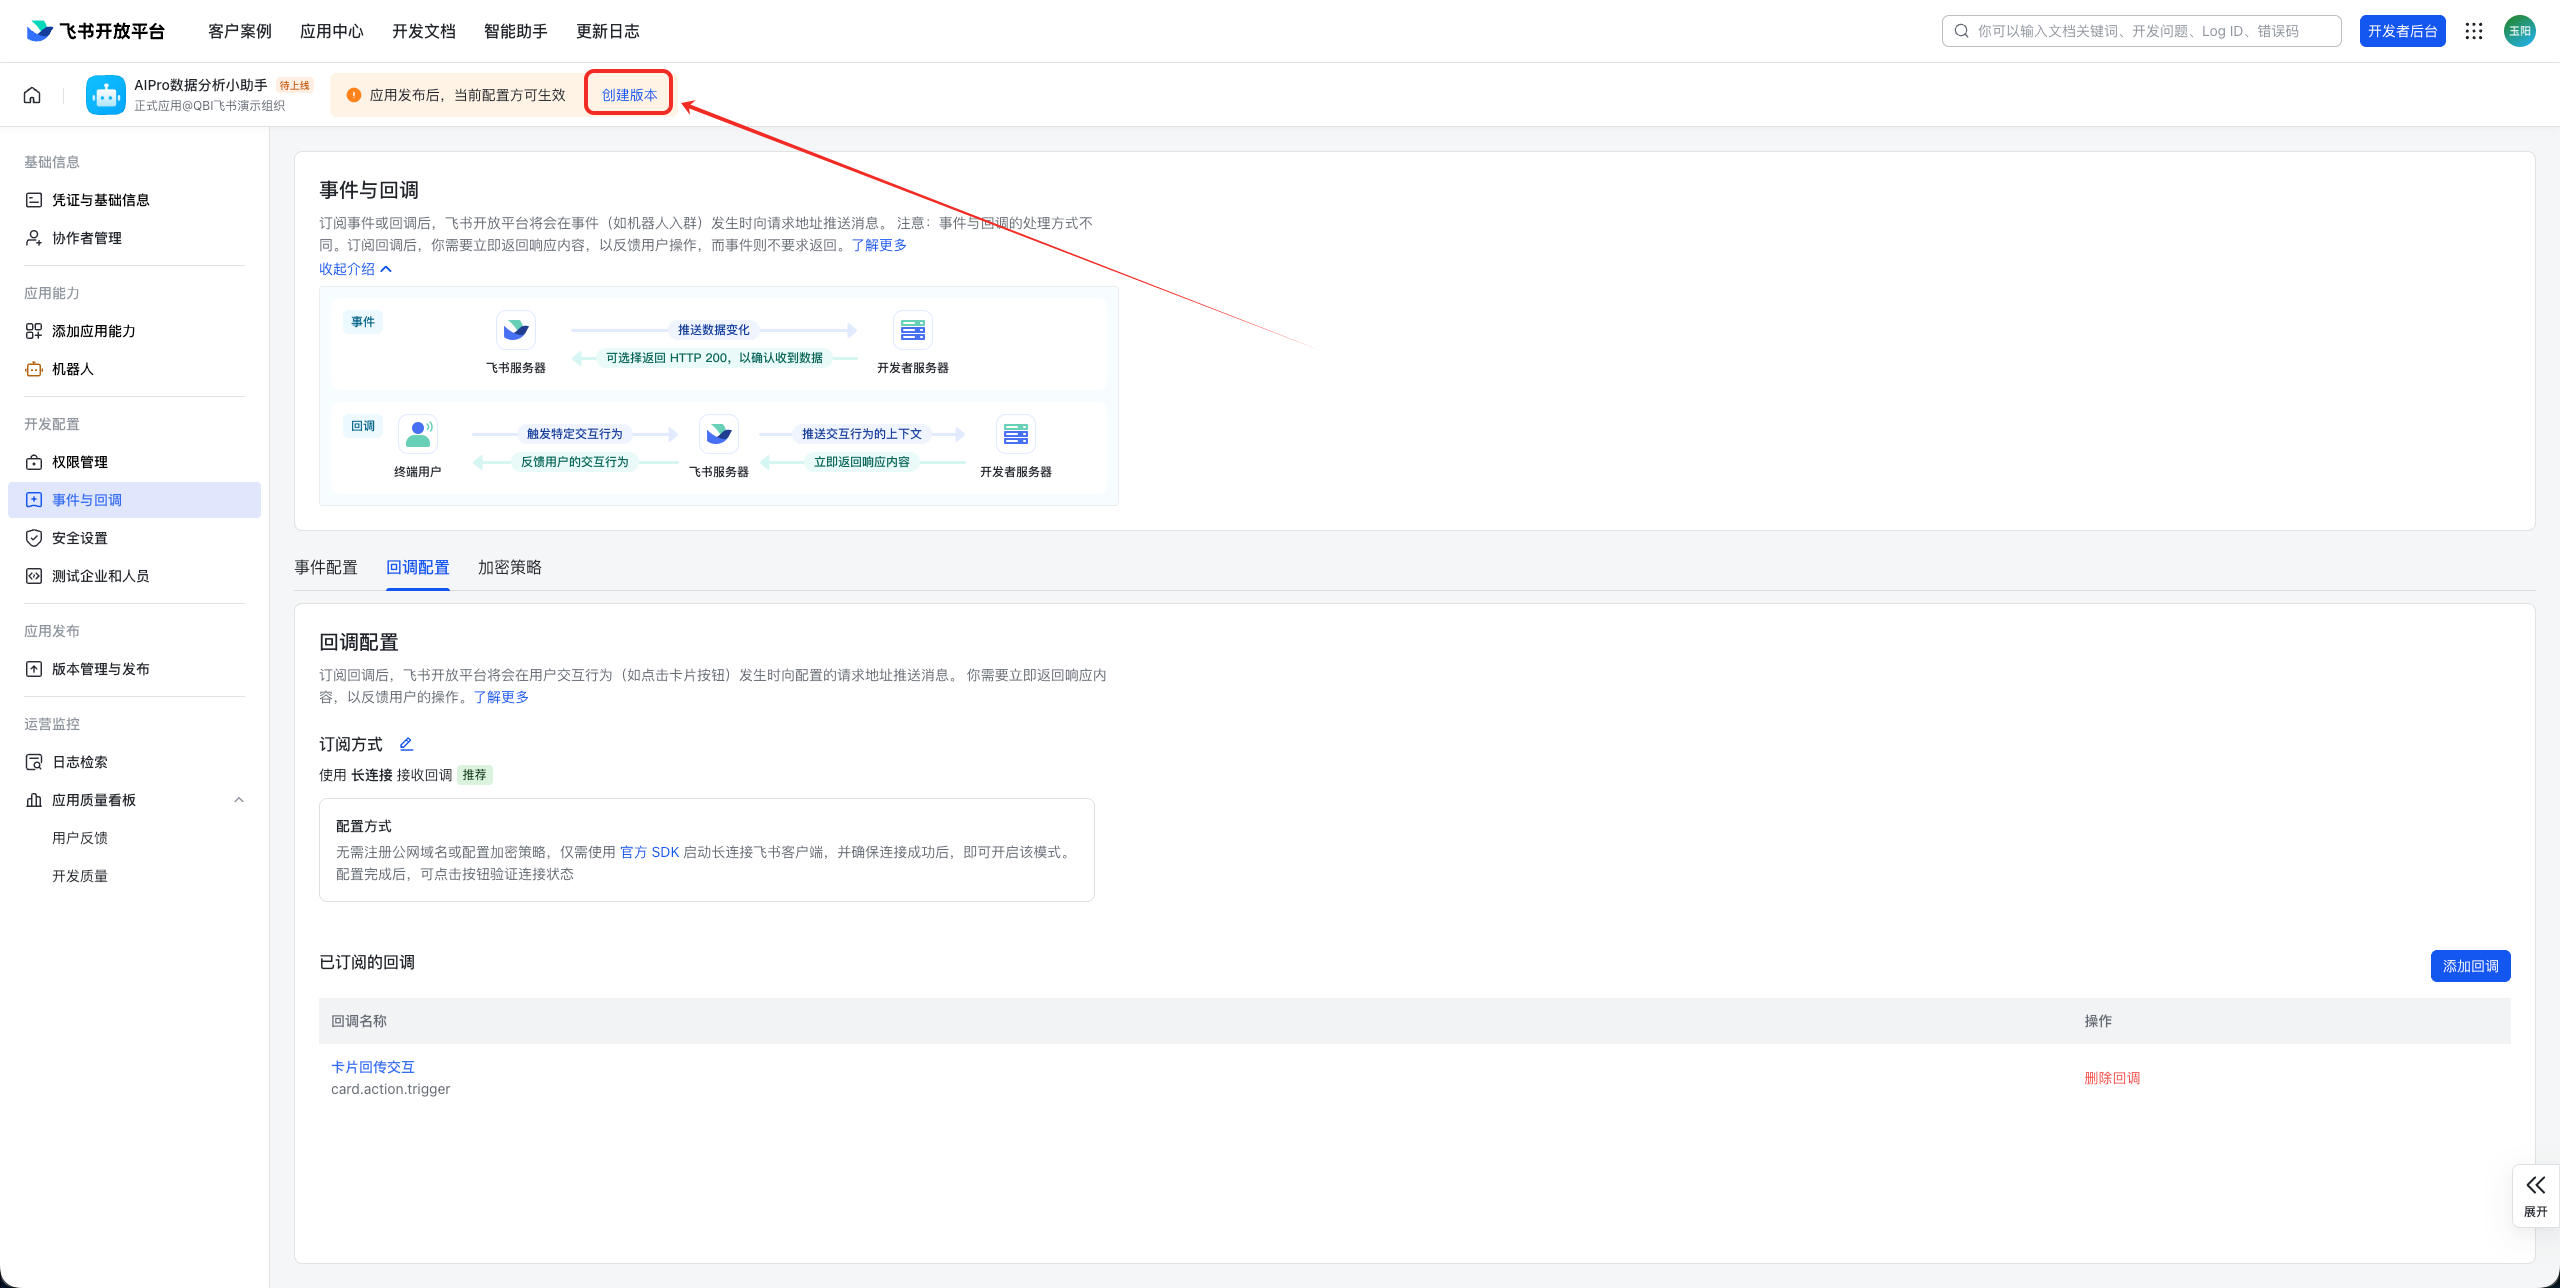
-
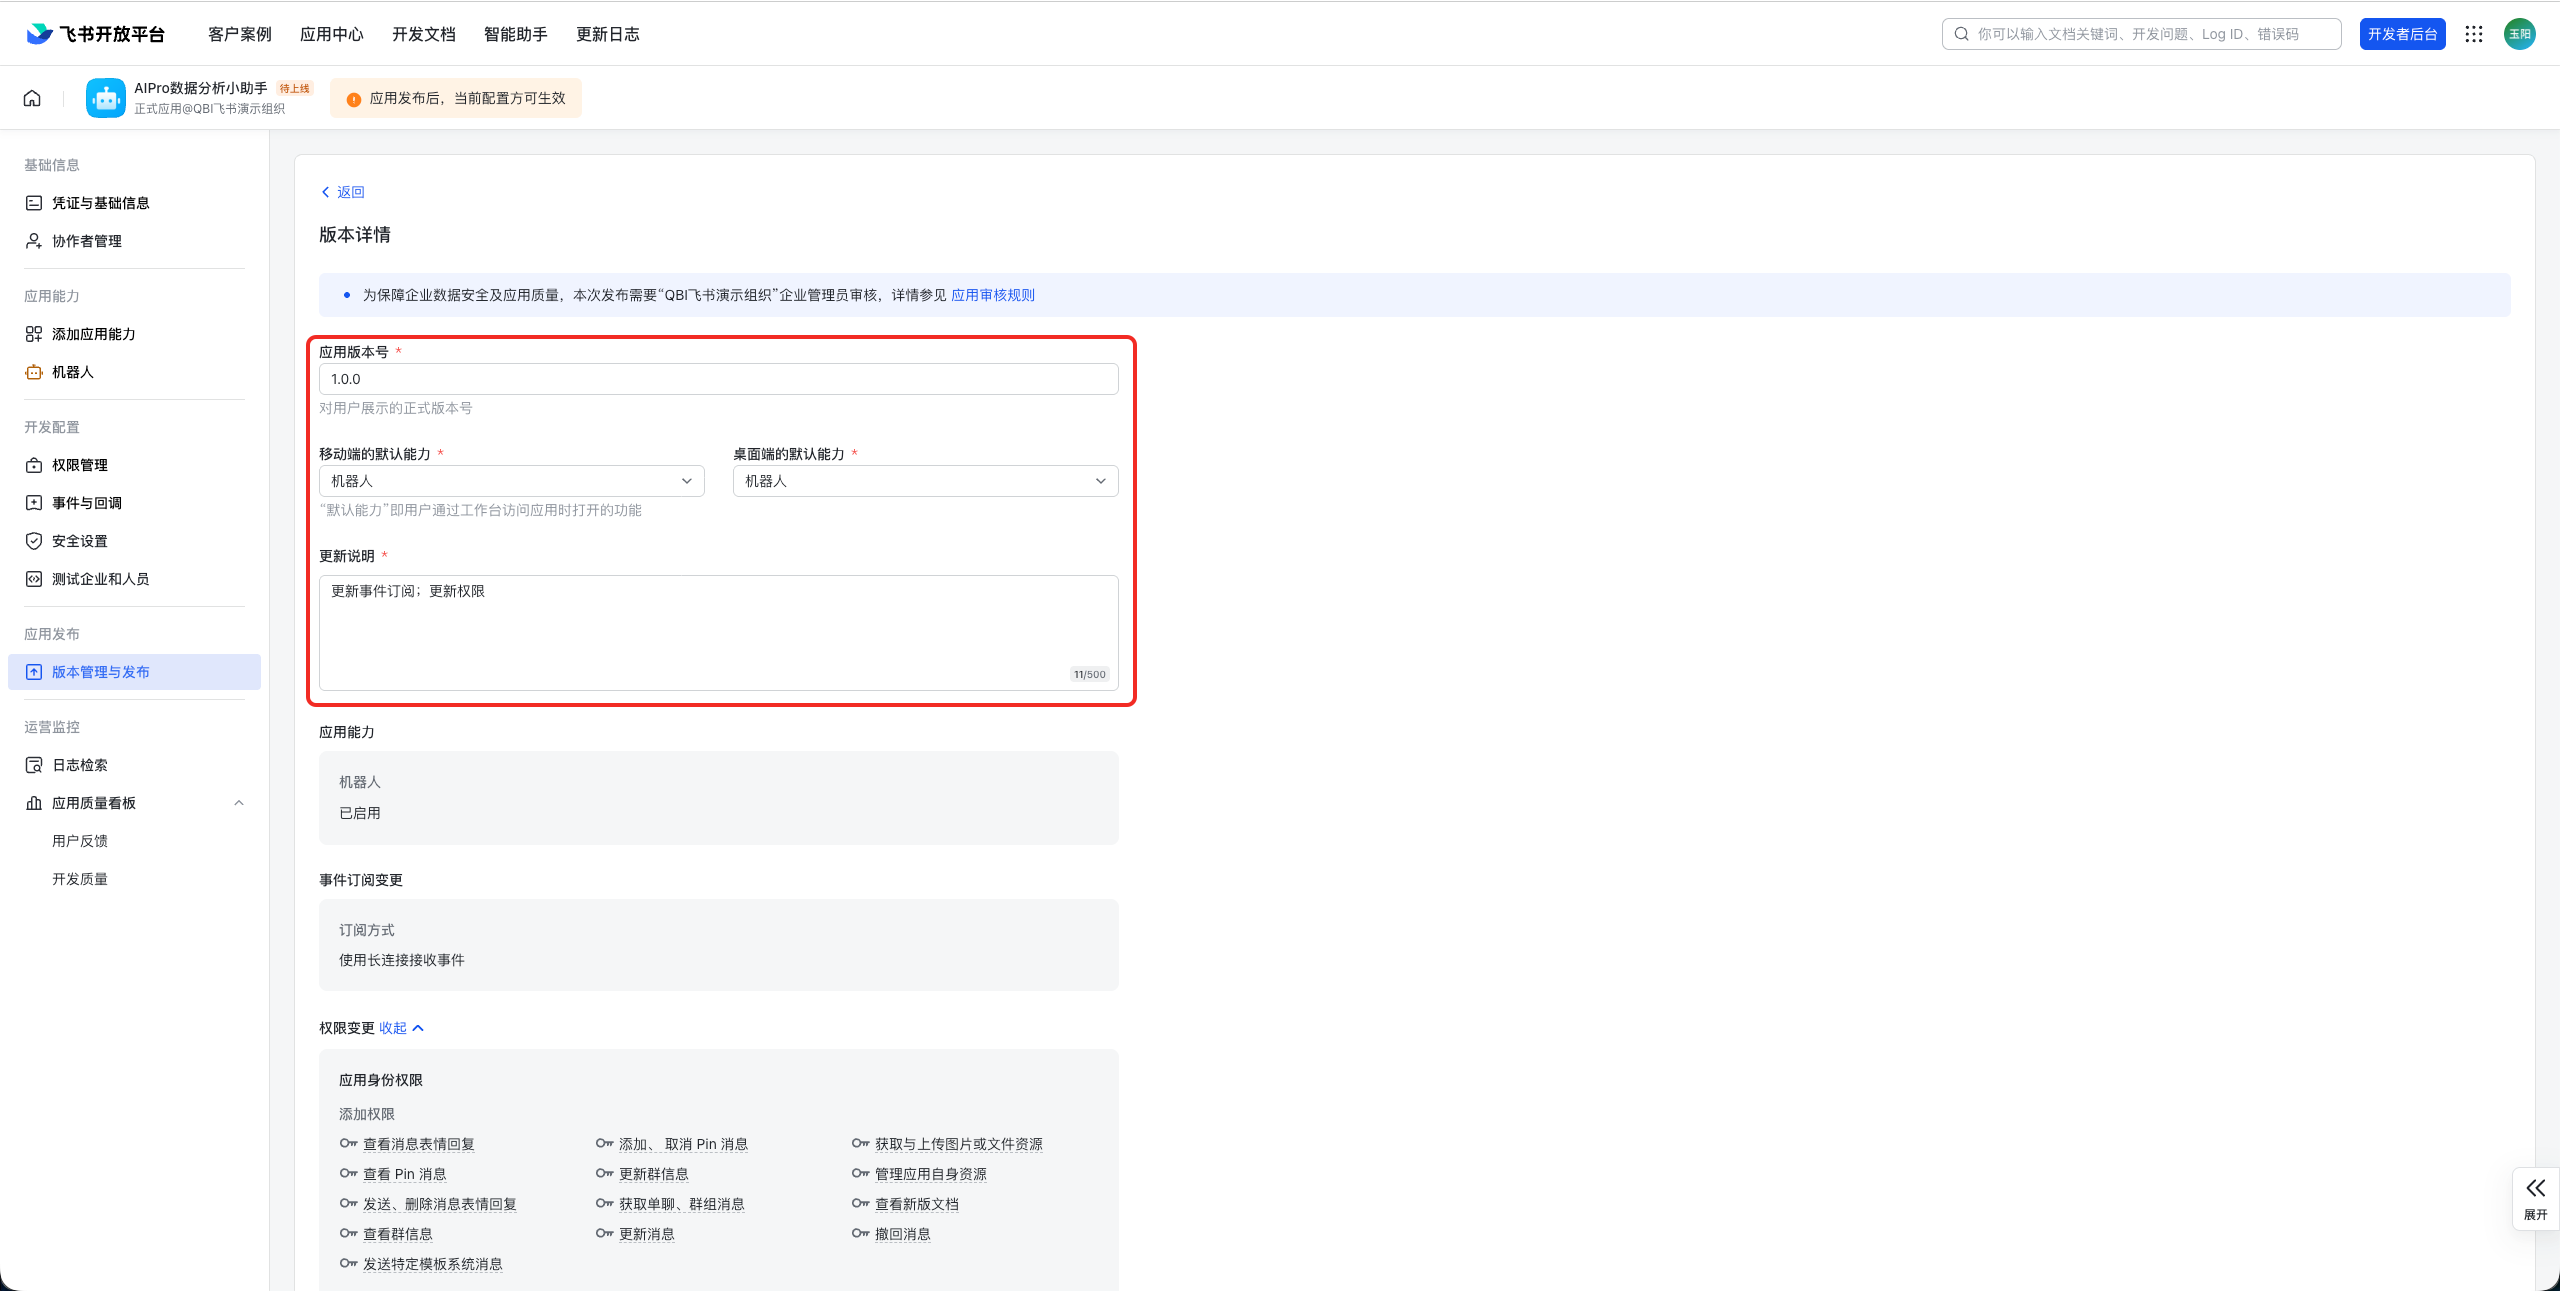
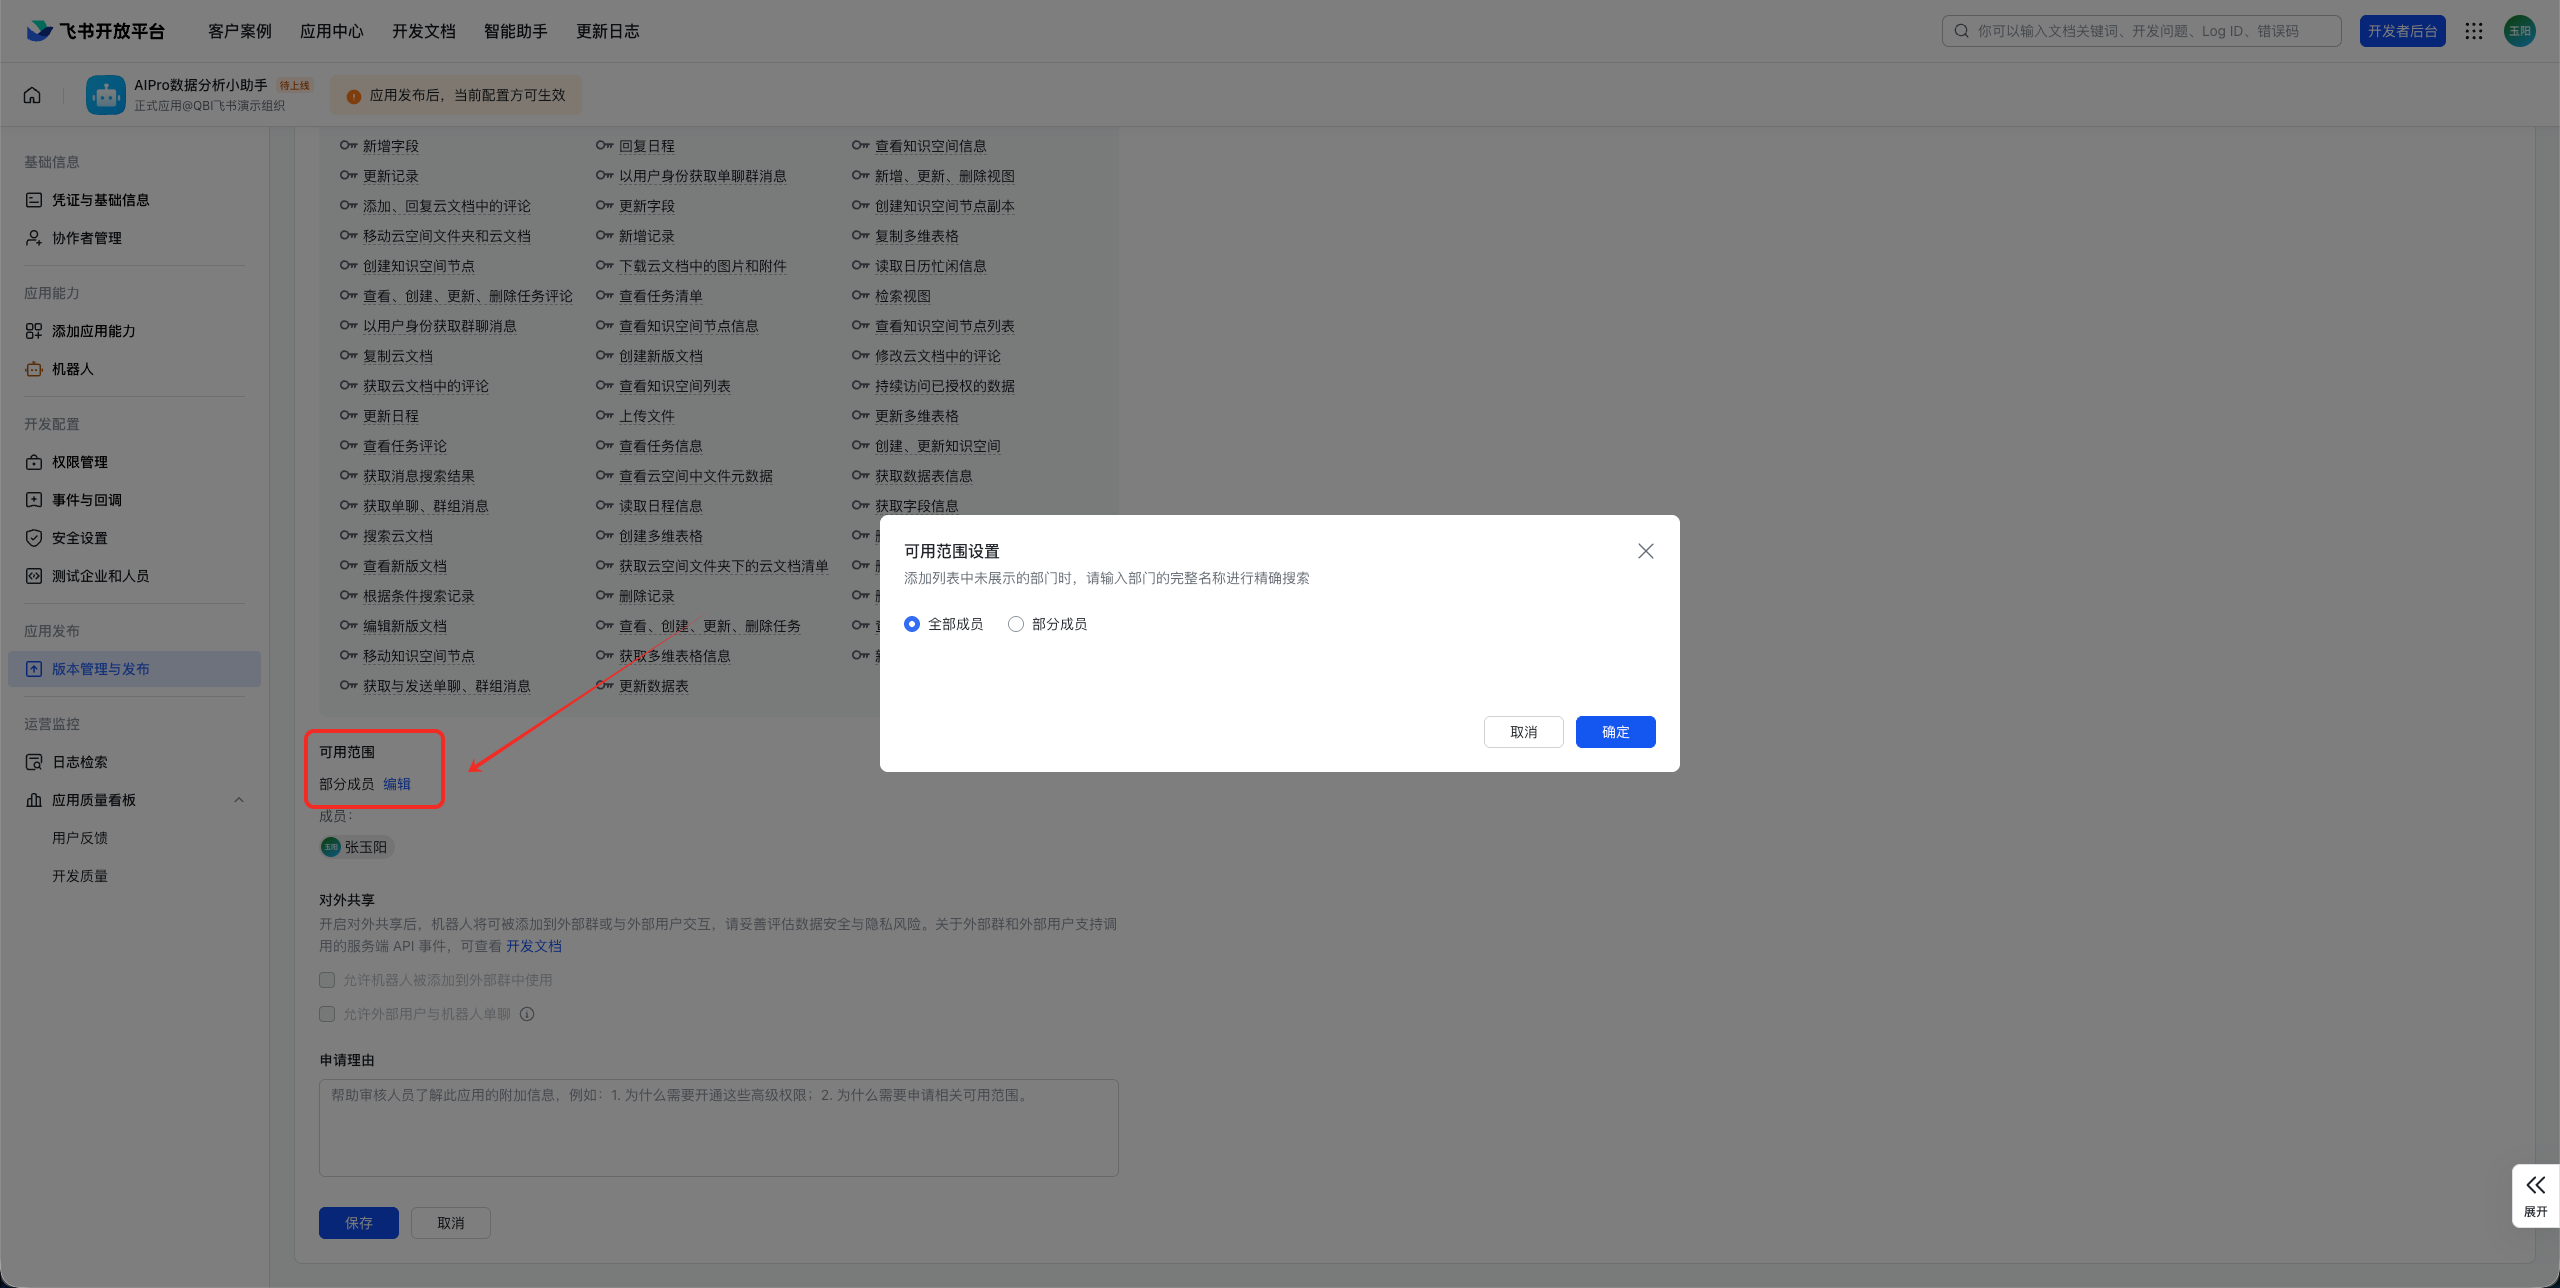
At the top of the app details page, click Create Version and enter the version number and update notes.
-
Set Availability to All Members.
-
Click Save, and in the dialog box, click Apply for Online Release.
-
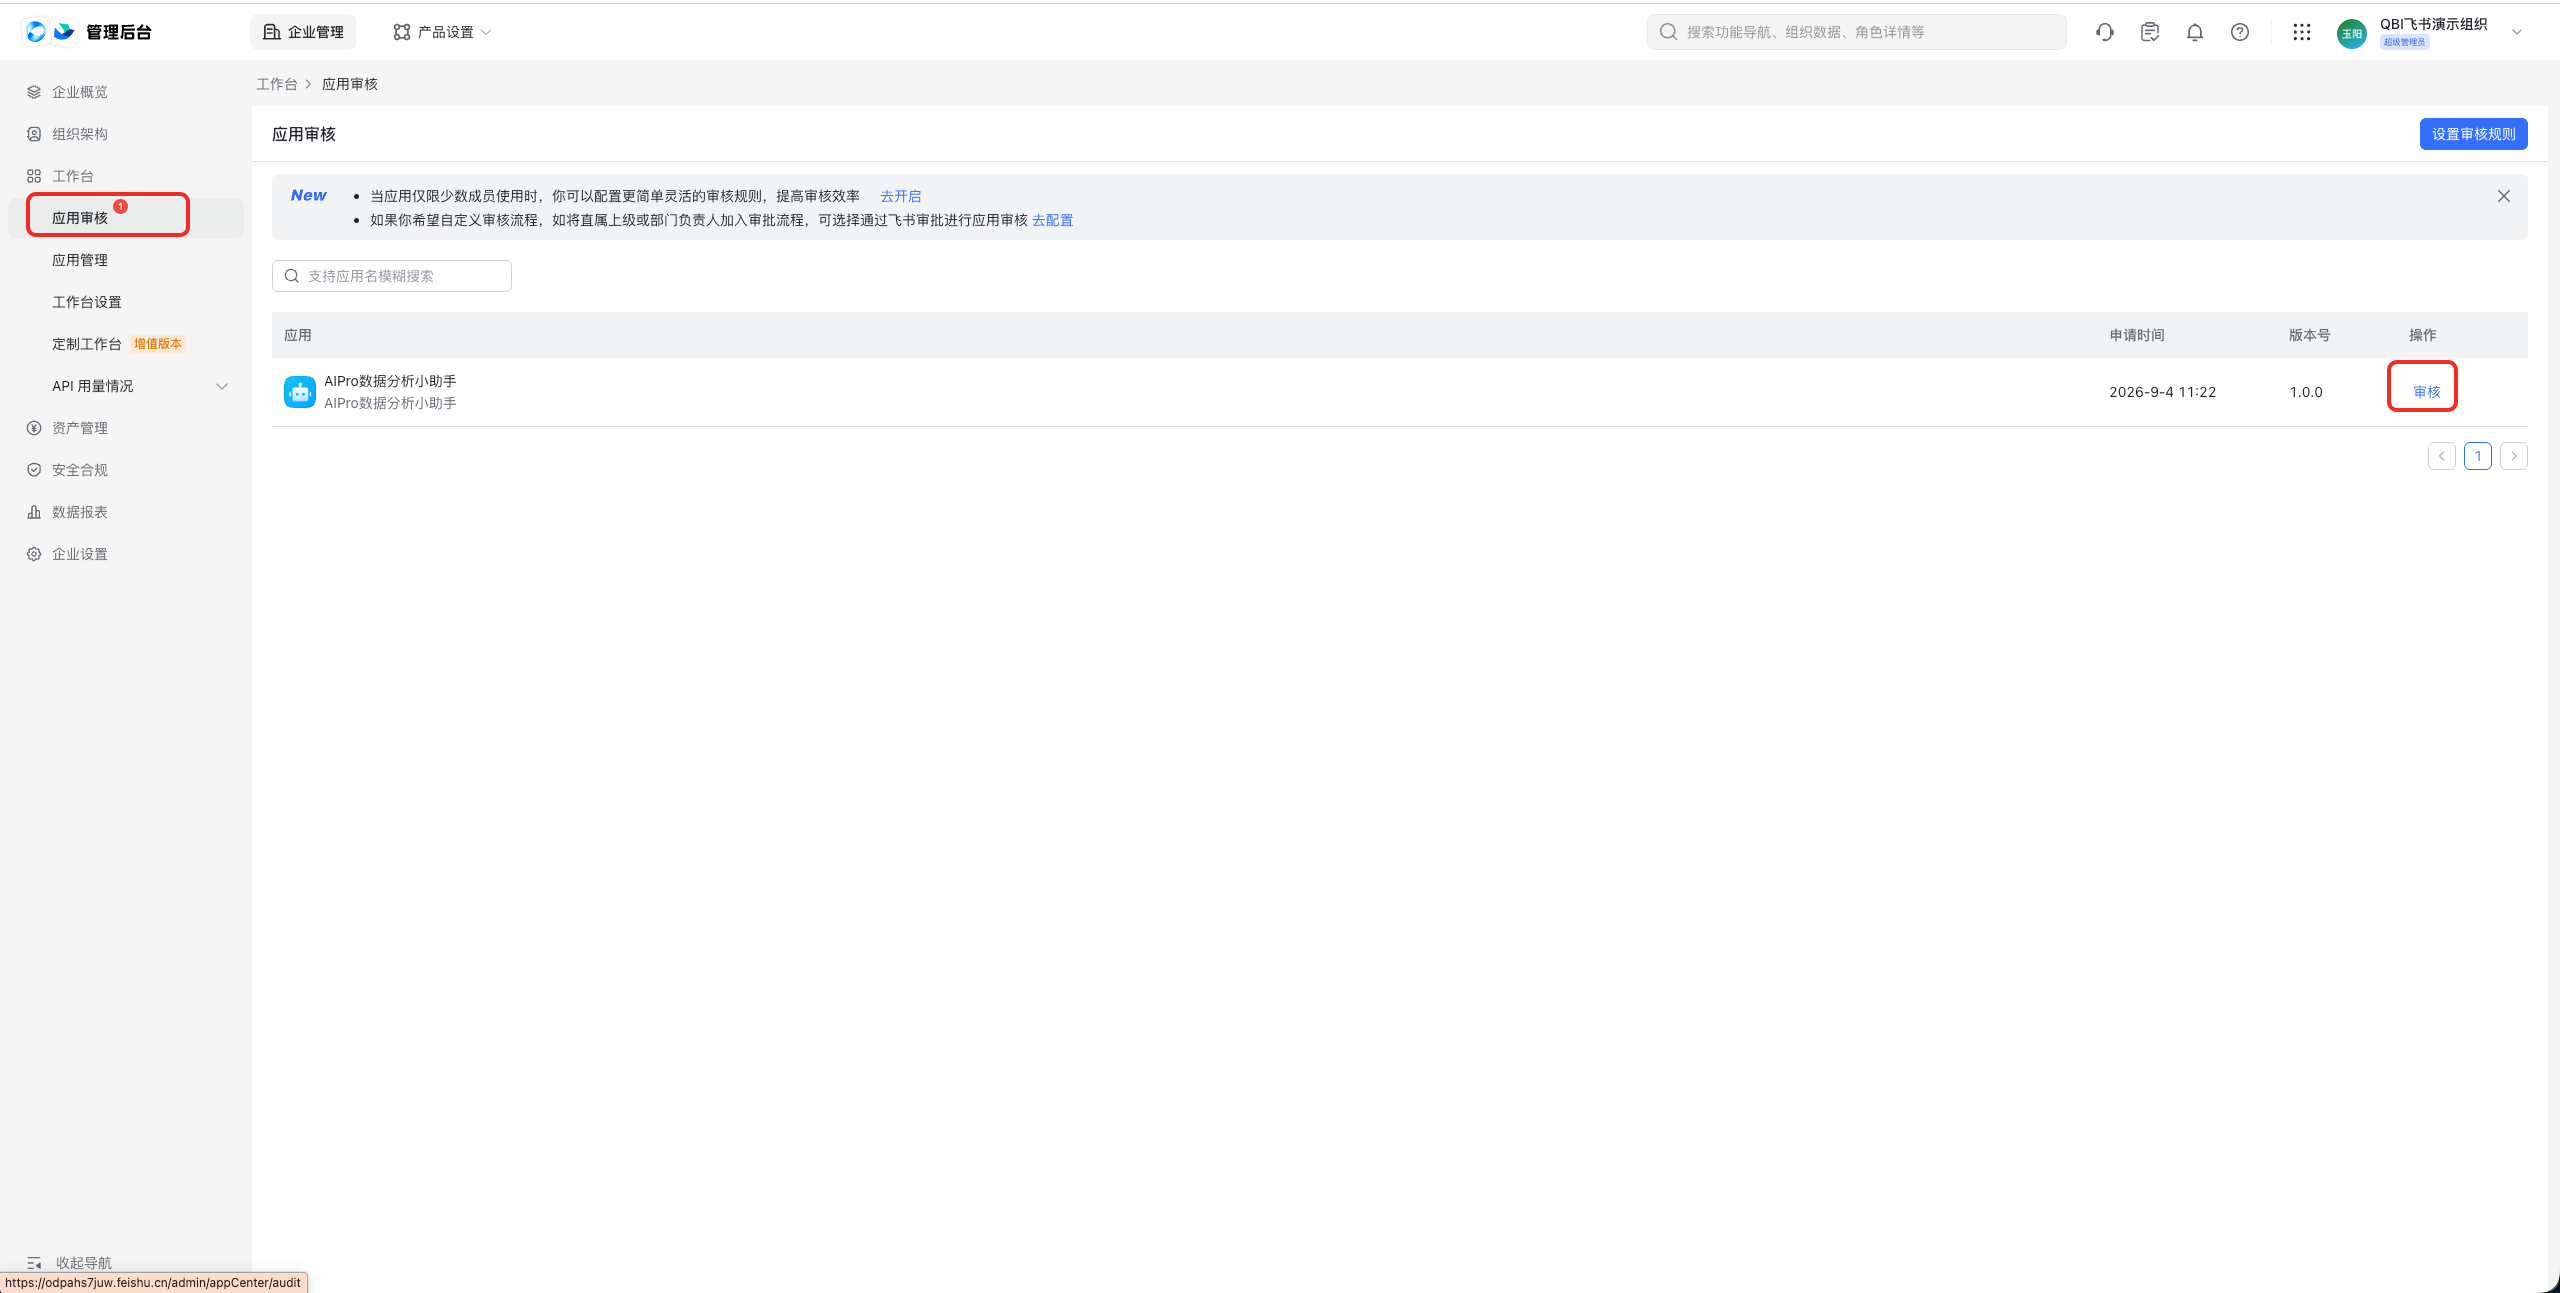
Wait for an administrator to approve the request. If you are an administrator, sign in to the Feishu Admin Console at https://odpahs7juw.feishu.cn/admin/index to approve it directly.
Related tasks
-
Channel Management: Check the integration status of the Feishu channel, edit its configuration, or unbind the channel in the Quick BI AIPro management center.
-
Channels: Enables organization members to bind their instant messaging (IM) accounts and use AIPro in Feishu.
-
DingTalk Configuration Guide: Instructions for integrating the DingTalk channel.