当SchedulerX在公网地域时,只要可以访问公网的机器或容器(例如,非阿里云的机器或本地开发环境),都可以接入SchedulerX。本文介绍如何在本地接入SchedulerX进行测试和开发。
前提条件
操作步骤
在应用pom.xml文件中添加SchedulerxWorker依赖。不同应用初始化SchedulerxWorker时有所不同:
普通Java或Spring应用
<dependency>
  <groupId>com.aliyun.schedulerx</groupId>
  <artifactId>schedulerx2-worker</artifactId>
  <version>${schedulerx2.version}</version>
  <!--如果用的是logback,需要把log4j和log4j2排除掉 -->
  <exclusions>
    <exclusion>
      <groupId>org.apache.logging.log4j</groupId>
      <artifactId>log4j-api</artifactId>
    </exclusion>
    <exclusion>
      <groupId>org.apache.logging.log4j</groupId>
      <artifactId>log4j-core</artifactId>
    </exclusion>
    <exclusion>
      <groupId>log4j</groupId>
      <artifactId>log4j</artifactId>
    </exclusion>
  </exclusions>
</dependency>
Spring Boot应用
<dependency> <groupId>com.aliyun.schedulerx</groupId> <artifactId>schedulerx2-spring-boot-starter</artifactId> <version>${schedulerx2.version}</version> <!--如果使用logback,需要将log4j和log4j2排除 --> <exclusions> <exclusion> <groupId>org.apache.logging.log4j</groupId> <artifactId>log4j-api</artifactId> </exclusion> <exclusion> <groupId>org.apache.logging.log4j</groupId> <artifactId>log4j-core</artifactId> </exclusion> <exclusion> <groupId>log4j</groupId> <artifactId>log4j</artifactId> </exclusion> </exclusions> </dependency>获取接入应用的配置信息,如部署应用的公网地域(Region)和对应的Endpoint(acm.aliyun.com)等。
登录MSE SchedulerX控制台,在顶部菜单栏,将地域切换为公网。
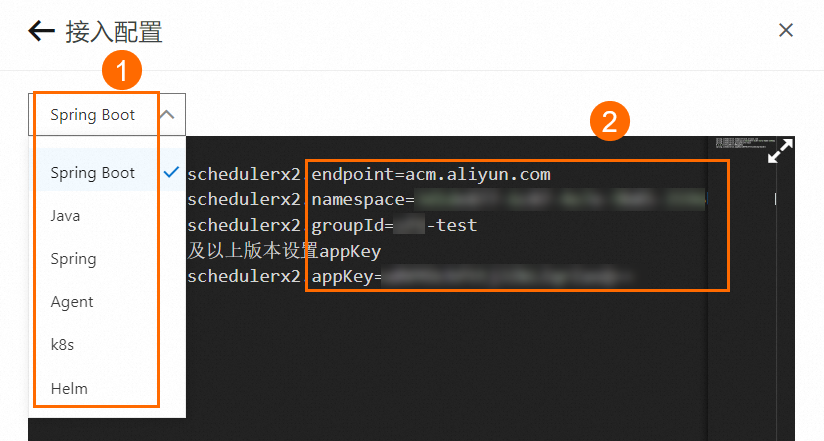
在左侧导航栏,单击应用管理,在应用管理页面,单击操作列的接入配置获取对应接入方式的配置信息。


在①处选择不同的接入方式获取接入配置。
初始化SchedulerxWorker。不同应用在初始化SchedulerxWorker有所不同:
普通Java应用
在main函数中初始化SchedulerxWorker。
public void initSchedulerxWorker() throws Exception { SchedulerxWorker schedulerxWorker = new SchedulerxWorker(); schedulerxWorker.setEndpoint("xxxx"); schedulerxWorker.setNamespace("xxxx"); schedulerxWorker.setGroupId("xxxx"); //1.2.1及以上版本需要设置应用key schedulerxWorker.setAppKey("xxxx"); schedulerxWorker.init(); }在接入配置面板,单击一键复制将配置拷贝至对应配置文件中,或将
schedulerxWorker.setEndpoint、schedulerxWorker.setNamespace、schedulerxWorker.setGroupId和schedulerxWorker.setAppKey的值设置为步骤2中获取的参数值。说明一个应用如果包含多个业务,或者需将定时任务归类,可以建立多个分组。例如,应用
animals新建两个分组animals.dogs和animals.cats。此时,无需申请两批实例分别接入这两个分组,只需在应用客户端中将这两个分组配置到groupId=后面即可,例如groupId=animals.dogs,animals.cats。在初始化SchedulerxWorker客户端时,如需添加其他配置需求,请参见SchedulerxWorker配置参数说明。
Spring应用
在XML配置文件中注入SchedulerxWorker Bean。
<bean id="schedulerxWorker" class="com.alibaba.schedulerx.worker.SchedulerxWorker"> <property name="endpoint"> <value>${endpoint}</value> </property> <property name="namespace"> <value>${namespace}</value> </property> <property name="groupId"> <value>${groupId}</value> </property> <!--1.2.1及以上版本设置appKey --> <property name="appKey"> <value>${appKey}</value> </property> </bean>在接入配置面板,单击一键复制将配置拷贝至对应配置文件中,或将
${endpoint}、${namespace}、${groupId}和${appKey}替换为步骤2中获取的参数值。Spring Boot应用
在application.properties文件中添加如下配置:
spring.schedulerx2.endpoint=${endpoint} spring.schedulerx2.namespace=${namespace} spring.schedulerx2.groupId=${groupId} # 1.2.1及以上版本设置appKey spring.schedulerx2.appKey=${appKey}在接入配置面板,单击一键复制将配置拷贝至对应配置文件中,或将
${endpoint}、${namespace}、${groupId}和${appKey}替换为步骤2中获取的参数值。说明如果一个应用包含多个业务,或者需要将定时任务进行归类,可以建立多个分组。例如,应用animals新建了两个分组animals.dogs和animals.cats,此时无需申请两批实例分别接入这两个分组,在应用客户端中将这两个分组配置到
groupId=后面即可,例如groupId=animals.dogs,animals.cats。在应用中创建类
JavaProcessor,实现任务调度。下方示例代码介绍如何实现一个简单的定时打印
hello schedulerx2.0的JavaProcessor类。package com.aliyun.schedulerx.test.job; import com.alibaba.schedulerx.worker.domain.JobContext; import com.alibaba.schedulerx.worker.processor.JavaProcessor; import com.alibaba.schedulerx.worker.processor.ProcessResult; @Component public class MyHelloJob extends JavaProcessor { @Override public ProcessResult process(JobContext context) throws Exception { System.out.println("hello schedulerx2.0"); return new ProcessResult(true); } }运行本地应用。
结果验证
登录MSE SchedulerX控制台,在左侧导航栏的应用管理,查看目标应用的实例总数。

如果实例总数为0,说明应用接入失败。请检查并修改本地应用。
如果实例总数不为0,显示接入实例个数,说明应用接入成功。