EAS(Elastic Algorithm Service)是PAI针对在线推理场景提供的模型在线服务。当您需要自动化部署和应用LLM大语言模型时,EAS为您提供了一键式解决方案。通过EAS,您能够轻松部署支持WebUI和API调用的LLM应用。部署LLM应用后,您可以利用LangChain框架集成企业知识库,以实现智能问答和自动化功能。此外,EAS还配备了BladeLLM与vLLM等推理加速引擎,您可以体验到高并发和低延迟的技术优势。本文为您介绍如何通过EAS一键部署和调用LLM大语言模型,以及常见的问题和解决方法。
背景信息
随着ChatGPT和通义千问等大模型在业界的广泛应用,LLM大语言模型的推理应用成为当前热门的应用之一。目前市面上有许多开源大模型可供选择,它们在不同领域都展现出各自独特的性能。在EAS上可快速从第三方拉起Llama3、Qwen、Llama2、ChatGLM、Baichuan、Yi-6B、Mistral-7B以及Falcon-7B等开源大模型文件。通过EAS,您可以在5分钟内一键部署流行的开源大语言模型推理服务应用,获得大语言模型的推理能力。
此外,部署在EAS上的LLM大语言模型服务不仅支持WebUI和API调用方式,还支持通过LangChain集成企业自有业务数据,从而生成基于本地知识库的定制答案。
LangChain功能介绍:
LangChain是一个开源的框架,可以让AI开发人员将像GPT-4这样的大语言模型(LLM)和外部数据结合起来,从而在尽可能少消耗计算资源的情况下,获得更好的性能和效果。
LangChain工作原理:
将一个大的数据源,比如一个20页的PDF文件,分成各个区块,并通过嵌入模型(比如BGE、text2vec等)将它们转换为数值向量,然后把这些向量存储到一个专门的向量数据库里。
LangChain首先将用户上传的知识库进行自然语言处理,并作为大模型的知识库存储在本地。每次推理时,会首先在本地知识库中查找与输入问题相近的文本块(chunk),并将知识库答案与用户输入的问题一起输入大模型,生成基于本地知识库的定制答案。
前提条件
已开通PAI并创建默认工作空间,详情请参见开通并创建默认工作空间。
如果使用RAM用户来部署模型,需要为RAM用户授予EAS的管理权限,详情请参见云产品依赖与授权:EAS。
使用限制
目前,推理加速引擎仅支持Qwen2-7b、Qwen1.5-1.8b、Qwen1.5-7b、Qwen1.5-14b、llama3-8b、llama2-7b、llama2-13b、chatglm3-6b、baichuan2-7b、baichuan2-13b、falcon-7b、yi-6b、mistral-7b-instruct-v0.2、gemma-2b-it、gemma-7b-it、deepseek-coder-7b-instruct-v1.5模型。
仅无推理加速的EAS服务支持使用Langchain功能。
部署EAS服务
进入模型在线服务页面。
登录PAI控制台。
在左侧导航栏单击工作空间列表,在工作空间列表页面中单击待操作的工作空间名称,进入对应工作空间内。
在工作空间页面的左侧导航栏选择模型部署>模型在线服务(EAS),进入模型在线服务(EAS)页面。

在模型在线服务(EAS)页面,单击部署服务,然后在场景化模型部署区域,单击LLM大语言模型部署。
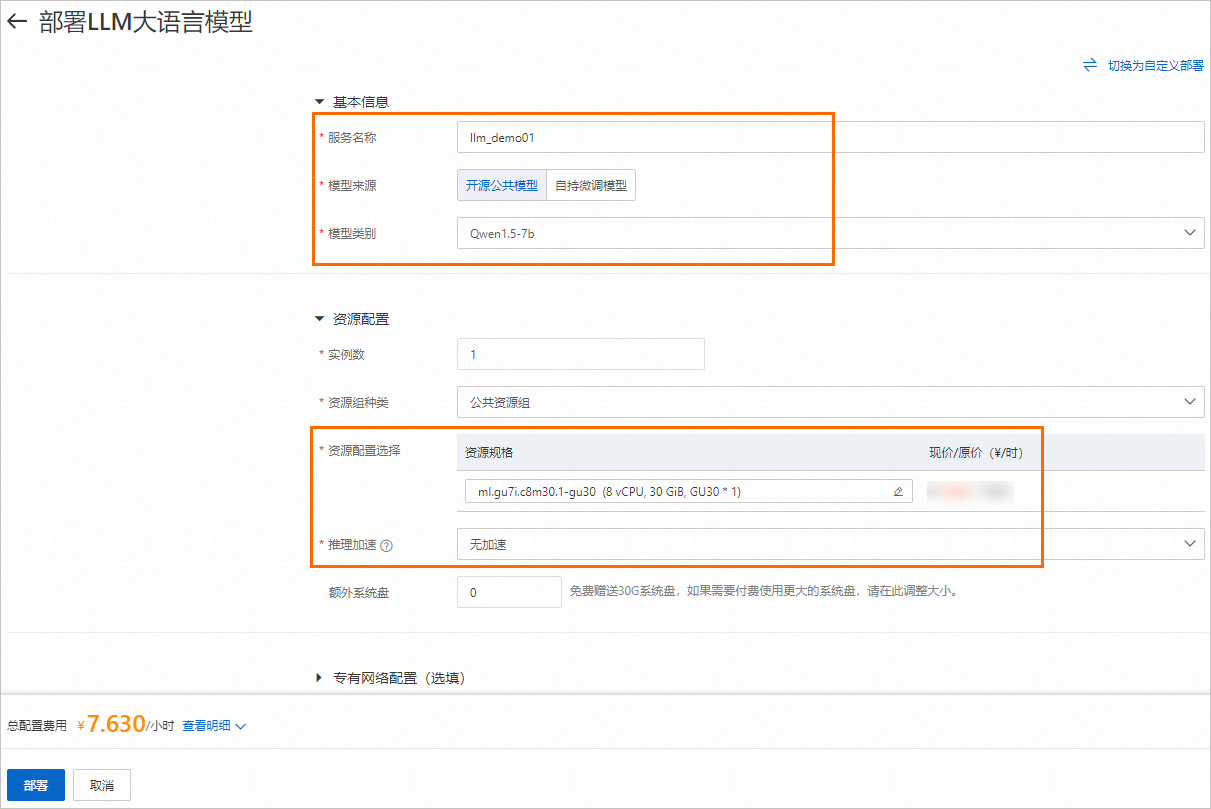
在部署LLM大语言模型页面,配置以下关键参数,其他参数使用默认配置。
参数
描述
服务名称
自定义服务名称。本方案使用的示例值为:llm_demo001。
模型来源
选择开源公共模型。
模型类别
本方案选择Qwen1.5-7b。EAS还提供了多种模型类别可供选择,以满足您的不同需求,例如chatglm3-6b、llama2-13b等。
资源配置选择
选择模型类别后,系统会自动推荐适合的资源规格。
说明如果当前地域的资源不足,您可选择在新加坡地域进行服务部署,或选择与模型参数量相匹配的其他资源规格,详情请参见如何切换其他的开源大模型。
推理加速
选择无加速。

单击部署,大约等待5分钟后即可完成模型部署。
启动WebUI进行模型推理
单击目标服务服务方式列下的查看Web应用。

在WebUI页面,进行模型推理验证。
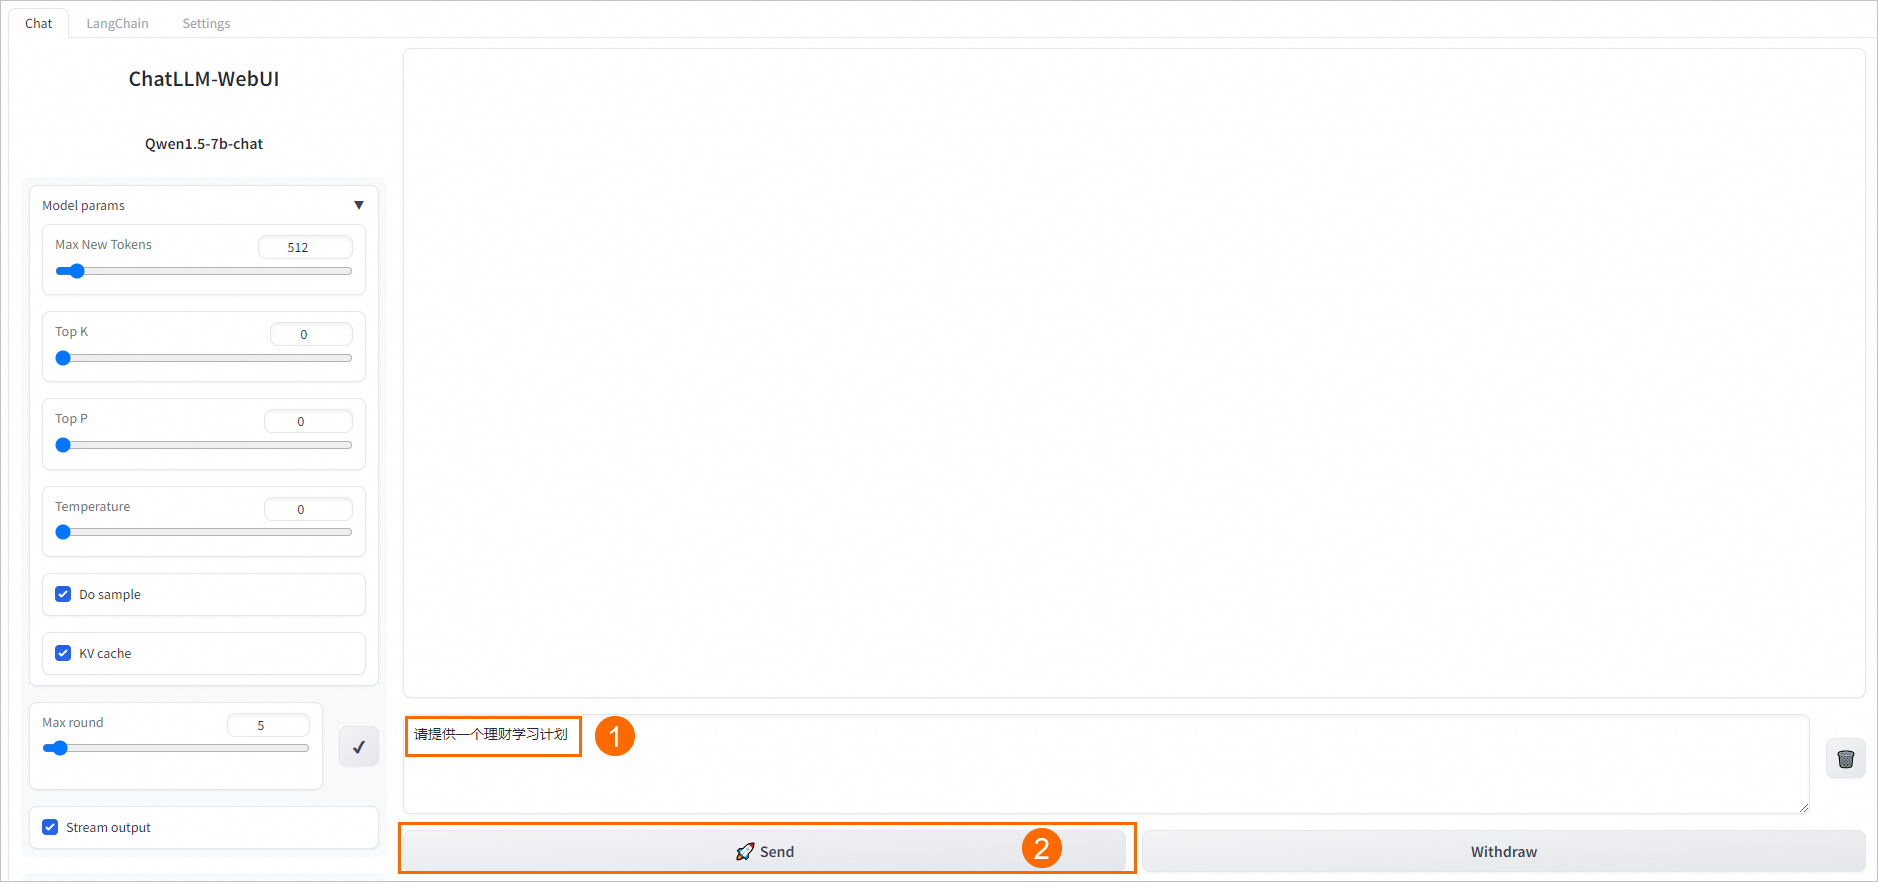
在ChatLLM-WebUI页面的文本框中输入对话内容,例如
请提供一个理财学习计划,单击Send,即可开始对话。
使用LangChain集成您自己的业务数据,具体操作步骤如下:
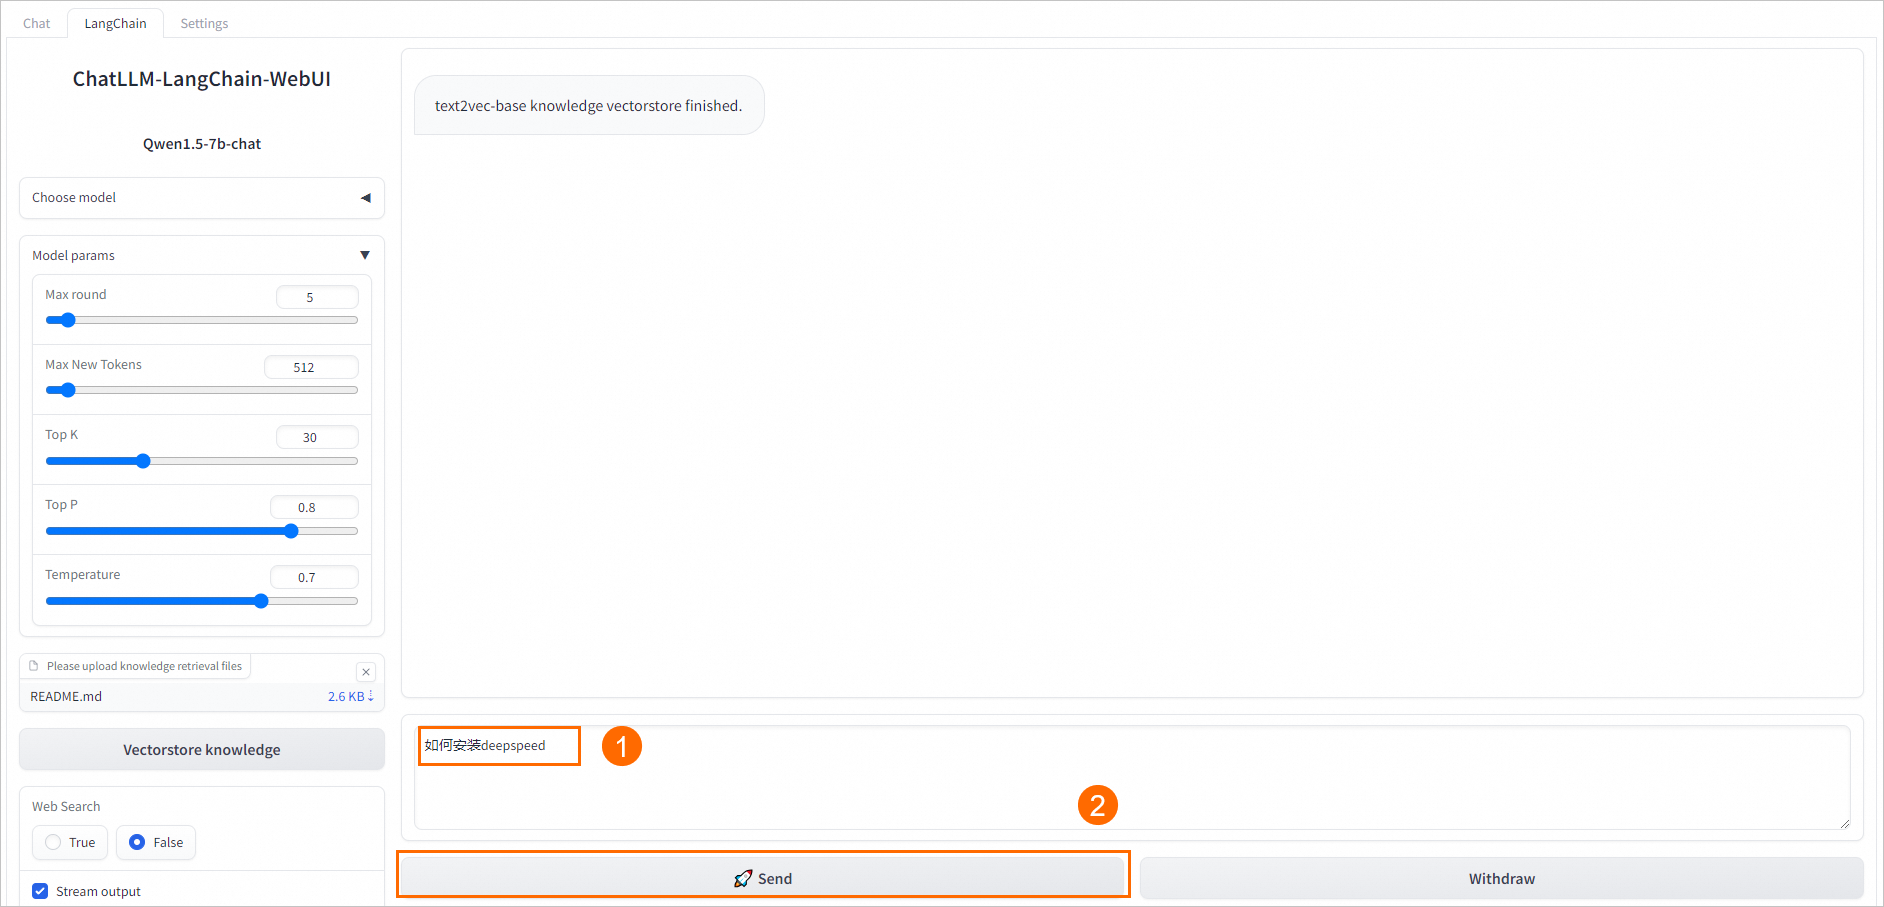
在WebUI页面上方的Tab页选择LangChain。
在WebUI页面左下角,按照界面操作指引拉取自定义数据,支持配置.txt、.md、.docx、.pdf格式的文件。

例如上传README.md文件,单击左下角的Vectorstore knowledge,返回如下结果表明自定义数据加载成功。

在WebUI页面底部输入框中,输入业务数据相关的问题进行对话即可。
例如在输入框中输入
如何安装deepspeed,单击Send,即可开始对话。
常见问题及解决方法
如何切换其他的开源大模型
您可以在EAS上快速从第三方拉起Qwen、Llama2、ChatGLM、Baichuan、Yi-6B、Mistral-7B以及Falcon-7B等开源大模型文件,参考以下操作步骤切换并部署这些模型:
单击目标服务操作列下的更新服务。
更新模型类别为其他开源大模型,系统将同步更新资源规格。请参考下表,了解更多关于部署开源大模型时支持使用的机型及运行命令。
模型名称
运行命令
推荐机型
Qwen2-7b(通义千问2版本-7B参数量)
python webui/webui_server.py --port=8000 --model-path=Qwen/Qwen2-7B-Instruct单卡GU30
单卡A10
单卡V100(32 G)
Qwen2-72b(通义千问2版本-72B参数量)
python webui/webui_server.py --port=8000 --model-path=Qwen/Qwen2-72B-Instruct两卡A100(80 G)
四卡A100(40 G)
八卡V100(32 G)
Qwen2-57b-A14b
python webui/webui_server.py --port=8000 --model-path=Qwen/Qwen2-57B-A14B-Instruct两卡A100(80 G)
四卡A100(40 G)
四卡V100(32 G)
Qwen1.5-1.8b(通义千问1.5版本-1.8B参数量)
python webui/webui_server.py --port=8000 --model-path=Qwen/Qwen1.5-1.8B-Chat单卡T4
单卡V100(16 G)
单卡GU30
单卡A10
Qwen1.5-7b(通义千问1.5版本-7B参数量)
python webui/webui_server.py --port=8000 --model-path=Qwen/Qwen1.5-7B-Chat单卡GU30
单卡A10
Qwen1.5-14b(通义千问1.5版本-14B参数量)
python webui/webui_server.py --port=8000 --model-path=Qwen/Qwen1.5-14B-Chat单卡V100(32 G)
单卡A100(40 G)
单卡A100(80 G)
2卡GU30
2卡A10
Qwen1.5-32b(通义千问1.5版本-32B参数量)
python webui/webui_server.py --port=8000 --model-path=Qwen/Qwen1.5-32B-Chat单卡A100(80 G)
四卡V100(32 G)
Qwen1.5-72b(通义千问1.5版本-72B参数量)
python webui/webui_server.py --port=8000 --model-path=Qwen/Qwen1.5-72B-Chat8卡V100(32 G)
2卡A100(80 G)
4卡A100(40 G)
Qwen1.5-110b(通义千问1.5版本-110B参数量)
python webui/webui_server.py --port=8000 --model-path=Qwen/Qwen1.5-110B-Chat8卡A100(40 G)
4卡A100(80 G)
llama3-8b
python webui/webui_server.py --port=8000 --model-path=/huggingface/meta-Llama-3-8B-Instruct/ --model-type=llama3单卡GU30
单卡A10
单卡V100(32 G)
llama3-70b
python webui/webui_server.py --port=8000 --model-path=/huggingface/meta-Llama-3-70B-Instruct/ --model-type=llama3两卡A100(80 G)
四卡A100(40 G)
八卡V100(32 G)
Llama2-7b
python webui/webui_server.py --port=8000 --model-path=meta-llama/Llama-2-7b-chat-hf单卡GU30
单卡A10
单卡V100(32 G)
Llama2-13b
python webui/webui_server.py --port=8000 --model-path=meta-llama/Llama-2-13b-chat-hf单卡V100(32 G)
2卡GU30
2卡A10
llama2-70b
python webui/webui_server.py --port=8000 --model-path=meta-llama/Llama-2-70b-chat-hf8卡V100(32 G)
2卡A100(80 G)
4卡A100(40 G)
chatglm3-6b
python webui/webui_server.py --port=8000 --model-path=THUDM/chatglm3-6b单卡GU30
单卡A10
单卡V100(16 G)
单卡V100(32 G)
baichuan2-7b
python webui/webui_server.py --port=8000 --model-path=baichuan-inc/Baichuan2-7B-Chat单卡GU30
单卡A10
单卡V100(32 G)
baichuan2-13b
python webui/webui_server.py --port=8000 --model-path=baichuan-inc/Baichuan2-13B-Chat2卡GU30
2卡A10
单卡V100(32 G)
falcon-7b
python webui/webui_server.py --port=8000 --model-path=tiiuae/falcon-7b-instruct单卡GU30
单卡A10
单卡V100(32 G)
falcon-40b
python webui/webui_server.py --port=8000 --model-path=tiiuae/falcon-40b-instruct8卡V100(32 G)
2卡A100(80 G)
4卡A100(40 G)
falcon-180b
python webui/webui_server.py --port=8000 --model-path=tiiuae/falcon-180B-chat8卡A100(80 G)
Yi-6b
python webui/webui_server.py --port=8000 --model-path=01-ai/Yi-6B-Chat单卡GU30
单卡A10
单卡V100(16 G)
单卡V100(32 G)
Yi-34b
python webui/webui_server.py --port=8000 --model-path=01-ai/Yi-34B-Chat4卡V100(16 G)
单卡A100(80 G)
4卡A10
mistral-7b-instruct-v0.2
python webui/webui_server.py --port=8000 --model-path=mistralai/Mistral-7B-Instruct-v0.2单卡GU30
单卡A10
单卡V100(32 G)
mixtral-8x7b-instruct-v0.1
python webui/webui_server.py --port=8000 --model-path=mistralai/Mixtral-8x7B-Instruct-v0.14卡A100(80G)
gemma-2b-it
python webui/webui_server.py --port=8000 --model-path=google/gemma-2b-it单卡T4
单卡V100(16 G)
单卡GU30
单卡A10
gemma-7b-it
python webui/webui_server.py --port=8000 --model-path=google/gemma-7b-it单卡GU30
单卡A10
单卡V100(32 G)
deepseek-coder-7b-instruct-v1.5
python webui/webui_server.py --port=8000 --model-path=deepseek-ai/deepseek-coder-7b-instruct-v1.5单卡GU30
单卡A10
单卡V100(32 G)
deepseek-coder-33b-instruct
python webui/webui_server.py --port=8000 --model-path=deepseek-ai/deepseek-coder-33b-instruct单卡A100(80 G)
2卡A100(40 G)
4卡V100(32 G)
deepseek-v2-lite
python webui/webui_server.py --port=8000 --model-path=deepseek-ai/DeepSeek-V2-Lite-Chat单卡A10
单卡A100(40 G)
更新完成后,单击部署。
如何提升推理并发且降低延迟?
EAS支持BladeLLM和vLLM的推理加速引擎,可以帮助您一键享受高并发和低延时的技术红利。具体操作步骤如下:
单击目标服务操作列下的更新服务。
在资源配置区域,更新推理加速参数,取值如下:
PAI-BladeLLM自动推理加速
开源框架vllm推理加速
单击部署。
如何挂载自定义模型?
如果您需要部署自定义的模型,可以使用OSS挂载自定义模型,具体操作步骤如下:
将自定义模型及相关配置文件上传到您自己的OSS Bucket目录中,关于如何创建存储空间和上传文件,详情请参见控制台创建存储空间和控制台上传文件。
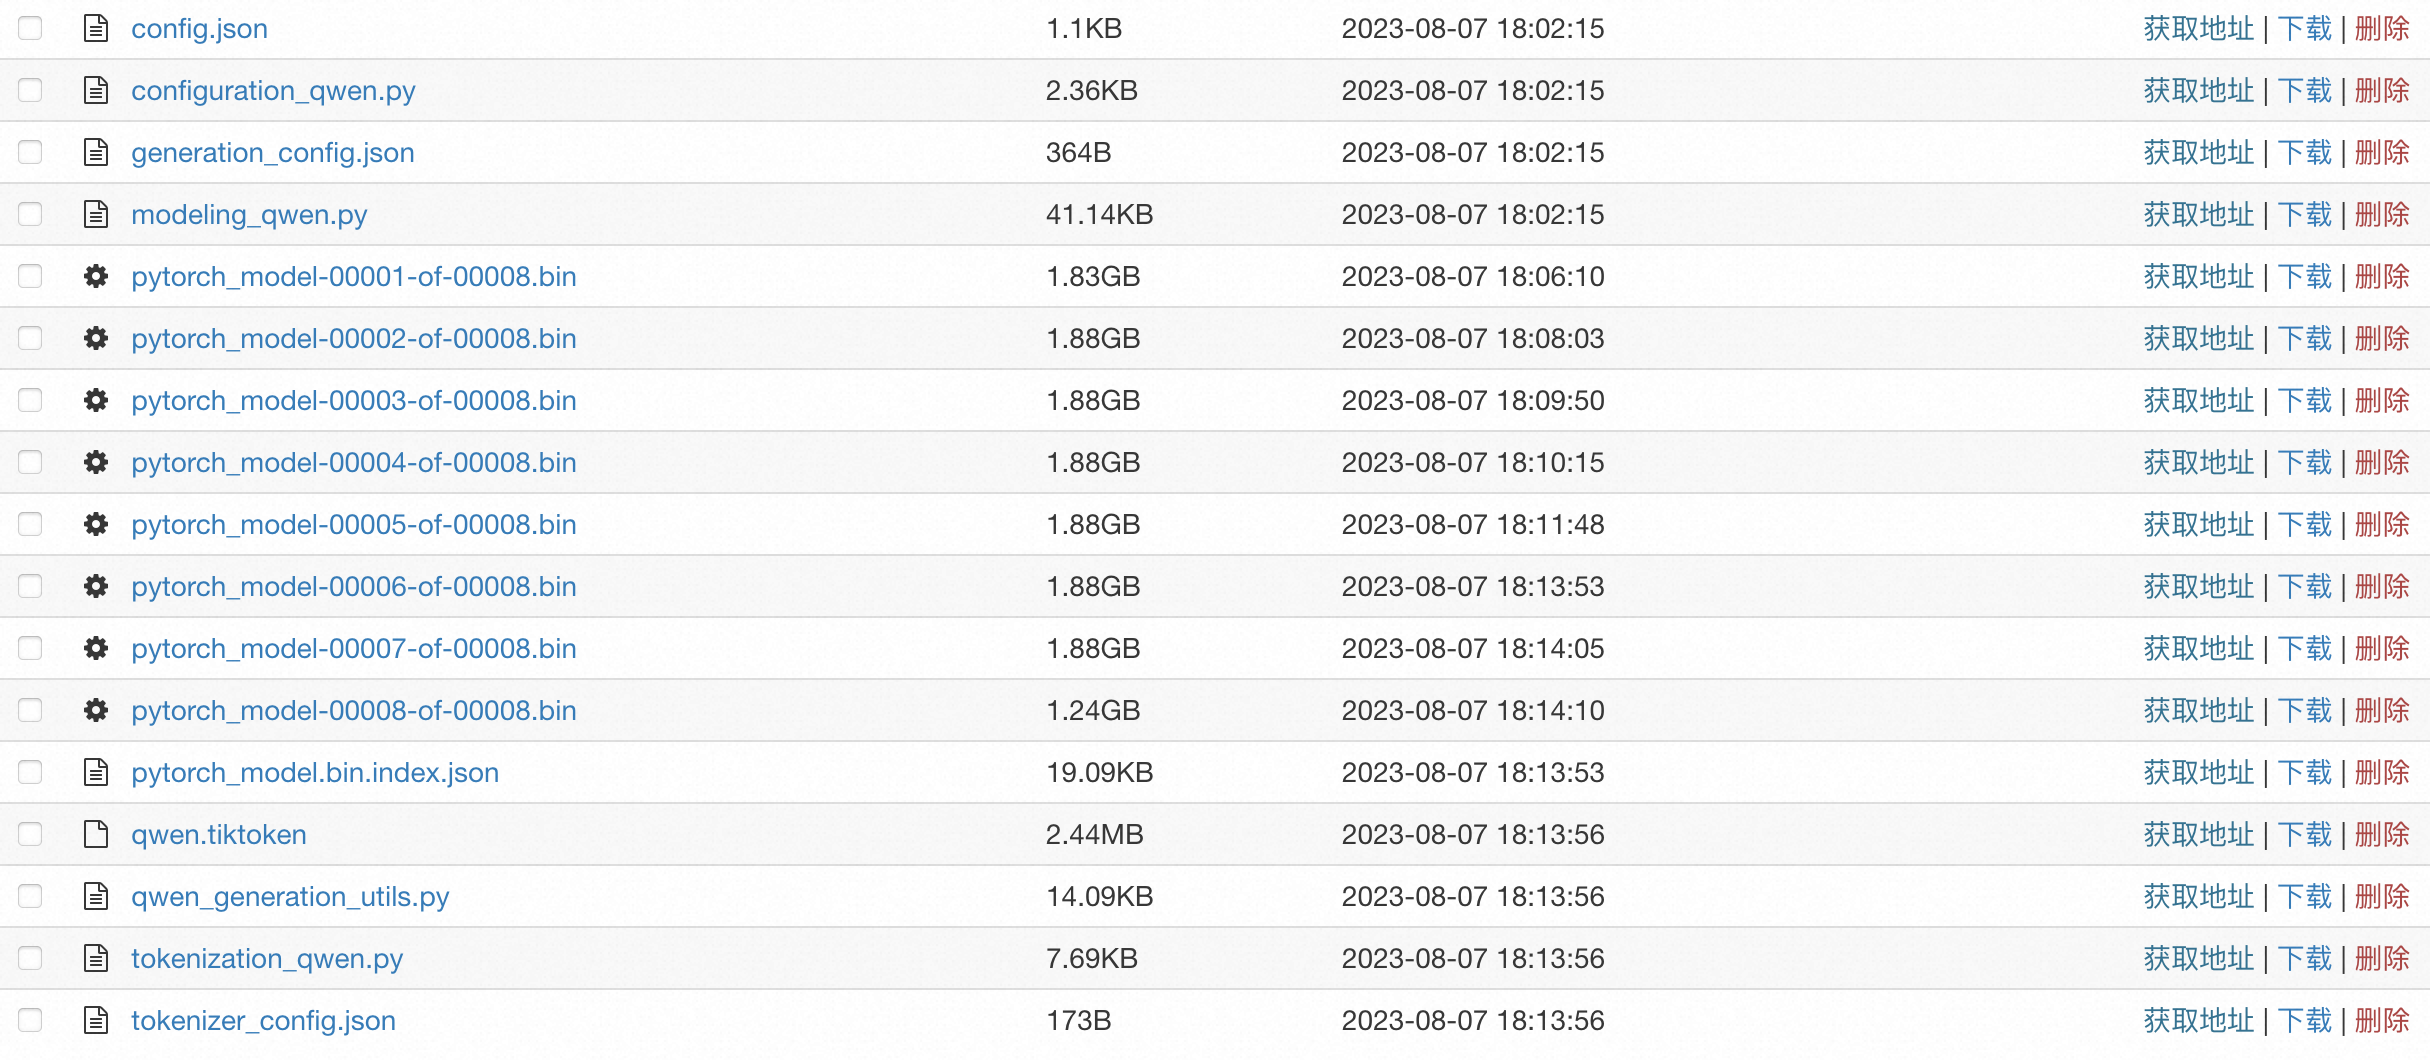
需要准备的模型文件样例如下:

其中配置文件中必须包含config.json文件,您需要按照Huggingface或Modelscope的模型格式配置Config文件。示例文件详情,请参见config.json。
单击目标服务操作列下的更新服务。
在部署LLM大语言模型页面,配置以下参数,参数配置完成后,单击部署。
参数
描述
基本信息
模型来源
选择自持微调模型。
模型类别
选择与模型相匹配的大模型类别、参数量和精度。
模型配置
配置类型选择按对象存储(OSS),并配置模型文件所在的OSS存储路径。
资源配置
资源配置选择
模型类别配置完成后,系统将自动配置资源规格。您也可以根据模型参数量,自行选择相匹配的资源规格,详情请参见如何切换其他的开源大模型。
如何使用API进行模型推理
获取服务访问地址和Token。
访问模型在线服务(EAS),选择工作空间后,进入EAS。
单击目标服务名称,进入服务详情页面。
在基本信息区域单击查看调用信息,在公网地址调用页签获取服务Token和访问地址。
启动API进行模型推理。
使用HTTP方式调用服务
非流式调用
客户端使用标准的HTTP格式,使用curl命令调用时,支持发送以下两种类型的请求:
发送String类型的请求
curl $host -H 'Authorization: $authorization' --data-binary @chatllm_data.txt -v其中:$authorization需替换为服务Token,$host:需替换为服务访问地址,chatllm_data.txt:该文件为包含问题的纯文本文件。
发送结构化类型的请求
curl $host -H 'Authorization: $authorization' -H "Content-type: application/json" --data-binary @chatllm_data.json -v -H "Connection: close"使用chatllm_data.json文件来设置推理参数,chatllm_data.json文件的内容格式如下:
{
  "max_new_tokens": 4096,
  "use_stream_chat": false,
  "prompt": "How to install it?",
  "system_prompt": "Act like you are programmer with 5+ years of experience.",
  "history": [
    [
      "Can you tell me what's the bladellm?",
      "BladeLLM is an framework for LLM serving, integrated with acceleration techniques like quantization, ai compilation, etc. , and supporting popular LLMs like OPT, Bloom, LLaMA, etc."
    ]
  ],
  "temperature": 0.8,
  "top_k": 10,
  "top_p": 0.8,
  "do_sample": true,
  "use_cache": true
}
参数说明如下,请酌情添加或删除。
参数
描述
默认值
max_new_tokens
生成输出token的最大长度,单位为个。
2048
use_stream_chat
是否使用流式输出形式。
true
prompt
用户的Prompt。
""
system_prompt
系统Prompt。
""
history
对话的历史记录,类型为List[Tuple(str, str)]。
[()]
temperature
用于调节模型输出结果的随机性,值越大随机性越强,0值为固定输出。Float类型,区间为0~1。
0.95
top_k
从生成结果中选择候选输出的数量。
30
top_p
从生成结果中按百分比选择输出结果。Float类型,区间为0~1。
0.8
do_sample
开启输出采样。
true
use_cache
开启KV Cache。
true
您也可以基于Python的requests包实现自己的客户端,示例代码如下:
import argparse
import json
from typing import Iterable, List

import requests

def post_http_request(prompt: str,
                      system_prompt: str,
                      history: list,
                      host: str,
                      authorization: str,
                      max_new_tokens: int = 2048,
                      temperature: float = 0.95,
                      top_k: int = 1,
                      top_p: float = 0.8,
                      langchain: bool = False,
                      use_stream_chat: bool = False) -> requests.Response:
    headers = {
        "User-Agent": "Test Client",
        "Authorization": f"{authorization}"
    }
    if not history:
        history = [
            (
                "San Francisco is a",
                "city located in the state of California in the United States. \
                It is known for its iconic landmarks, such as the Golden Gate Bridge \
                and Alcatraz Island, as well as its vibrant culture, diverse population, \
                and tech industry. The city is also home to many famous companies and \
                startups, including Google, Apple, and Twitter."
            )
        ]
    pload = {
        "prompt": prompt,
        "system_prompt": system_prompt,
        "top_k": top_k,
        "top_p": top_p,
        "temperature": temperature,
        "max_new_tokens": max_new_tokens,
        "use_stream_chat": use_stream_chat,
        "history": history
    }
    if langchain:
        pload["langchain"] = langchain
    response = requests.post(host, headers=headers,
                             json=pload, stream=use_stream_chat)
    return response

def get_response(response: requests.Response) -> List[str]:
    data = json.loads(response.content)
    output = data["response"]
    history = data["history"]
    return output, history

if __name__ == "__main__":
    parser = argparse.ArgumentParser()
    parser.add_argument("--top-k", type=int, default=4)
    parser.add_argument("--top-p", type=float, default=0.8)
    parser.add_argument("--max-new-tokens", type=int, default=2048)
    parser.add_argument("--temperature", type=float, default=0.95)
    parser.add_argument("--prompt", type=str, default="How can I get there?")
    parser.add_argument("--langchain", action="store_true")

    args = parser.parse_args()

    prompt = args.prompt
    top_k = args.top_k
    top_p = args.top_p
    use_stream_chat = False
    temperature = args.temperature
    langchain = args.langchain
    max_new_tokens = args.max_new_tokens

    host = "EAS服务公网地址"
    authorization = "EAS服务公网Token"

    print(f"Prompt: {prompt!r}\n", flush=True)
    # 在客户端请求中可设置语言模型的system prompt。
    system_prompt = "Act like you are programmer with \
                5+ years of experience."

    # 客户端请求中可设置对话的历史信息,客户端维护当前用户的对话记录,用于实现多轮对话。通常情况下可以使用上一轮对话返回的histroy信息,history格式为List[Tuple(str, str)]。
    history = []
    response = post_http_request(
        prompt, system_prompt, history,
        host, authorization,
        max_new_tokens, temperature, top_k, top_p,
        langchain=langchain, use_stream_chat=use_stream_chat)
    output, history = get_response(response)
    print(f" --- output: {output} \n --- history: {history}", flush=True)

# 服务端返回JSON格式的响应结果,包含推理结果与对话历史。
def get_response(response: requests.Response) -> List[str]:
    data = json.loads(response.content)
    output = data["response"]
    history = data["history"]
    return output, history
其中:
host:配置为服务访问地址。
authorization:配置为服务Token。
流式调用
流式调用使用HTTP SSE方式,其他设置方式与非流式相同,代码参考如下:
import argparse
import json
from typing import Iterable, List

import requests


def clear_line(n: int = 1) -> None:
    LINE_UP = '\033[1A'
    LINE_CLEAR = '\x1b[2K'
    for _ in range(n):
        print(LINE_UP, end=LINE_CLEAR, flush=True)


def post_http_request(prompt: str,
                      system_prompt: str,
                      history: list,
                      host: str,
                      authorization: str,
                      max_new_tokens: int = 2048,
                      temperature: float = 0.95,
                      top_k: int = 1,
                      top_p: float = 0.8,
                      langchain: bool = False,
                      use_stream_chat: bool = False) -> requests.Response:
    headers = {
        "User-Agent": "Test Client",
        "Authorization": f"{authorization}"
    }
    if not history:
        history = [
            (
                "San Francisco is a",
                "city located in the state of California in the United States. \
                It is known for its iconic landmarks, such as the Golden Gate Bridge \
                and Alcatraz Island, as well as its vibrant culture, diverse population, \
                and tech industry. The city is also home to many famous companies and \
                startups, including Google, Apple, and Twitter."
            )
        ]
    pload = {
        "prompt": prompt,
        "system_prompt": system_prompt,
        "top_k": top_k,
        "top_p": top_p,
        "temperature": temperature,
        "max_new_tokens": max_new_tokens,
        "use_stream_chat": use_stream_chat,
        "history": history
    }
    if langchain:
        pload["langchain"] = langchain
    response = requests.post(host, headers=headers,
                             json=pload, stream=use_stream_chat)
    return response


def get_streaming_response(response: requests.Response) -> Iterable[List[str]]:
    for chunk in response.iter_lines(chunk_size=8192,
                                     decode_unicode=False,
                                     delimiter=b"\0"):
        if chunk:
            data = json.loads(chunk.decode("utf-8"))
            output = data["response"]
            history = data["history"]
            yield output, history


if __name__ == "__main__":
    parser = argparse.ArgumentParser()
    parser.add_argument("--top-k", type=int, default=4)
    parser.add_argument("--top-p", type=float, default=0.8)
    parser.add_argument("--max-new-tokens", type=int, default=2048)
    parser.add_argument("--temperature", type=float, default=0.95)
    parser.add_argument("--prompt", type=str, default="How can I get there?")
    parser.add_argument("--langchain", action="store_true")
    args = parser.parse_args()

    prompt = args.prompt
    top_k = args.top_k
    top_p = args.top_p
    use_stream_chat = True
    temperature = args.temperature
    langchain = args.langchain
    max_new_tokens = args.max_new_tokens

    host = ""
    authorization = ""

    print(f"Prompt: {prompt!r}\n", flush=True)
    system_prompt = "Act like you are programmer with \
                5+ years of experience."
    history = []
    response = post_http_request(
        prompt, system_prompt, history,
        host, authorization,
        max_new_tokens, temperature, top_k, top_p,
        langchain=langchain, use_stream_chat=use_stream_chat)

    for h, history in get_streaming_response(response):
        print(
            f" --- stream line: {h} \n --- history: {history}", flush=True)
其中:
host:配置为服务访问地址。
authorization:配置为服务Token。
使用WebSocket方式调用服务
为了更好地维护用户对话信息,您也可以使用WebSocket方式保持与服务的连接完成单轮或多轮对话,代码示例如下:
import os
import time
import json
import struct
from multiprocessing import Process

import websocket

round = 5
questions = 0


def on_message_1(ws, message):
    if message == "<EOS>":
        print('pid-{} timestamp-({}) receives end message: {}'.format(os.getpid(),
              time.time(), message), flush=True)
        ws.send(struct.pack('!H', 1000), websocket.ABNF.OPCODE_CLOSE)
    else:
        print("{}".format(time.time()))
        print('pid-{} timestamp-({}) --- message received: {}'.format(os.getpid(),
              time.time(), message), flush=True)


def on_message_2(ws, message):
    global questions
    print('pid-{} --- message received: {}'.format(os.getpid(), message))
    # end the client-side streaming
    if message == "<EOS>":
        questions = questions + 1
        if questions == 5:
            ws.send(struct.pack('!H', 1000), websocket.ABNF.OPCODE_CLOSE)


def on_message_3(ws, message):
    print('pid-{} --- message received: {}'.format(os.getpid(), message))
    # end the client-side streaming
    ws.send(struct.pack('!H', 1000), websocket.ABNF.OPCODE_CLOSE)


def on_error(ws, error):
    print('error happened: ', str(error))


def on_close(ws, a, b):
    print("### closed ###", a, b)


def on_pong(ws, pong):
    print('pong:', pong)

# stream chat validation test
def on_open_1(ws):
    print('Opening Websocket connection to the server ... ')
    params_dict = {}
    params_dict['prompt'] = """Show me a golang code example: """
    params_dict['temperature'] = 0.9
    params_dict['top_p'] = 0.1
    params_dict['top_k'] = 30
    params_dict['max_new_tokens'] = 2048
    params_dict['do_sample'] = True
    raw_req = json.dumps(params_dict, ensure_ascii=False).encode('utf8')
    # raw_req = f"""To open a Websocket connection to the server: """

    ws.send(raw_req)
    # end the client-side streaming


# multi-round query validation test
def on_open_2(ws):
    global round
    print('Opening Websocket connection to the server ... ')
    params_dict = {"max_new_tokens": 6144}
    params_dict['temperature'] = 0.9
    params_dict['top_p'] = 0.1
    params_dict['top_k'] = 30
    params_dict['use_stream_chat'] = True
    params_dict['prompt'] = "您好!"
    params_dict = {
        "system_prompt":
        "Act like you are programmer with 5+ years of experience."
    }
    raw_req = json.dumps(params_dict, ensure_ascii=False).encode('utf8')
    ws.send(raw_req)
    params_dict['prompt'] = "请使用Python,编写一个排序算法"
    raw_req = json.dumps(params_dict, ensure_ascii=False).encode('utf8')
    ws.send(raw_req)
    params_dict['prompt'] = "请转写成java语言的实现"
    raw_req = json.dumps(params_dict, ensure_ascii=False).encode('utf8')
    ws.send(raw_req)
    params_dict['prompt'] = "请介绍一下你自己?"
    raw_req = json.dumps(params_dict, ensure_ascii=False).encode('utf8')
    ws.send(raw_req)
    params_dict['prompt'] = "请总结上述对话"
    raw_req = json.dumps(params_dict, ensure_ascii=False).encode('utf8')
    ws.send(raw_req)


# Langchain validation test.
def on_open_3(ws):
    global round
    print('Opening Websocket connection to the server ... ')

    params_dict = {}
    # params_dict['prompt'] = """To open a Websocket connection to the server: """
    params_dict['prompt'] = """Can you tell me what's the MNN?"""
    params_dict['temperature'] = 0.9
    params_dict['top_p'] = 0.1
    params_dict['top_k'] = 30
    params_dict['max_new_tokens'] = 2048
    params_dict['use_stream_chat'] = False
    params_dict['langchain'] = True
    raw_req = json.dumps(params_dict, ensure_ascii=False).encode('utf8')
    ws.send(raw_req)


authorization = ""
host = "ws://" + ""


def single_call(on_open_func, on_message_func, on_clonse_func=on_close):
    ws = websocket.WebSocketApp(
        host,
        on_open=on_open_func,
        on_message=on_message_func,
        on_error=on_error,
        on_pong=on_pong,
        on_close=on_clonse_func,
        header=[
            'Authorization: ' + authorization],
    )

    # setup ping interval to keep long connection.
    ws.run_forever(ping_interval=2)


if __name__ == "__main__":
    for i in range(5):
        p1 = Process(target=single_call, args=(on_open_1, on_message_1))
        p2 = Process(target=single_call, args=(on_open_2, on_message_2))
        p3 = Process(target=single_call, args=(on_open_3, on_message_3))

        p1.start()
        p2.start()
        p3.start()

        p1.join()
        p2.join()
        p3.join()
其中:
authorization:配置为服务Token。
host:配置为服务访问地址。并将访问地址中前端的http替换为ws。
use_stream_chat:通过该请求参数来控制客户端是否为流式输出。默认值为True,表示服务端返回流式数据。
参考上述示例代码中的on_open_2函数的实现方法实现多轮对话。
如何配置更多参数?
单击目标服务操作列下的更新服务。
在部署LLM大语言模型页面,单击右上角的切换为自定义部署。
在模型服务信息区域的运行命令中配置以下参数,参数配置完成后,单击更新。
参数
描述
默认值
--model-path
设置预置模型名或自定义模型路径。
示例1:加载预置模型,您可以使用EAS预置的meta-llama/Llama-2-*系列模型(包括:7b-hf,7b-chat-hf,13b-hf,13b-chat-hf等)。例如
python webui/webui_server.py --port=8000 --model-path=meta-llama/Llama-2-7b-chat-hf。示例2:加载本地自定义模型,例如
python webui/webui_server.py --port=8000 --model-path=/llama2-7b-chat。
服务的默认模型为meta-llama/Llama-2-7b-chat-hf。
--cpu
如需使用CPU完成模型推理可使用此命令行参数。
例如:
python webui/webui_server.py --port=8000 --cpu。默认使用GPU做模型推理。
--precision
设置llama2模型的精度:支持使用fp32、fp16等精度,例如
python webui/webui_server.py --port=8000 --precision=fp32。系统根据GPU显存大小自动配置7b模型使用的精度。
--port
指定WebUI服务的监听端口。
示例:
python webui/webui_server.py --port=8000。8000
--api-only
仅使用API方式启动服务。默认情况下,部署服务会同时启动WebUI与API Server。
示例:
python webui/webui_server.py --api-only。False
--no-api
仅使用WebUI方式启动服务。默认情况下,部署服务会同时启动WebUI与API Server。
示例:
python webui/webui_server.py --no-api。False
--max-new-tokens
生成输出token的最大长度,单位为个。
示例:
python api/api_server.py --port=8000 --max-new-tokens=1024。2048
--temperature
用于调节模型输出结果的随机性,值越大随机性越强,0值为固定输出。Float类型,区间为0~1。
示例:
python api/api_server.py --port=8000 --max_length=0.8。0.95
--max_round
推理时可支持的历史对话轮数。
示例:
python api/api_server.py --port=8000 --max_round=10。5
--top_k
从生成结果中选择候选输出的数量,正整数。
示例:
python api/api_server.py --port=8000 --top_k=10。None
--top_p
从生成结果中按百分比选择输出结果。Float类型,区间为0~1。
示例:
python api/api_server.py --port=8000 --top_p=0.9。None
--no-template
Llama2、Falcon等模型会提供默认的Prompt模板,如果不设置该参数,会使用默认的Prompt模板,如果设置了该参数,您需要指定自己的模板。
示例:
python api/api_server.py --port=8000 --no-template。使用默认的Prompt模板
--log-level
选择日志输出等级,日志等级分为DEBUG、INFO、WARNING和ERROR。
示例:
python api/api_server.py --port=8000 --log-level=DEBUG。INFO
--export-history-path
EAS LLM服务支持后台导出对话记录。启动服务时,需要通过命令行参数指定导出路径。通常情况下,该路径是一个OSS的挂载路径。EAS服务会将1小时内的对话记录导出到一个文件中。
示例:
python api/api_server.py --port=8000 --export-history-path=/your_mount_path。默认不开启
--export-interval
设置倒数记录的时间周期,单位为秒。例如,设置
--export-interval=3600时,表示将最近1小时的对话记录导入到一个文件中。3600
相关文档
更多关于EAS的内容介绍,请参见EAS模型服务概述。
在WebUI页面集成LangChain业务数据后,API接口的模型推理也能生效,推荐您使用本地知识库的检索功能以增强体验,详情请参见大模型RAG对话系统。
若要了解ChatLLM-WebUI的重要版本发布信息,请参见ChatLLM-WebUI版本发布详情。