您可以通过STS服务为其他用户颁发一个临时访问凭证,该用户可使用临时访问凭证在有效时间内访问表格存储资源。临时访问凭证无需透露您的长期密钥,且超过有效期后,该凭证自动失效,使您的表格存储资源访问更加灵活和安全。
背景信息
RAM角色是一种虚拟用户,可以被授予访问特定资源的权限。与RAM用户不同,RAM角色没有永久身份凭证(登录密码或访问密钥),需要被一个可信实体(如RAM用户)扮演。扮演成功后,可信实体将获得RAM角色的临时身份凭证,即安全令牌(STS Token),使用该安全令牌就能以RAM角色身份访问表格存储。更多信息,请参见RAM角色概览。
可信实体为阿里云账号的RAM角色主要用于解决跨账号访问和临时授权问题。本文以同账号的RAM用户扮演RAM角色为例向您介绍如何使用STS临时访问凭证发起请求访问表格存储资源。
操作步骤
使用STS临时访问凭证访问表格存储,首先您需要创建一个RAM角色用于被扮演,该角色需要被授予访问表格存储的权限。其次您需要创建一个RAM用户用来扮演RAM角色,获取STS临时访问凭证。最后您需要使用获取到的STS临时访问凭证发起请求,访问表格存储资源。
步骤一:创建RAM角色
使用阿里云账号(主账号)或RAM管理员登录RAM控制台。
在左侧导航栏,选择,进入角色页面。
单击创建角色,配置信任主体信息,单击确定。
参数
示例值
信任主体类型
云账号
信任主体名称
当前云账号
在创建角色对话框,填写角色名称为
RamTablestore,单击确定。
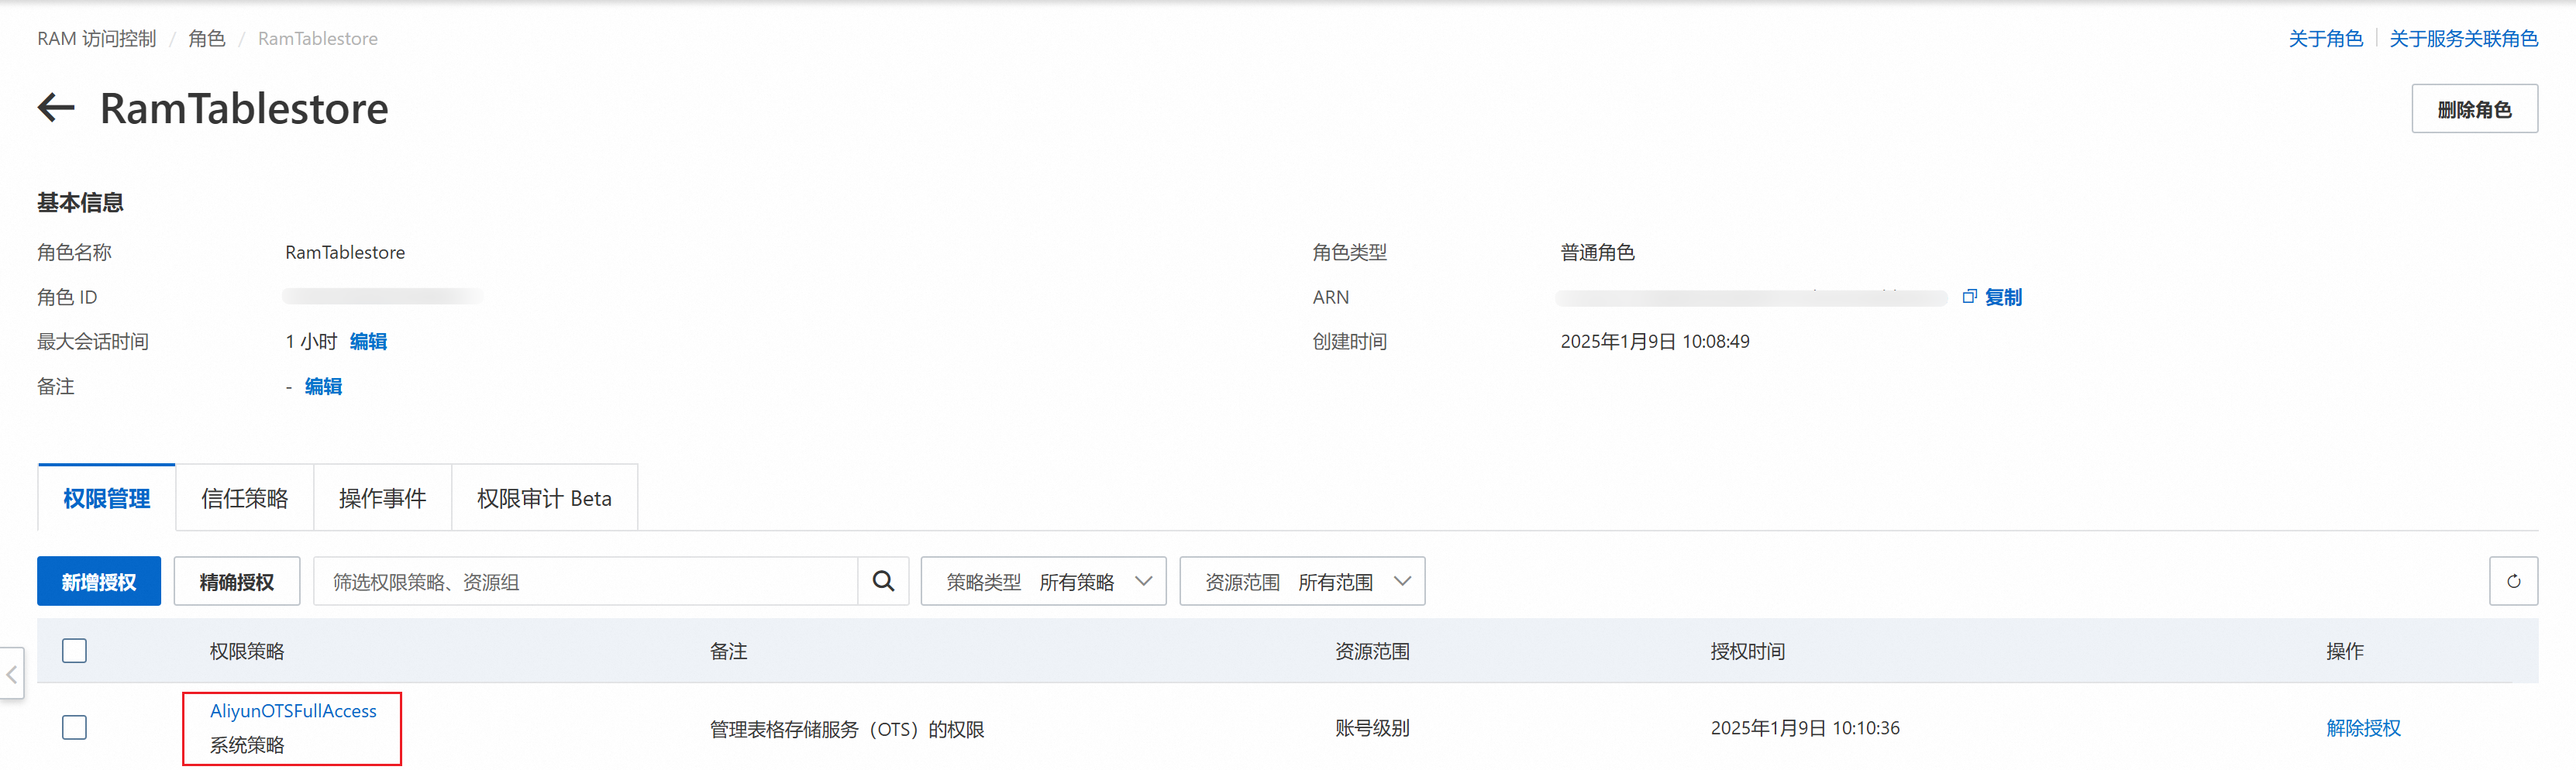
使用STS服务获取临时访问凭证时需要指定RAM角色的ARN,您可以在角色列表中单击角色名称进入角色详情页,在基本信息区域内找到ARN并复制。

步骤二:为RAM角色授予访问表格存储权限
使用默认策略
以 AliyunOTSFullAccess 为例授予RAM角色访问表格存储的权限。
AliyunOTSFullAccess 拥有表格存储的完全访问权限,您也可以选择以下方式进行授权。
如果需要只读权限,请授予RAM角色
AliyunOTSReadOnlyAccess权限。如果需要只写权限,请授予RAM角色
AliyunOTSWriteOnlyAccess权限。
在左侧导航栏,选择。
在角色页面,找到目标RAM角色。
单击RAM角色右侧的新增授权或单击角色名称进入角色详情页,在权限管理区域单击新增授权。
在新增授权面板的权限策略区域,搜索
AliyunOTSFullAccess并选中。单击确认新增授权。
使用自定义策略
创建自定义权限策略。
在左侧导航栏,选择。
在权限策略页面,单击创建权限策略。
在创建权限策略页面,单击脚本编辑,并在输入框中编写脚本,单击确定。
以下示例脚本授予访问单个实例的权限,您可以根据需要自定义策略脚本,例如表和API级别的权限控制或基于场景(IP、访问时间限制等)的权限控制。关于RAM Policy的更多信息,请参见自定义RAM Policy。
{ "Version": "1", "Statement": [ { "Effect": "Allow", "Action": "ots:*", "Resource": "acs:ots:*:*:instance/your_instance_name*" } ] }在创建权限策略对话框,填写策略名称,例如
TestRAMPolicy,单击确定。
为RAM角色授予自定义权限策略。
在左侧导航栏,选择。
在角色页面,找到目标RAM角色。
单击RAM角色右侧的新增授权或单击角色名称进入角色详情页,在权限管理区域单击新增授权。
在新增授权面板的权限策略区域,搜索并选中已创建的自定义权限策略。
单击确认新增授权。
您可以在角色列表单击角色名称进入角色详情页,在权限管理页签下查看被授权的权限策略。
步骤三:创建RAM用户
创建一个RAM用户用于扮演RAM角色。
使用阿里云账号(主账号)或RAM管理员登录RAM控制台。
在左侧导航栏,选择。
在用户页面,单击创建用户。
在创建用户页面的用户账号信息区域,设置用户基本信息。
登录名称:可包含英文字母、数字、半角句号(.)、短划线(-)和下划线(_),最多64个字符。
显示名称:最多包含128个字符或汉字。
标签:单击
 ,输入标签键和标签值。为RAM用户绑定标签,便于后续基于标签管理用户。
说明通过单击添加用户,您可以批量创建多个RAM用户。
在访问方式区域,选中使用永久AccessKey访问,单击确定。
说明如果需要使用RAM用户登录和访问阿里云控制台,请选中控制台访问。
根据界面提示,完成安全验证。
单击操作列的复制,保存RAM用户信息。您也可以单独复制AccessKey ID和AccessKey Secret。
重要RAM用户的AccessKey Secret只在创建时显示,页面关闭后将无法查看,请及时保存并妥善保管。
步骤四:为RAM用户授予请求AssumeRole的权限
扮演RAM角色需要授予RAM用户请求AssumeRole的权限。
在左侧导航栏,选择。
在用户页面,找到目标RAM用户。
单击RAM用户右侧的新增授权或单击用户名称进入用户详情页,在权限管理页签单击新增授权。
在新增授权面板的权限策略区域,搜索
AliyunSTSAssumeRoleAccess并选中。单击确认新增授权。
步骤五:使用RAM用户扮演RAM角色获取临时访问凭证
在访问资源之前,您需要使用RAM用户扮演RAM角色获取临时访问凭证,临时访问凭证只能在凭证有效期内使用。此处以Java为例介绍具体操作。
如果您想在OpenAPI门户直接调用AssumeRole接口获取临时访问凭证,请参见调用AssumeRole接口。
准备工作
您需要在Maven项目中引用以下依赖。
<dependency>
    <groupId>com.aliyun</groupId>
    <artifactId>sts20150401</artifactId>
    <version>1.1.6</version>
</dependency>
示例代码
以下示例代码使用RAM用户扮演RAM角色获取STS临时访问凭证并打印到控制台,凭证有效期是1个小时。
运行代码前请将RAM用户的AccessKey以及RAM角色的ARN配置到系统环境变量,配置方法请参见配置环境变量。
STS服务接入点(Endpoint)列表请参见服务接入点。
import com.aliyun.sts20150401.models.AssumeRoleResponse;
import com.aliyun.tea.*;

public class AssumeRoleSample {
    public static com.aliyun.sts20150401.Client createClient() throws Exception {
        // 工程代码泄露可能会导致 AccessKey 泄露,并威胁账号下所有资源的安全性。以下代码示例仅供参考。
        com.aliyun.teaopenapi.models.Config config = new com.aliyun.teaopenapi.models.Config()
                // 必填,请确保代码运行环境设置了环境变量 ALIBABA_CLOUD_ACCESS_KEY_ID。
                .setAccessKeyId(System.getenv("ALIBABA_CLOUD_ACCESS_KEY_ID"))
                // 必填,请确保代码运行环境设置了环境变量 ALIBABA_CLOUD_ACCESS_KEY_SECRET。
                .setAccessKeySecret(System.getenv("ALIBABA_CLOUD_ACCESS_KEY_SECRET"));
        // Endpoint,STS 服务接入点
        config.endpoint = "sts.cn-hangzhou.aliyuncs.com";
        return new com.aliyun.sts20150401.Client(config);
    }

    public static void main(String[] args) throws Exception {
        com.aliyun.sts20150401.Client client = AssumeRoleSample.createClient();
        com.aliyun.sts20150401.models.AssumeRoleRequest assumeRoleRequest = new com.aliyun.sts20150401.models.AssumeRoleRequest()
                // 临时访问凭证的有效时间,单位为秒。最小值为900,最大值以当前角色设定的最大会话时间为准。当前角色最大会话时间取值范围为3600秒~43200秒,默认值为3600秒。
                .setDurationSeconds(3600L)
                // 必填,请确保代码运行环境设置了环境变量 TABLESTORE_STS_ROLE_ARN,即 RAM 角色的 ARN。
                .setRoleArn(System.getenv("TABLESTORE_STS_ROLE_ARN"))
                // 必填,自定义角色会话名称,用来区分不同的令牌。
                .setRoleSessionName("RAMTablestore");
        com.aliyun.teautil.models.RuntimeOptions runtime = new com.aliyun.teautil.models.RuntimeOptions();
        try {
            // 获取 STS 临时访问凭证并打印,请妥善保管临时访问凭证。
            AssumeRoleResponse response = client.assumeRoleWithOptions(assumeRoleRequest, runtime);
            System.out.println("Expiration: " + response.getBody().getCredentials().getExpiration());
            System.out.println("Access Key Id: " + response.getBody().getCredentials().getAccessKeyId());
            System.out.println("Access Key Secret: " + response.getBody().getCredentials().getAccessKeySecret());
            System.out.println("Security Token: " + response.getBody().getCredentials().getSecurityToken());
        } catch (TeaException error) {
            // 此处仅做打印展示,请谨慎对待异常处理,在工程项目中切勿直接忽略异常。
            // 错误 message
            System.out.println(error.getMessage());
            // 诊断地址
            System.out.println(error.getData().get("Recommend"));
            com.aliyun.teautil.Common.assertAsString(error.message);
        } catch (Exception _error) {
            TeaException error = new TeaException(_error.getMessage(), _error);
            // 此处仅做打印展示,请谨慎对待异常处理,在工程项目中切勿直接忽略异常。
            // 错误 message
            System.out.println(error.getMessage());
            // 诊断地址
            System.out.println(error.getData().get("Recommend"));
            com.aliyun.teautil.Common.assertAsString(error.message);
        }
    }
}如果您想了解更多语言的STS SDK及代码示例,请参见STS SDK概览。
步骤六:使用临时访问凭证访问表格存储
准备工作
在表格存储控制台创建实例和数据表。
获取实例名称、实例访问地址、地域ID。地域列表请参见地域。
根据不同的编程语言,安装对应的Tablestore SDK。
Java
如果您使用的是Maven项目,请在项目的pom.xml文件中添加如下依赖:
<dependency> <groupId>com.aliyun.openservices</groupId> <artifactId>tablestore</artifactId> <version>5.17.4</version> </dependency>更多信息,请参见安装Tablestore Java SDK。
Go
在项目目录中执行
go mod init <DIRNAME>命令生成go.mod文件后,执行如下命令安装表格存储Go SDK。说明<DIRNAME>为项目目录路径,请以实际路径为准。go get github.com/aliyun/aliyun-tablestore-go-sdk/tablestore更多信息,请参见安装Tablestore Go SDK。
Python
执行如下命令直接通过pip进行SDK安装。
sudo pip install tablestore更多信息,请参见安装Tablestore Python SDK。
Node.js
通过npm执行如下命令安装表格存储Node.js SDK。
npm install tablestore说明如果使用npm遇到网络问题,您可以使用淘宝提供的npm镜像。具体网址请参见cnpm。
更多信息,请参见安装Tablestore Node.js SDK。
.NET
具体操作,请参见安装Tablestore .NET SDK。
PHP
具体操作,请参见安装Tablestore PHP SDK。
宽表模型
使用宽表模型时,您需要使用STS临时访问凭证初始化Tablestore Client并发起请求。
运行代码前请替换代码内的实例信息,并将STS临时访问凭证配置到系统环境变量,配置方法请参见配置环境变量。
Java
V4签名(推荐)
以下Java示例代码使用V4签名初始化Tablestore Client,并获取实例中的所有数据表名称。
import com.alicloud.openservices.tablestore.ClientConfiguration;
import com.alicloud.openservices.tablestore.SyncClient;
import com.alicloud.openservices.tablestore.core.ResourceManager;
import com.alicloud.openservices.tablestore.core.auth.*;
import com.alicloud.openservices.tablestore.model.AlwaysRetryStrategy;
import com.alicloud.openservices.tablestore.model.ListTableResponse;

public class InitClientV4 {
    public static void main(String[] args) {
        // yourRegion 填写您的实例所在地域,如 cn-hangzhou
        final String region = "yourRegion";
        // yourInstanceName 填写您的实例名称
        final String instanceName = "yourInstanceName";
        // yourEndpoint 填写您的实例访问地址
        final String endpoint = "yourEndpoint";
        // 获取环境变量里的 STS AccessKey ID、STS AccessKey Secret 和 STS Token
        final String accessKeyId = System.getenv("TABLESTORE_ACCESS_KEY_ID");
        final String accessKeySecret = System.getenv("TABLESTORE_ACCESS_KEY_SECRET");
        final String securityToken = System.getenv("TABLESTORE_SESSION_TOKEN");

        // 构造 V4 签名
        DefaultCredentials credentials = new DefaultCredentials(accessKeyId, accessKeySecret, securityToken);
        V4Credentials credentialsV4 = V4Credentials.createByServiceCredentials(credentials, region);
        CredentialsProvider provider = new DefaultCredentialProvider(credentialsV4);

        // 初始化 Tablestore Client
        SyncClient client = new SyncClient(endpoint, provider, instanceName, null, new ResourceManager(null, null));

        /*
        // 您可以通过指定 ClientConfiguration 修改默认配置项,以下示例为部分自定义配置项。
        ClientConfiguration clientConfiguration = new ClientConfiguration();
        clientConfiguration.setConnectionTimeoutInMillisecond(5000); // 设置建立连接的超时时间,单位为毫秒。
        clientConfiguration.setSocketTimeoutInMillisecond(5000); // 设置 socket 超时时间,单位为毫秒。
        clientConfiguration.setRetryStrategy(new AlwaysRetryStrategy()); // 设置重试策略,如果不设置,则采用默认的重试策略。
        SyncClient client = new SyncClient(endpoint, provider, instanceName, clientConfiguration, new ResourceManager(null, null));
         */

        // 列出实例中的数据表列表并打印到控制台
        ListTableResponse listTableResponse = client.listTable();
        listTableResponse.getTableNames().forEach(System.out::println);

        // 关闭 Tablestore Client
        client.shutdown();
    }
}V2签名
以下Java示例代码使用V2签名初始化Tablestore Client,并获取实例中的所有数据表名称。
import com.alicloud.openservices.tablestore.ClientConfiguration;
import com.alicloud.openservices.tablestore.SyncClient;
import com.alicloud.openservices.tablestore.core.ResourceManager;
import com.alicloud.openservices.tablestore.core.auth.CredentialsProvider;
import com.alicloud.openservices.tablestore.core.auth.DefaultCredentialProvider;
import com.alicloud.openservices.tablestore.core.auth.DefaultCredentials;
import com.alicloud.openservices.tablestore.model.AlwaysRetryStrategy;
import com.alicloud.openservices.tablestore.model.ListTableResponse;

public class InitClientV2 {
    public static void main(String[] args) {
        // yourInstanceName 填写您的实例名称
        final String instanceName = "yourInstanceName";
        // yourEndpoint 填写您的实例访问地址
        final String endpoint = "yourEndpoint";
        // 获取环境变量里的 STS AccessKey ID、STS AccessKey Secret 和 STS Token
        final String accessKeyId = System.getenv("TABLESTORE_ACCESS_KEY_ID");
        final String accessKeySecret = System.getenv("TABLESTORE_ACCESS_KEY_SECRET");
        final String securityToken = System.getenv("TABLESTORE_SESSION_TOKEN");

        // 构造 V2 签名
        DefaultCredentials credentials = new DefaultCredentials(accessKeyId, accessKeySecret, securityToken);
        CredentialsProvider provider = new DefaultCredentialProvider(credentials);

        // 初始化 Tablestore Client
        SyncClient client = new SyncClient(endpoint, provider, instanceName, null, new ResourceManager(null, null));

        /*
        // 您可以通过指定 ClientConfiguration 修改默认配置项,以下示例为部分自定义配置项。
        ClientConfiguration clientConfiguration = new ClientConfiguration();
        clientConfiguration.setConnectionTimeoutInMillisecond(5000); // 设置建立连接的超时时间,单位为毫秒。
        clientConfiguration.setSocketTimeoutInMillisecond(5000); // 设置 socket 超时时间,单位为毫秒。
        clientConfiguration.setRetryStrategy(new AlwaysRetryStrategy()); // 设置重试策略,如果不设置,则采用默认的重试策略。
        SyncClient client = new SyncClient(endpoint, provider, instanceName, clientConfiguration, new ResourceManager(null, null));
         */

        // 列出实例中的数据表列表并打印到控制台
        ListTableResponse listTableResponse = client.listTable();
        listTableResponse.getTableNames().forEach(System.out::println);

        // 关闭 Tablestore Client
        client.shutdown();
    }
}
Go
以下Go示例代码用于初始化Tablestore Client,并获取实例中的所有数据表名称。
package main

import (
	"fmt"
	"os"
	"github.com/aliyun/aliyun-tablestore-go-sdk/tablestore"
)

func main() {
	// yourInstanceName 填写您的实例名称
	instanceName := "yourInstanceName"
	// yourEndpoint 填写您的实例访问地址
	endpoint := "yourEndpoint"
	// 获取环境变量里的 STS AccessKey ID、STS AccessKey Secret 和 STS Token
	accessKeyId := os.Getenv("TABLESTORE_ACCESS_KEY_ID")
	accessKeySecret := os.Getenv("TABLESTORE_ACCESS_KEY_SECRET")
	securityToken := os.Getenv("TABLESTORE_SESSION_TOKEN")

	// 初始化 Tablestore Client
	client := tablestore.NewClientWithConfig(endpoint, instanceName, accessKeyId, accessKeySecret, securityToken, nil)

	// 列出实例中的数据表列表并打印到控制台
	tables, err := client.ListTable()
    if err != nil {
        fmt.Println("Failed to list table.")
    } else {
        for _, table := range (tables.TableNames) {
            fmt.Println(table)
        }
    }
}
Python
以下Python示例代码用于初始化Tablestore Client,并获取实例中的所有数据表名称。
# -*- coding: utf-8 -*-
import os
from tablestore import OTSClient

# yourInstanceName 填写您的实例名称
instance_name = "yourInstanceName"
# yourEndpoint 填写您的实例访问地址
endpoint = "yourEndpoint"
# 获取环境变量里的 STS AccessKey ID、STS AccessKey Secret 和 STS Token
access_key_id = os.getenv("TABLESTORE_ACCESS_KEY_ID")
access_key_secret = os.getenv("TABLESTORE_ACCESS_KEY_SECRET")
sts_token = os.getenv("TABLESTORE_SESSION_TOKEN")

# 初始化 Tablestore Client
client = OTSClient(endpoint, access_key_id, access_key_secret, instance_name, sts_token=sts_token)

# 列出实例中的数据表列表并打印到控制台
resp = client.list_table()
for table_name in resp:
    print(table_name)
Node.js
以下Node.js示例代码用于初始化Tablestore Client,并获取实例中的所有数据表名称。
// 此处为相对路径,请根据实际情况进行调整。
var TableStore = require('../index.js');

// yourInstanceName 填写您的实例名称
var instancename = 'yourInstanceName';
// yourEndpoint 填写您的实例访问地址
var endpoint = 'yourEndpoint';
// 获取环境变量里的 STS AccessKey ID、STS AccessKey Secret 和 STS Token
var accessKeyId = process.env.TABLESTORE_ACCESS_KEY_ID;
var accessKeySecret = process.env.TABLESTORE_ACCESS_KEY_SECRET;
var stsToken = process.env.TABLESTORE_SESSION_TOKEN;

// 初始化 Tablestore Client
var client = new TableStore.Client({
  accessKeyId: accessKeyId,
  secretAccessKey: accessKeySecret,
  stsToken: stsToken,
  endpoint: endpoint,
  instancename: instancename
});

// 列出实例中的数据表列表并打印到控制台
client.listTable({}, function (err, data) {
    if (err) {
        console.log('error:', err);
        return;
    }
    console.log('success:', data);
});
PHP
以下PHP示例代码用于初始化Tablestore Client,并获取实例中的所有数据表名称。
<?php
// 此处为相对路径,请根据实际情况进行调整。
require (__DIR__ . '/../../vendor/autoload.php');

use Aliyun\OTS\OTSClient as OTSClient;

// yourInstanceName 填写您的实例名称
$instanceName = "yourInstanceName";
// yourEndpoint 填写您的实例访问地址
$endpoint = "yourEndpoint";
// 获取环境变量里的 STS AccessKey ID、STS AccessKey Secret 和 STS Token
$accessKeyId = getenv('TABLESTORE_ACCESS_KEY_ID');
$accessKeySecret = getenv('TABLESTORE_ACCESS_KEY_SECRET');
$stsToken = getenv('TABLESTORE_SESSION_TOKEN');


// 初始化 Tablestore Client
$otsClient = new OTSClient(array(
    'EndPoint' => $endpoint,
    'AccessKeyID' => $accessKeyId,
    'AccessKeySecret' => $accessKeySecret,
    'InstanceName' => $instanceName,
    'StsToken' => $stsToken,
));

# 列出实例中的数据表列表并打印到控制台
$response = $otsClient->listTable (array ());
print json_encode ($response);
时序模型
使用时序模型时,您需要使用STS临时访问凭证初始化Timeseries Client并发起请求。目前仅Java和Go语言支持操作时序模型。
运行代码前请替换代码内的实例信息,并将STS临时访问凭证配置到系统环境变量,配置方法请参见配置环境变量。
Java
V4签名(推荐)
以下Java示例代码使用V4签名初始化Timeseries Client,并获取实例中的所有时序表名称。
import com.alicloud.openservices.tablestore.ClientConfiguration;
import com.alicloud.openservices.tablestore.TimeseriesClient;
import com.alicloud.openservices.tablestore.core.ResourceManager;
import com.alicloud.openservices.tablestore.core.auth.CredentialsProvider;
import com.alicloud.openservices.tablestore.core.auth.DefaultCredentialProvider;
import com.alicloud.openservices.tablestore.core.auth.DefaultCredentials;
import com.alicloud.openservices.tablestore.core.auth.V4Credentials;
import com.alicloud.openservices.tablestore.model.AlwaysRetryStrategy;
import com.alicloud.openservices.tablestore.model.timeseries.ListTimeseriesTableResponse;

public class InitTimeseriesClientV4 {
    public static void main(String[] args) {
        // yourRegion 填写您的实例所在地域,如 cn-hangzhou
        final String region = "yourRegion";
        // yourInstanceName 填写您的实例名称
        final String instanceName = "yourInstanceName";
        // yourEndpoint 填写您的实例访问地址
        final String endpoint = "yourEndpoint";
        // 获取环境变量里的 STS AccessKey ID、STS AccessKey Secret 和 STS Token
        final String accessKeyId = System.getenv("TABLESTORE_ACCESS_KEY_ID");
        final String accessKeySecret = System.getenv("TABLESTORE_ACCESS_KEY_SECRET");
        final String securityToken = System.getenv("TABLESTORE_SESSION_TOKEN");

        // 构造 V4 签名
        DefaultCredentials credentials = new DefaultCredentials(accessKeyId, accessKeySecret, securityToken);
        V4Credentials credentialsV4 = V4Credentials.createByServiceCredentials(credentials, region);
        CredentialsProvider provider = new DefaultCredentialProvider(credentialsV4);

        // 初始化 Tablestore TimeSeries Client
        TimeseriesClient client = new TimeseriesClient(endpoint, provider, instanceName, null, new ResourceManager(null, null));

        /*
        // 您可以通过指定 ClientConfiguration 修改默认配置项,以下示例为部分自定义配置项。
        ClientConfiguration clientConfiguration = new ClientConfiguration();
        clientConfiguration.setConnectionTimeoutInMillisecond(5000); // 设置建立连接的超时时间,单位为毫秒。
        clientConfiguration.setSocketTimeoutInMillisecond(5000); // 设置 socket 超时时间,单位为毫秒。
        clientConfiguration.setRetryStrategy(new AlwaysRetryStrategy()); // 设置重试策略,如果不设置,则采用默认的重试策略。
        TimeseriesClient client = new TimeseriesClient(endpoint, provider, instanceName, clientConfiguration, new ResourceManager(null, null));
         */

        // 列出实例中的时序表列表并打印到控制台
        ListTimeseriesTableResponse listTimeseriesTableResponse = client.listTimeseriesTable();
        listTimeseriesTableResponse.getTimeseriesTableNames().forEach(System.out::println);

        // 关闭 Tablestore Client
        client.shutdown();
    }
}V2签名
以下Java示例代码使用V2签名初始化Timeseries Client,并获取实例中的所有时序表名称。
import com.alicloud.openservices.tablestore.ClientConfiguration;
import com.alicloud.openservices.tablestore.TimeseriesClient;
import com.alicloud.openservices.tablestore.core.ResourceManager;
import com.alicloud.openservices.tablestore.core.auth.CredentialsProvider;
import com.alicloud.openservices.tablestore.core.auth.DefaultCredentialProvider;
import com.alicloud.openservices.tablestore.core.auth.DefaultCredentials;
import com.alicloud.openservices.tablestore.model.AlwaysRetryStrategy;
import com.alicloud.openservices.tablestore.model.timeseries.ListTimeseriesTableResponse;

public class InitTimeseriesClientV2 {
    public static void main(String[] args) {
        // yourInstanceName 填写您的实例名称
        final String instanceName = "yourInstanceName";
        // yourEndpoint 填写您的实例访问地址
        final String endpoint = "yourEndpoint";
        // 获取环境变量里的 STS AccessKey ID、STS AccessKey Secret 和 STS Token
        final String accessKeyId = System.getenv("TABLESTORE_ACCESS_KEY_ID");
        final String accessKeySecret = System.getenv("TABLESTORE_ACCESS_KEY_SECRET");
        final String securityToken = System.getenv("TABLESTORE_SESSION_TOKEN");

        // 构造 V2 签名
        DefaultCredentials credentials = new DefaultCredentials(accessKeyId, accessKeySecret, securityToken);
        CredentialsProvider provider = new DefaultCredentialProvider(credentials);

        // 初始化 Tablestore TimeSeries Client
        TimeseriesClient client = new TimeseriesClient(endpoint, provider, instanceName, null, new ResourceManager(null, null));

        /*
        // 您可以通过指定 ClientConfiguration 修改默认配置项,以下示例为部分自定义配置项。
        ClientConfiguration clientConfiguration = new ClientConfiguration();
        clientConfiguration.setConnectionTimeoutInMillisecond(5000); // 设置建立连接的超时时间,单位为毫秒。
        clientConfiguration.setSocketTimeoutInMillisecond(5000); // 设置 socket 超时时间,单位为毫秒。
        clientConfiguration.setRetryStrategy(new AlwaysRetryStrategy()); // 设置重试策略,如果不设置,则采用默认的重试策略。
        TimeseriesClient client = new TimeseriesClient(endpoint, provider, instanceName, clientConfiguration, new ResourceManager(null, null));
         */

        // 列出实例中的时序表列表并打印到控制台
        ListTimeseriesTableResponse listTimeseriesTableResponse = client.listTimeseriesTable();
        listTimeseriesTableResponse.getTimeseriesTableNames().forEach(System.out::println);

        // 关闭 Tablestore Client
        client.shutdown();
    }
}
Go
以下Go示例代码用于初始化Timeseries Client,并获取实例中的所有时序表名称。
package main

import (
    "fmt"
    "os"
    "github.com/aliyun/aliyun-tablestore-go-sdk/tablestore"
)

func main() {
    // yourInstanceName 填写您的实例名称
    instanceName := "yourInstanceName"
    // yourEndpoint 填写您的实例访问地址
    endpoint := "yourEndpoint"
    // 获取环境变量里的 STS AccessKey ID、STS AccessKey Secret 和 STS Token
    accessKeyId := os.Getenv("TABLESTORE_ACCESS_KEY_ID")
    accessKeySecret := os.Getenv("TABLESTORE_ACCESS_KEY_SECRET")
    securityToken := os.Getenv("TABLESTORE_SESSION_TOKEN")

    // 初始化 Tablestore Client
    client := tablestore.NewTimeseriesClientWithConfig(endpoint, instanceName, accessKeyId, accessKeySecret, securityToken, nil, nil)

    // 列出实例中的数据表列表并打印到控制台
    timeseriesTables, err := client.ListTimeseriesTable()
    if err != nil {
        fmt.Println("Failed to list table.")
    } else {
        for _, timeseriesTablesMeta := range (timeseriesTables.GetTimeseriesTableMeta()) {
            fmt.Println(timeseriesTablesMeta.GetTimeseriesTableName())
        }
    }
}
配置环境变量
直接在代码中保存访问凭证容易导致信息泄露,请按以下操作将访问凭证保存在系统环境变量中。
Windows
# 配置 RAM 用户的 AccessKey ID
setx ALIBABA_CLOUD_ACCESS_KEY_ID your_access_key_id /m
# 配置 RAM 用户的 AccessKey Secret
setx ALIBABA_CLOUD_ACCESS_KEY_SECRET your_access_key_secret /m
# 配置 RAM 角色的 ARN
setx TABLESTORE_STS_ROLE_ARN your_ram_role_arn /m
# 配置临时访问凭证 STS AccessKey ID
setx TABLESTORE_ACCESS_KEY_ID your_sts_access_key_id /m
# 配置临时访问凭证 STS AccessKey Secret
setx TABLESTORE_ACCESS_KEY_SECRET your_sts_access_key_secret /m
# 配置临时访问凭证 STS Token
setx TABLESTORE_SESSION_TOKEN your_sts_token /m
macOS/Linux/Unix
# 配置 RAM 用户的 AccessKey ID
export ALIBABA_CLOUD_ACCESS_KEY_ID=your_access_key_id
# 配置 RAM 用户的 AccessKey Secret
export ALIBABA_CLOUD_ACCESS_KEY_SECRET=your_access_key_secret
# 配置 RAM 角色的 ARN
export TABLESTORE_STS_ROLE_ARN=your_ram_role_arn
# 配置临时访问凭证 STS AccessKey ID
export TABLESTORE_ACCESS_KEY_ID=your_sts_access_key_id
# 配置临时访问凭证 STS AccessKey Secret
export TABLESTORE_ACCESS_KEY_SECRET=your_sts_access_key_secret
# 配置临时访问凭证 STS Token
export TABLESTORE_SESSION_TOKEN=your_sts_token