Blocks
A block is a black box tool that encapsulates basic widgets. This topic describes the features of blocks to help you quickly understand and use them.
A block defines data transmission between its internal and external environments. Internally, you can encapsulate business-related widget styles, widget layouts, default data (excluding data sources other than static data and APIs), and blueprint logic. Externally, you can define business-related data interfaces for the block.
The block feature is available only in DataV Professional Edition and Premium Edition. To use this feature, you can upgrade your DataV edition.
Block interface nodes
Blocks define internal and external data transmission. You can configure them using the Data interface, Event interface, and Action interface nodes in the blueprint editor. The differences between these interfaces are as follows:
Data interface: Receives data from external data sources into the block. The blueprint editor then distributes this data to internal widgets.
Event interface: Receives events from internal widgets and exposes the data externally.
Action interface: Receives actions triggered by external widgets and directs internal widgets to execute the corresponding business logic.
When you use a block, treat it as a single unit. You only need to understand and set its externally defined block interfaces, without needing to know the internal logic. For more information about how to configure and use block interfaces in the block editor, see Use block interfaces.
Block example
The following figure shows an example block. The block defines two data interfaces, one event interface, and three action interfaces. The functions of each interface type are explained in the following examples.
The Import rose chart data interface receives data and immediately imports it into the ECharts rose chart widget.
The List Carousel Click event interface accepts data emitted from the List Carousel widget's When A Single Row Is Clicked event.
The Update style action interface is triggered after data is acquired. The data is processed by a serial data processing logic node, which then calls the vertical capsule column chart widget's Update widget configuration action.
The following figures show the Data Source Configuration, Interaction, and Blueprint Parameters panels for the example block when it is in use.
Data configuration
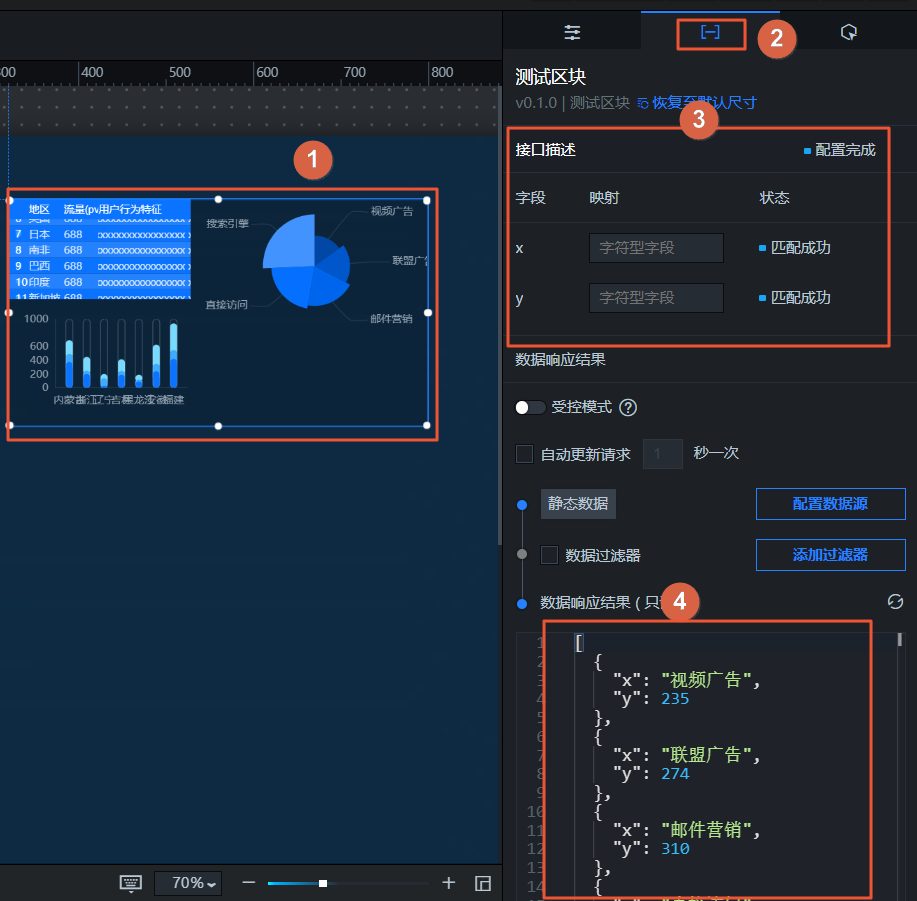
Interaction configuration
Blueprint parameter configuration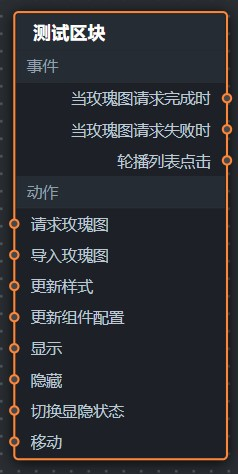
FAQ
Q: Does a block contain widgets?
A: You can drag a component from the block editor's layer panel onto the canvas to configure the block component.
Q: Is there interaction within a block?
A: You can export a block to the blueprint editor, where you can connect the block interface node to the corresponding component node to configure the business logic interactions. For more information, see Use block interfaces.
Q: Is there interaction between the inside and outside of a block?
A: You can create a block API and add it to a visualization screen. For more information, see Use a block API and Add a block.
Q: How do I debug a block?
A: You can use the block preview feature to debug configured block interfaces and other features.
Q: After a block is built, how do I use it in the visualization application canvas editor?
A: First, publish the block. Then, go to the visualization application canvas editor. In the editor, open the asset list, select the Blocks module, and view your built blocks in the block list. You can also add the blocks you need. For more information, see Publish a block and Add a block.
Q: After a new version of a block is published, how do I perform a one-click upgrade for an old block that is in use in a visualization application?
A: In the canvas editor, click the target block to open its configuration panel on the right. In the upper-right corner of the panel, click the button to upgrade the block version. The method for upgrading a block is the same as for upgrading other assets. For more information, see Upgrade an asset.
Q: How can I create a block quickly and easily?
A: In addition to creating a blank block from the My Blocks panel, you can also perform a one-click upgrade of a favorited widget to a block from the widget favorites panel. Alternatively, you can select a widget in the canvas editor, right-click it, and export it as a block. For more information, see Upgrade a favorited asset to a block.