After purchasing Quick Audience with your Alibaba Cloud account, you must complete a few setup steps before you can use your data for user insight analysis and other operations.
This topic describes how to quickly configure accounts and create data sources and datasets. This example assumes that only an Alibaba Cloud account and several developer users have been added to the system.
In this example, the Alibaba Cloud account serves as both the organization administrator and the workspace administrator. You can also assign these roles to other users or add users with different roles. For more information about system configuration, see Organization Member Management.
Prerequisites
You have purchased Quick Audience with your Alibaba Cloud account.
A user has registered an Alibaba Cloud account on the official Alibaba Cloud website. Alternatively, the Alibaba Cloud account has created a Resource Access Management (RAM) user for other users. For more information, see Create a RAM user.
Add members
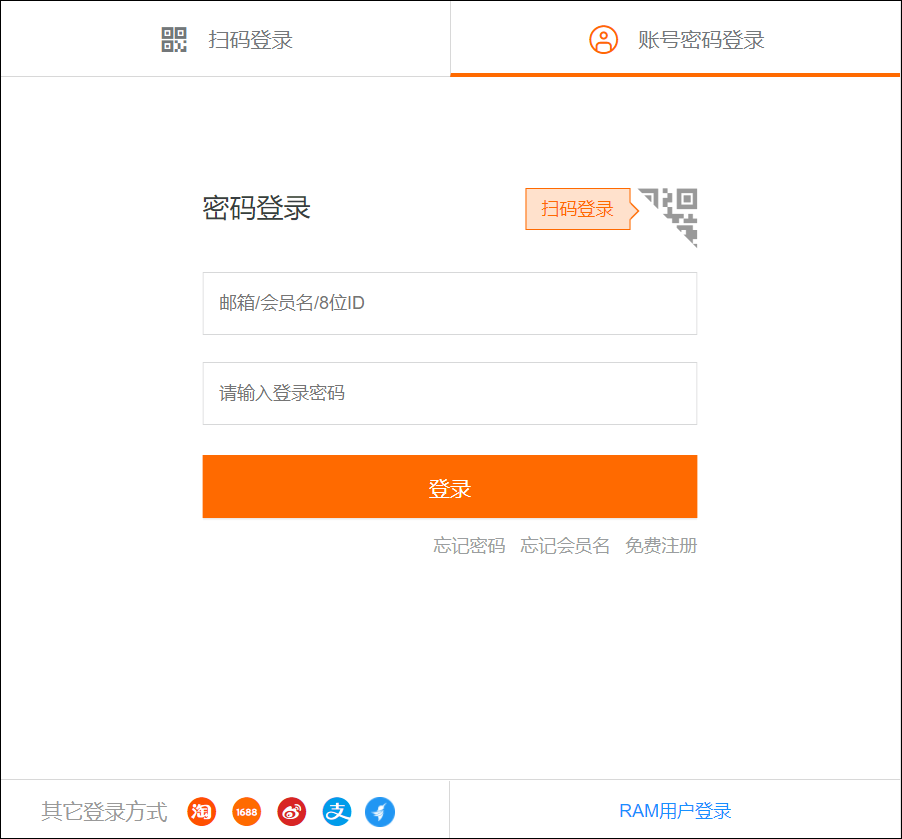
Log on to the Quick Audience console with the Alibaba Cloud account that you used to purchase Quick Audience.
If the organization is not initialized, the organization initialization page appears after you log on. Enter an organization name and click Create to complete the initialization.
After the organization is initialized, the system automatically creates a workspace named "Default Workspace".
Operations such as user insights and marketing must be performed in a workspace. If you need multiple workspaces for different brands or departments, create new workspaces.
In the upper-right corner of the page, click the
 icon. In the navigation pane on the left, choose Organization Management > Workspace Management.
In the upper-right corner, click New Workspace.
In the dialog box that appears, enter a workspace name and description, and then click OK.
Add members to the workspace and assign them the developer role. This allows the members to create and use datasets in the workspace.
In the upper-right corner of the page, click the
 icon. From the drop-down list in the upper-left corner, select the workspace to which you want to add members. Choose Workspace > Space Members Management.
In the upper-right corner, choose Add Space Member > Add Single Member.
In the dialog box that appears, enter the Alibaba Cloud account of the member, enter a nickname for the user, and select a workspace role to grant to the member. In this example, the role is Developer.
ImportantWhen adding a member, use the full account name. For a RAM user, the format is <username>@<default domain name> or <username>@<enterprise alias>. Do not omit the at sign (@) and the characters that follow it. Otherwise, the system cannot identify the account.
The nickname must be unique within the organization. The nickname can be the same as the account name. If the account name contains an at sign (@), use the characters before the at sign.
Add a data source
Quick Audience supports AnalyticDB for MySQL 3.0 (ADB 3.0), AnalyticDB for MySQL 2.0 (ADB 2.0), and AnalyticDB for PostgreSQL (ADB PG).
In Quick Audience, data sources are classified into two types based on their scope:
Organization data source: A data source added to an organization. It can be used by multiple workspaces within the organization. To use an organization data source in a workspace, you must first grant permissions to that workspace. If the data in your data source can be used by multiple workspaces, set it as an organization data source.
Workspace data source: A data source added to a specific workspace. It can only be used by that workspace. If a data source is only for a single workspace, set it as a workspace data source.
The following steps describe how to add an organization data source using ADB 3.0 as an example. For information about adding other types of data sources, see Data Source Table Authorization. To add ADB 3.0 as a workspace data source, configure the same parameters and whitelist IP addresses. For more information about adding a workspace data source, see Data Source (Analytical Data Source).
Log on to the Quick Audience console with the Alibaba Cloud account that you used to purchase Quick Audience.
In the upper-right corner of the page, click the
icon. In the navigation pane on the left, choose Organization Management > Data Authorization to go to the Data Source Table Authorization page.In the upper-right corner of the page, click New Data Source.
In the dialog box that appears, set Data Source Type to AnalyticDB for MySQL 3.0.
Configure the data source parameters as described in the following table.
Parameter
Description
Display Name
Enter a display name for the data source. For example, XX_purpose_ADB3.0.
Region
Select the region where the data source is located.
Database Address
Enter the hostname or IP address of the data source.
Port
Enter the port number.
Database
Enter the name of the database to connect to.
Account
Enter the database user account for the connection.
This can be a privileged account or a standard account. A standard account must be granted all operation permissions on the database. For more information, see ADB 3.0 Database Accounts.
Password
Enter the password for the database user.
Obtain the preceding parameters as follows:
Log on to the AnalyticDB console with the Alibaba Cloud account that you used to purchase the ADB 3.0 cluster.
In the upper-left corner of the page, select the region where the cluster is located.
In the navigation pane on the left, choose Cluster List. On the 3.0 Cluster List tab, click the ID of the cluster that you want to use to go to the cluster management page.
On the Cluster Information page, obtain the Region (Zone), Database Address (Public Endpoint), and Port (Public Port) parameters.
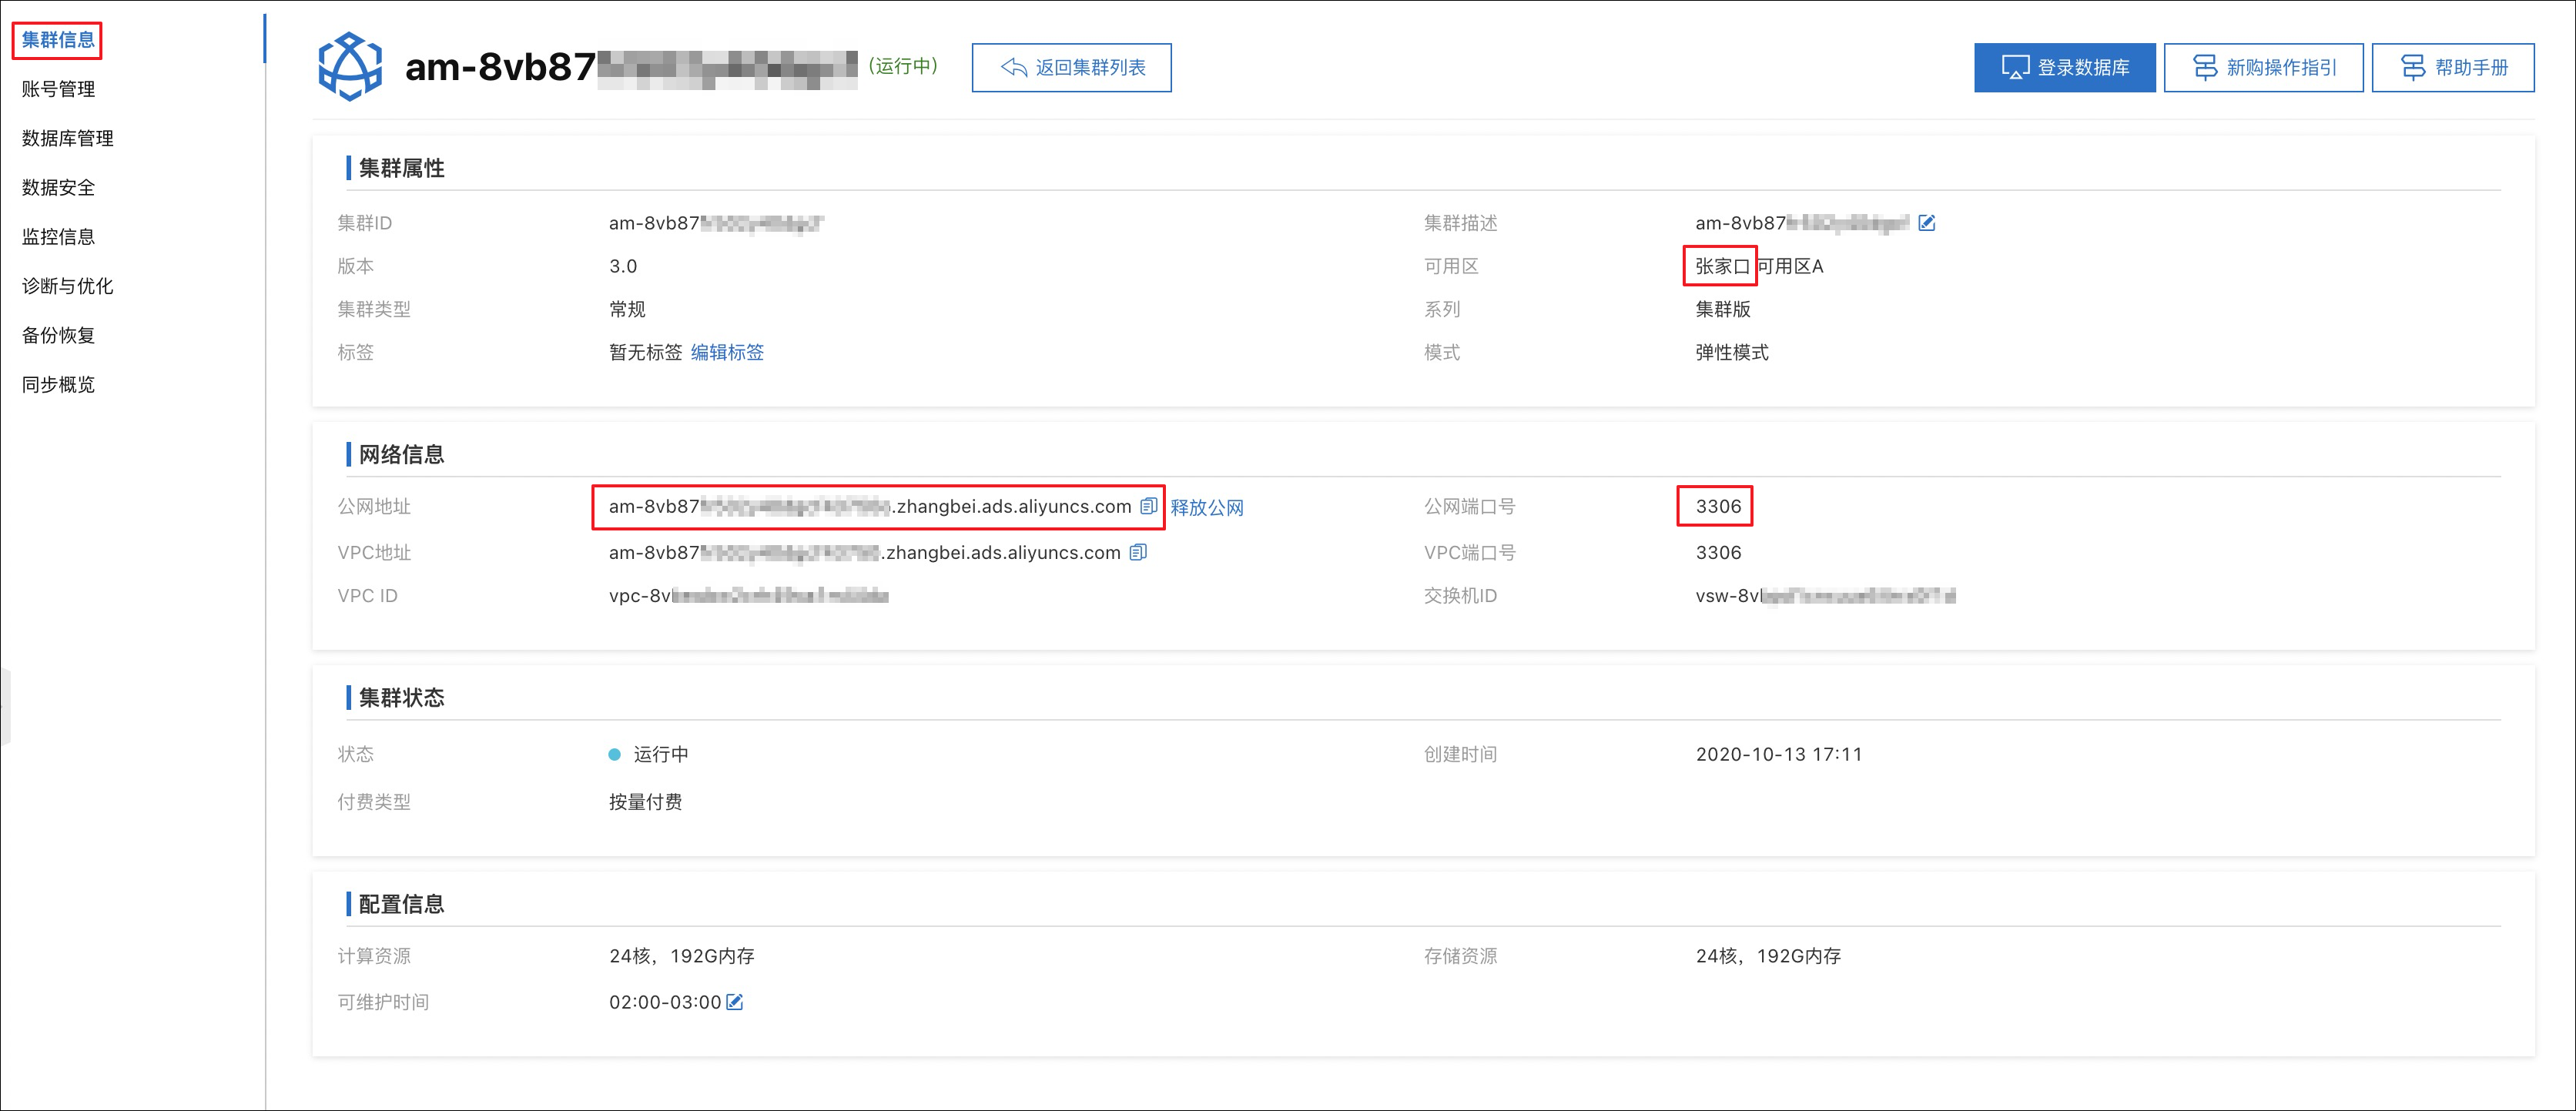
On the Account Management page, obtain the Account and Password parameters.

In the navigation pane on the left, choose Database Management to obtain the Database (Database Name) parameter.
In the AnalyticDB console, choose Data Security in the navigation pane on the left. Click Modify and add the IP address of Quick Audience, which is provided on the Add Data Source page, to the whitelist. This allows Quick Audience to access the data source cluster. For more information, see Set a whitelist.
Click Connection Test to test the connectivity of the data source.
If the test fails, a message appears. Modify the configuration.
After the connectivity test is successful, click Add to complete the configuration.
NoteThe IP addresses for Quick Audience vary by region. Set the whitelist based on the IP address provided on the interface.

After you add an organization data source, you must grant permissions to the workspace. There are three types of authorization for organization data sources:
Table permissions: Grant permissions on an entire table to a workspace.
Row permissions: Grant permissions on specific rows in a table to a workspace by filtering based on the values of specified fields. If you specify multiple fields, the authorized rows must meet the value requirements of all specified fields.
Column permissions: Grant permissions on specified fields of a table to a workspace.
The following steps describe how to grant table permissions. For information about other permission types, see Authorize an organization data source.
After you add the organization data source, it appears on the Data Source Table Authorization page. Click the
icon for the data source.In the dialog box that appears, select Table Permission.
Select the data tables from the data source to grant permissions on, and the workspace to grant access to. You can select multiple items or all items.
Set the authorization validity period.
Click OK to complete the authorization. The authorized workspaces appear in the authorized workspace list.
 icon for the data source.
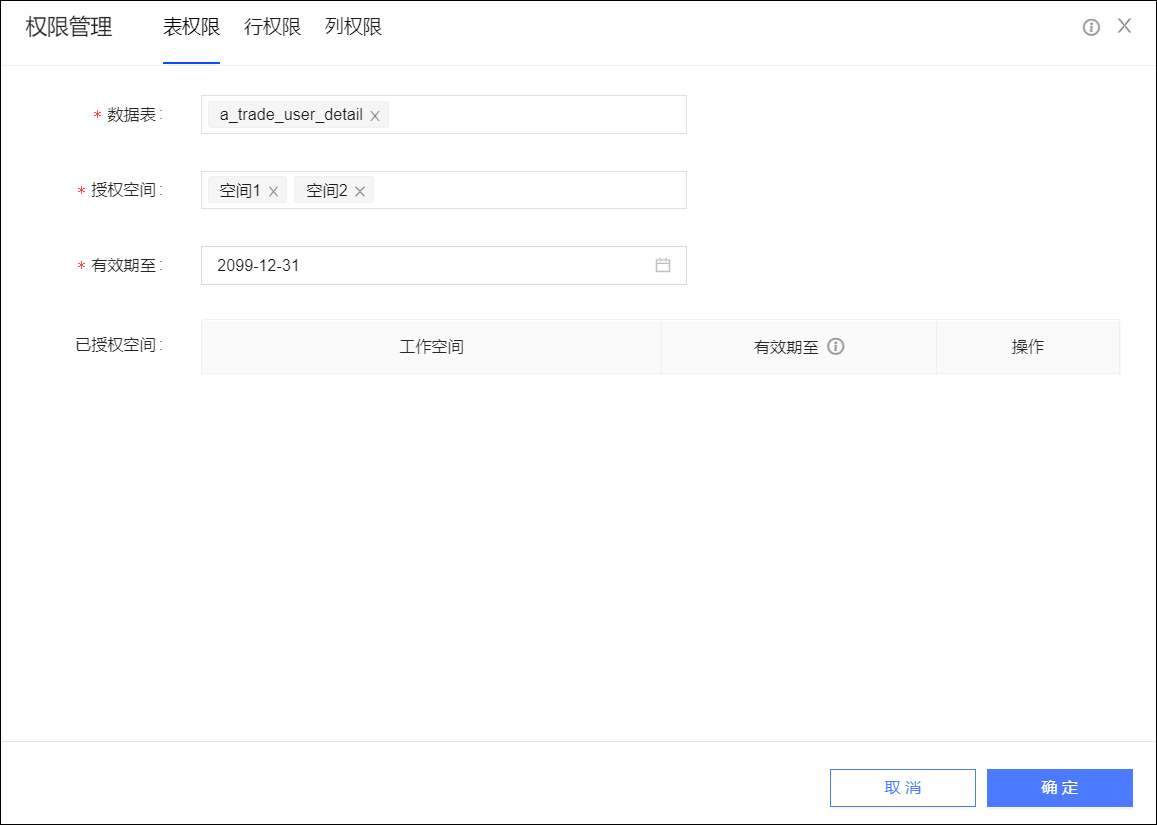
Log on and use as a workspace member
After you add workspace members, add an organization data source, and grant the workspace permissions to use it, workspace members can log on to the system. They can then enter the workspace and use the data from the data source for insight analysis and other operations.
Log on to the Quick Audience console as a workspace member.
The logon method for RAM users is different from that for Alibaba Cloud accounts. Click RAM User Logon in the lower-right corner to go to the logon page shown in the following figure.After you log on, choose User Insights. From the drop-down list in the upper-left corner, select the workspace you want to enter.
Choose Dataset. On the dataset page, you can use the data from the authorized organization data source to create datasets. You can then perform further user analysis, audience filtering, and pushes based on these datasets. For more information about creating different types of datasets, see Create a user tag dataset.
 The logon method for RAM users is different from that for Alibaba Cloud accounts. Click RAM User Logon in the lower-right corner to go to the logon page shown in the following figure.
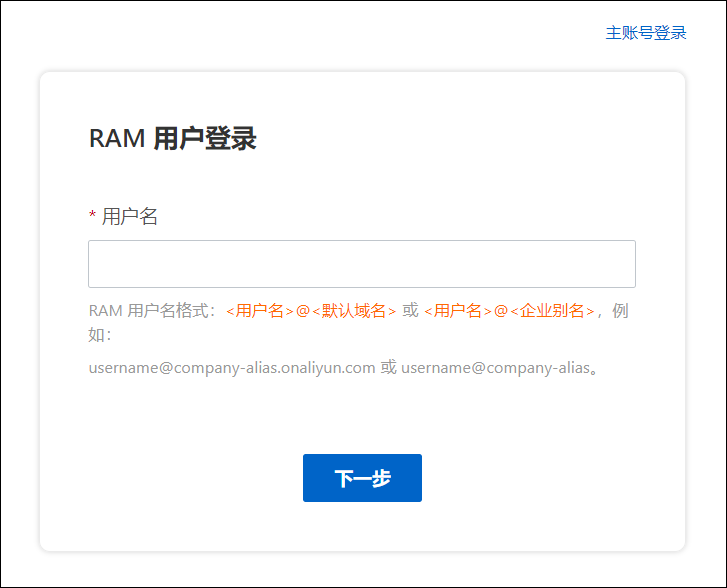
Create a dataset
Create a dataset from a data source to serve as the direct object for user insight analysis.
There are several types of datasets. In this example, a user tag dataset is used for user insight analysis. You can also create behavioral datasets, RFM datasets, and AIPL datasets. For more information, see Datasets.
You can create a user tag dataset in two ways:
On the Data Source page, click the Create Dataset icon and select a dataset type.
On the Dataset page, click New and select a dataset type.
The following steps describe how to create a user tag dataset from the Data Source page.
Choose Workspace > Configuration Management > Data Center > Data Source to go to the Data Source page. This page displays the data sources available in the current workspace.
Click a data source name. The data tables in that data source are displayed on the right.
Select a tag table, click the corresponding Create Dataset icon, and select User Tag Dataset.
On the dataset configuration page, click Next.
NoteClick the + icon to the right of the selected data table to build an association model. On the build association model page, select the foreign key field and join type. You can also create a dataset based on a single data table without building an association model.
On the Configure Tags page, set User Identifier, User Identifier Type, Tag Alias, Tag Description, Tag Type, Tag Category, and ID Type. Then, click Finish.
For more information, see Create a user tag dataset.
Enter a dataset name and a save location, and then click Confirm. After the dataset is created, it is automatically saved in the selected folder.