Service activation
This topic describes how suppliers can activate their stores on the LinkedMall channel.
Submit an onboarding request
After your enterprise is onboarded, go to the Channel Provider Workbench. In the navigation pane, choose to start the service activation process.
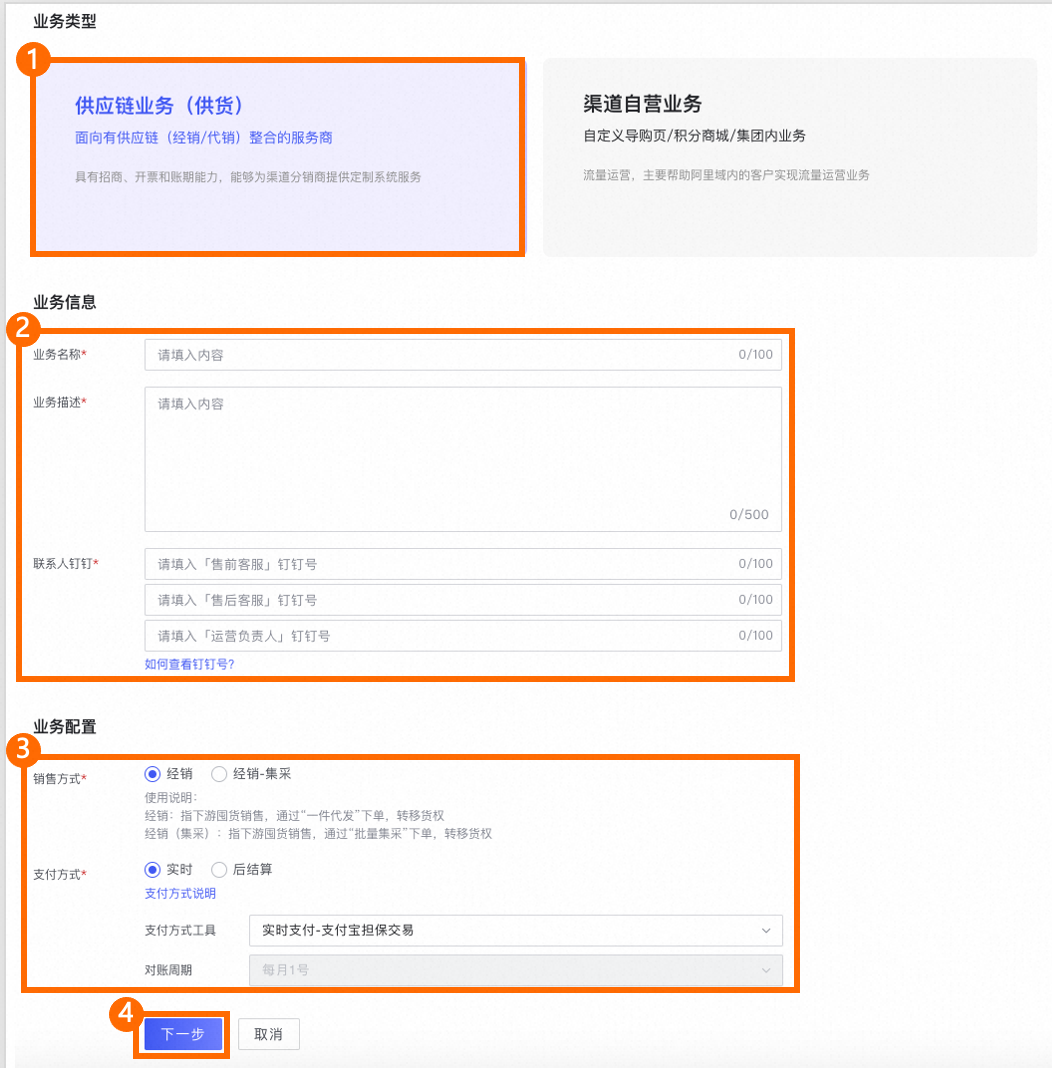
Set Business Type to Supply Chain Business (Supply).
Enter information such as Business Name, Business Description, and Contact DingTalk ID.
Configure business: Select a Sales Method and a Payment Method, and then select a Payment Method Tool. Click
 to view the Payment Method Description.Note
To create batch purchase orders, select the Distribution - Centralized Procurement sales method.
Click Next.
Wait for approval
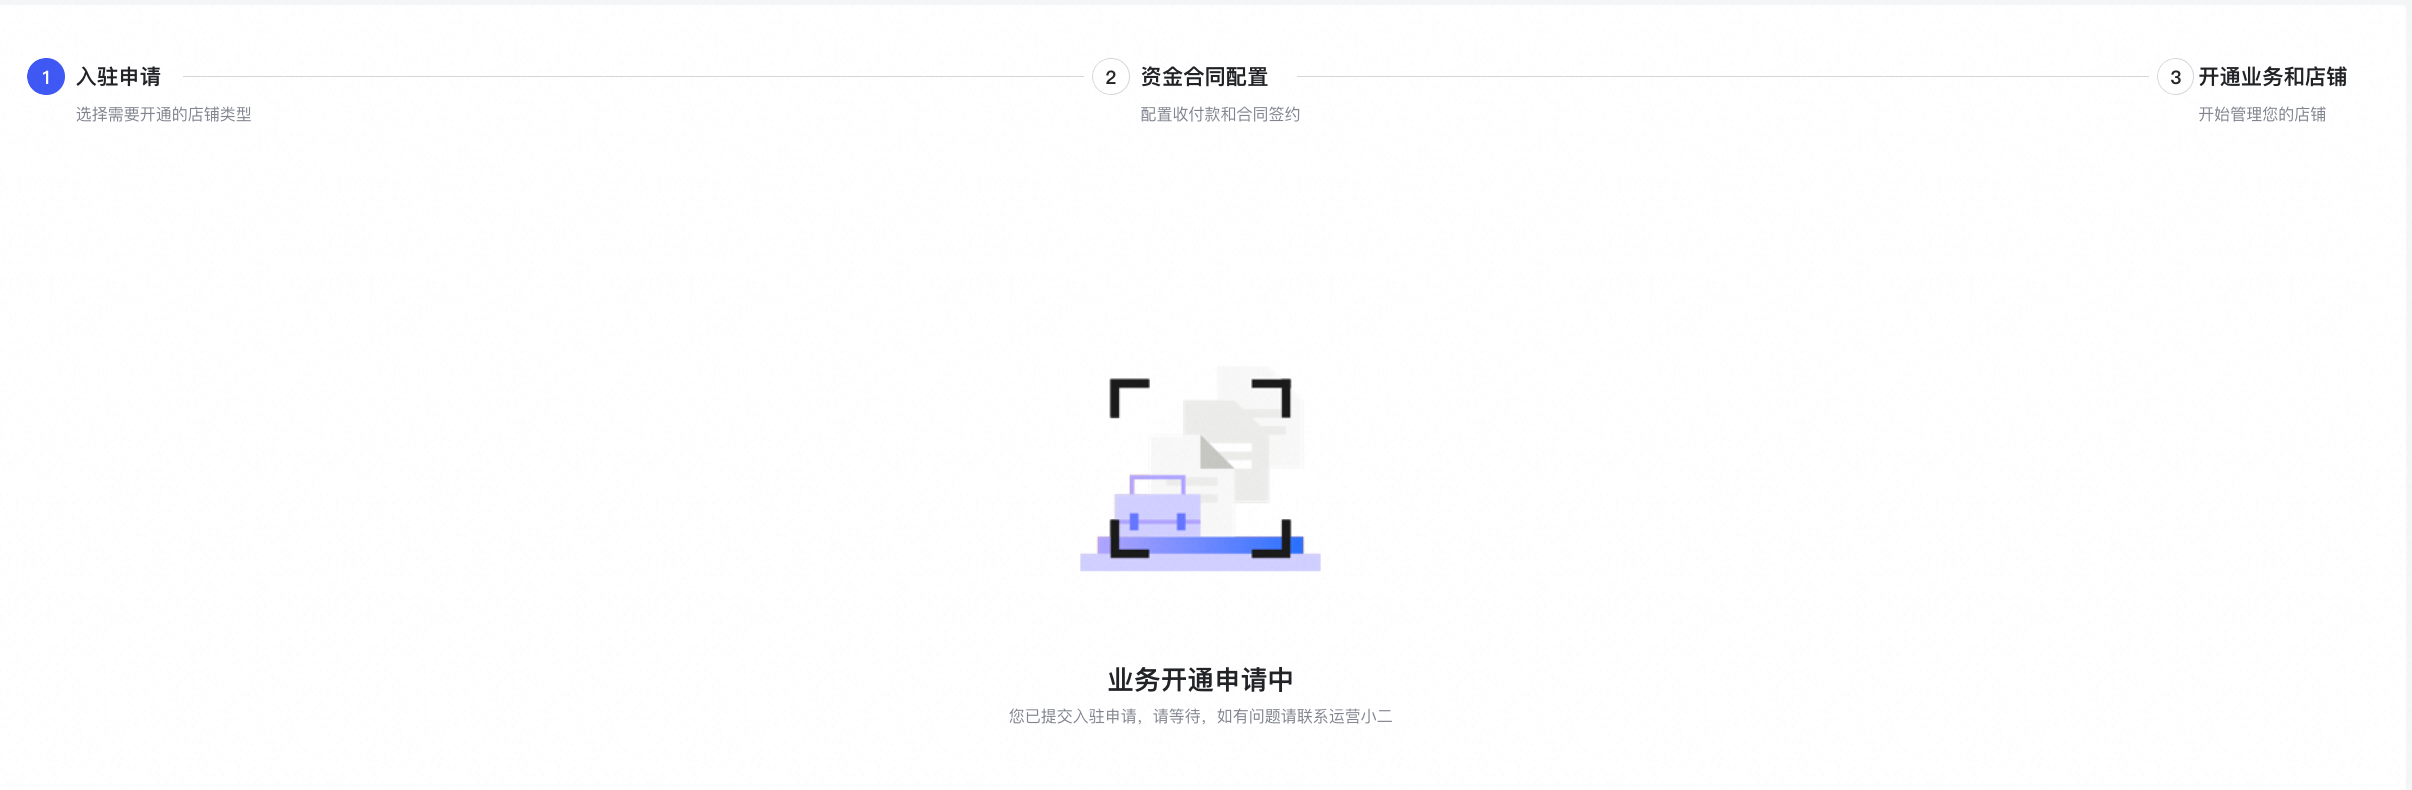
After you submit the service activation information, the onboarding status changes to Service Activation Requested. The LinkedMall operations team will then review your request.
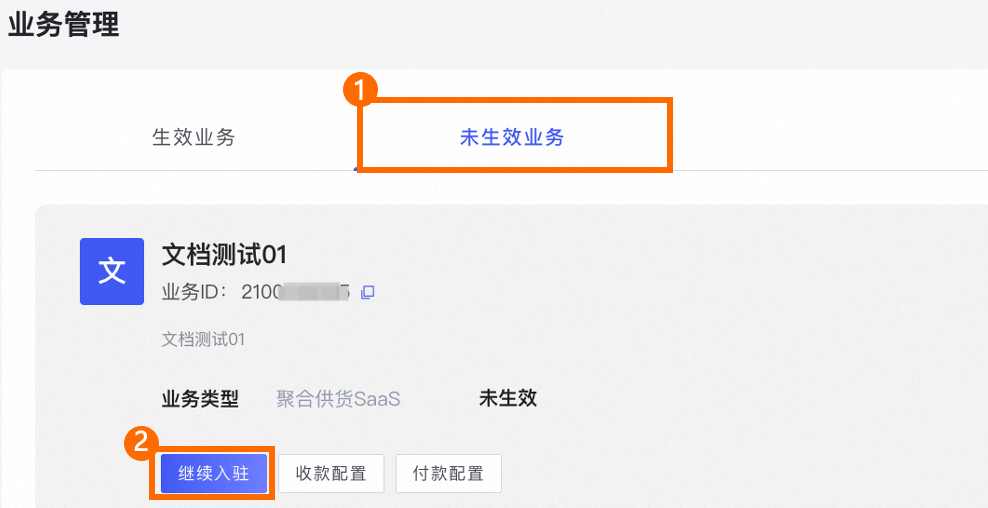
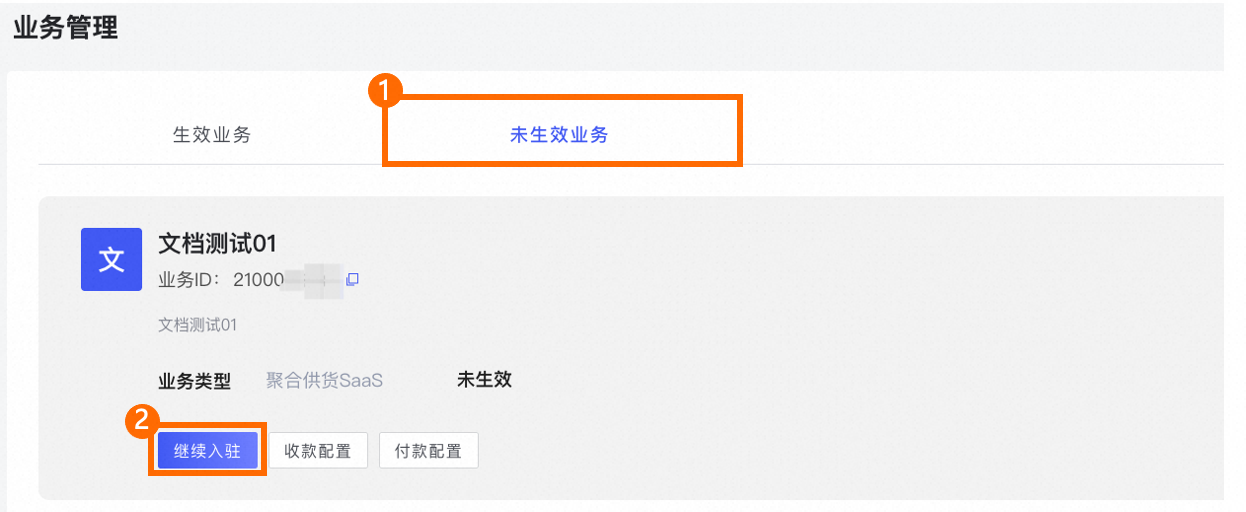
After the Alibaba Cloud operations team approves your request, go to the Channel Provider Workbench. Choose . On the Inactive Businesses tab, click Continue Onboarding to complete the process.
Sign contracts and configure payment information
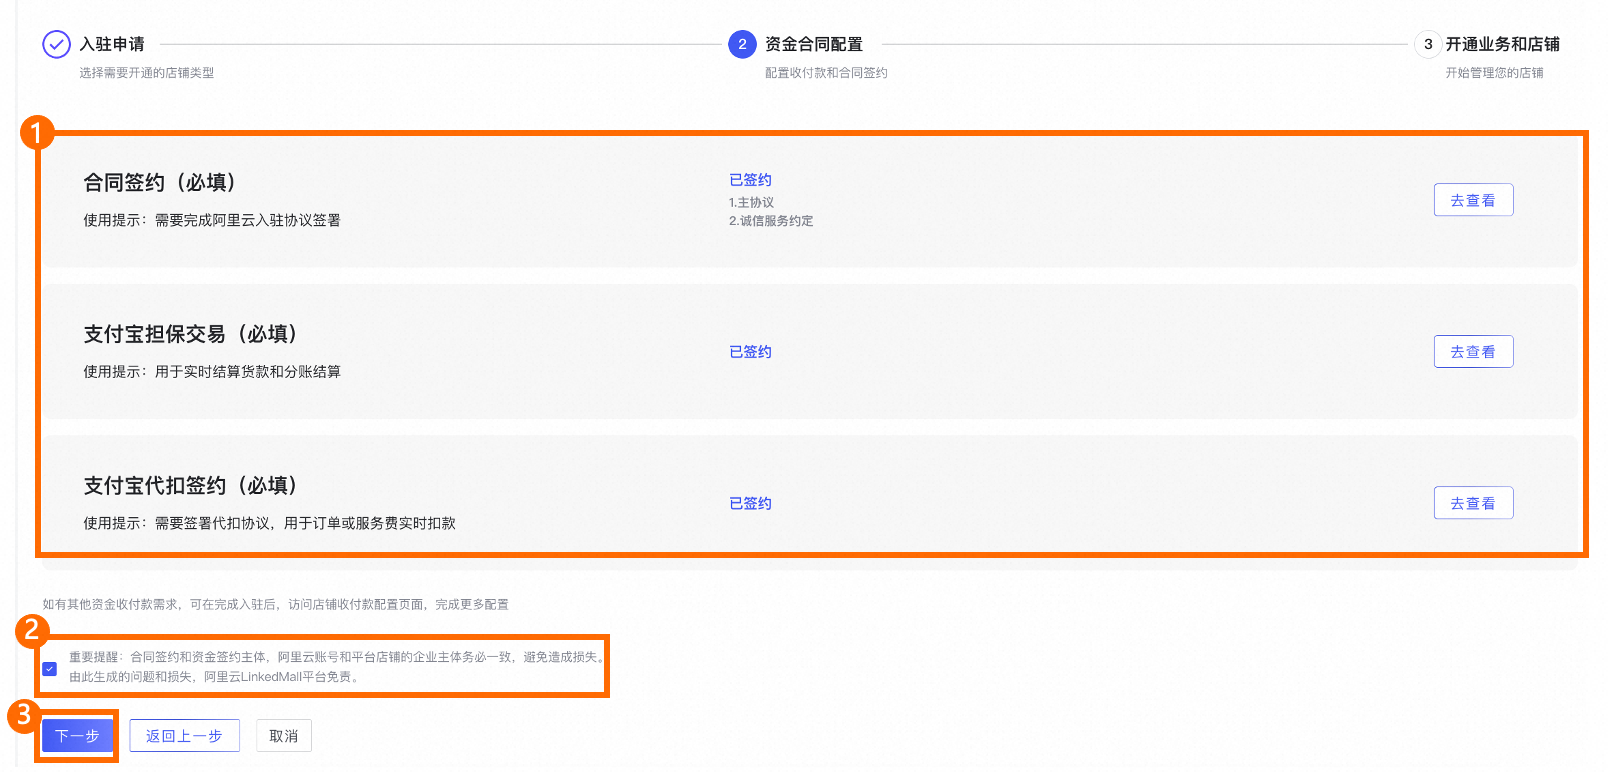
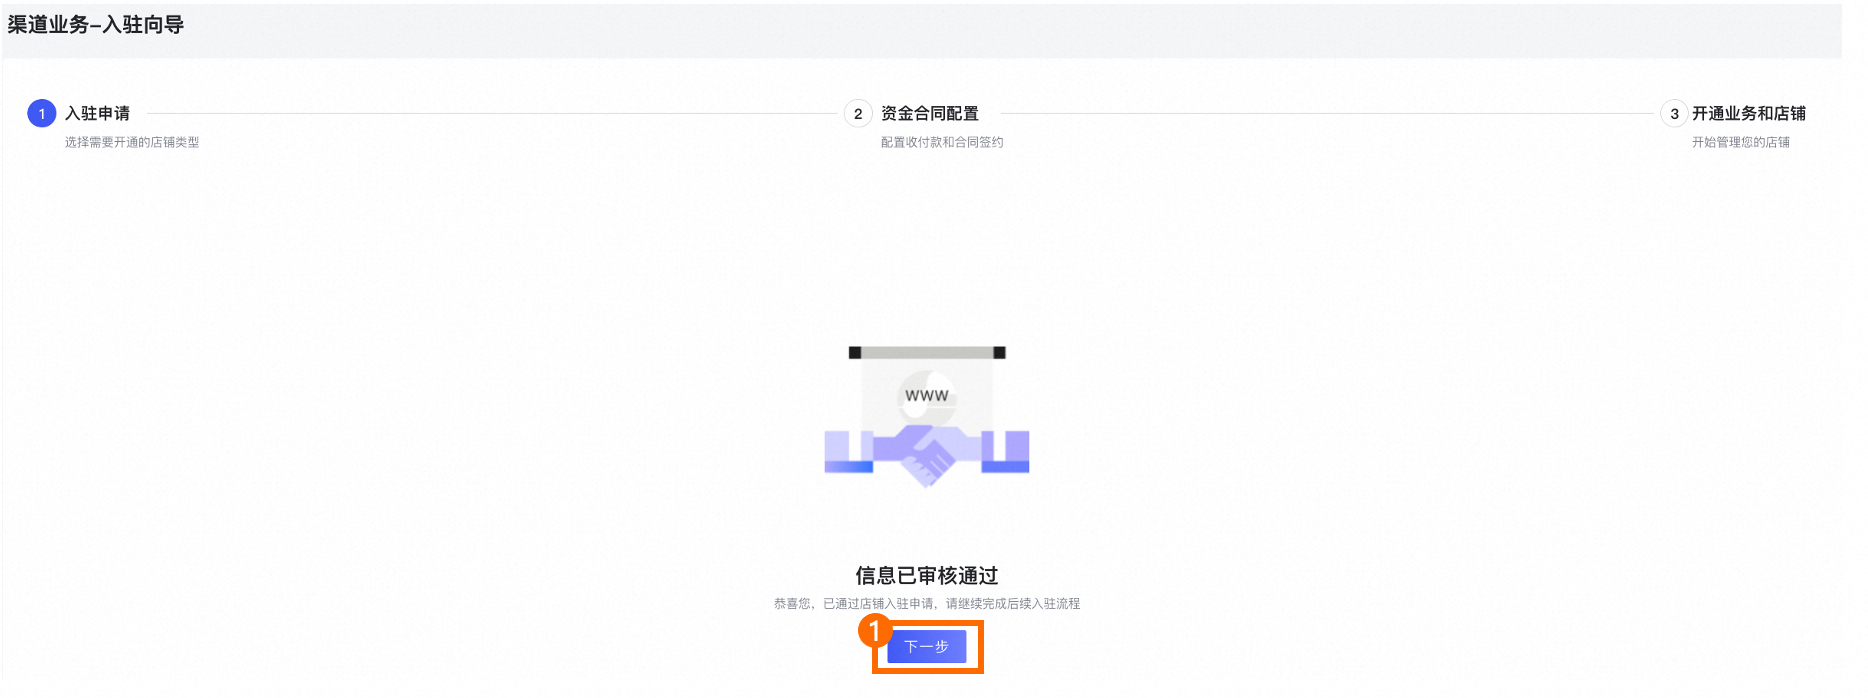
After you click Continue Onboarding, the Channel Business - Onboarding Wizard page is displayed. The service activation status is Information Approved. Click Next to begin configuring financial contracts. This process involves signing contracts and setting up collection and payment accounts.
You must sign the Contract, Alipay Secured Transaction, and Alipay Withholding agreements. You must also configure and enable collection and payment accounts.
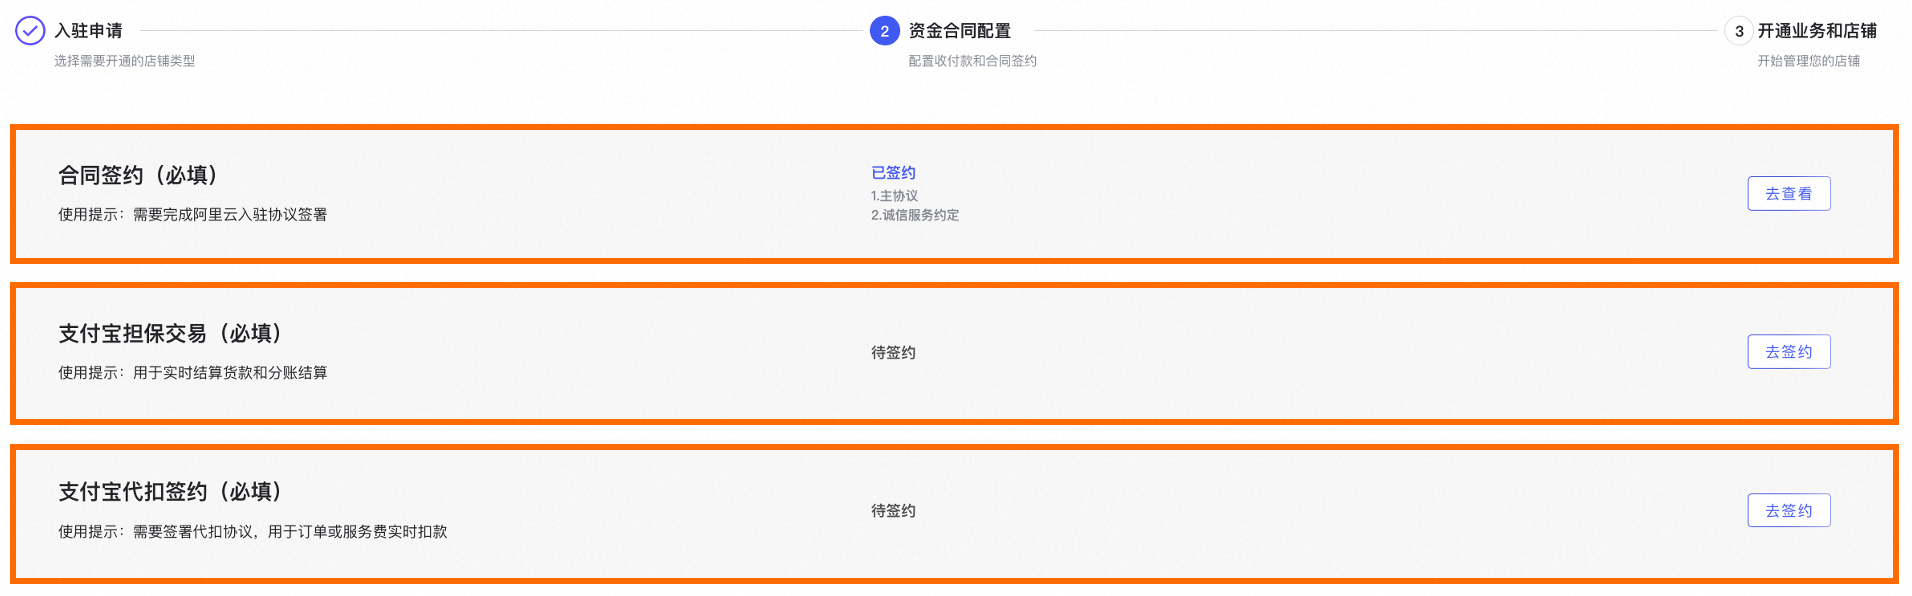
Sign contracts
Currently, the agreements related to service activation for channel providers are signed automatically.
Configure and enable collection accounts
Configure a collection account
Use an enterprise Alipay account to enable Alipay Secured Transaction for collecting payments.
To the right of Alipay Secured Transaction (Required), click Sign. The Store Collection configuration page opens.
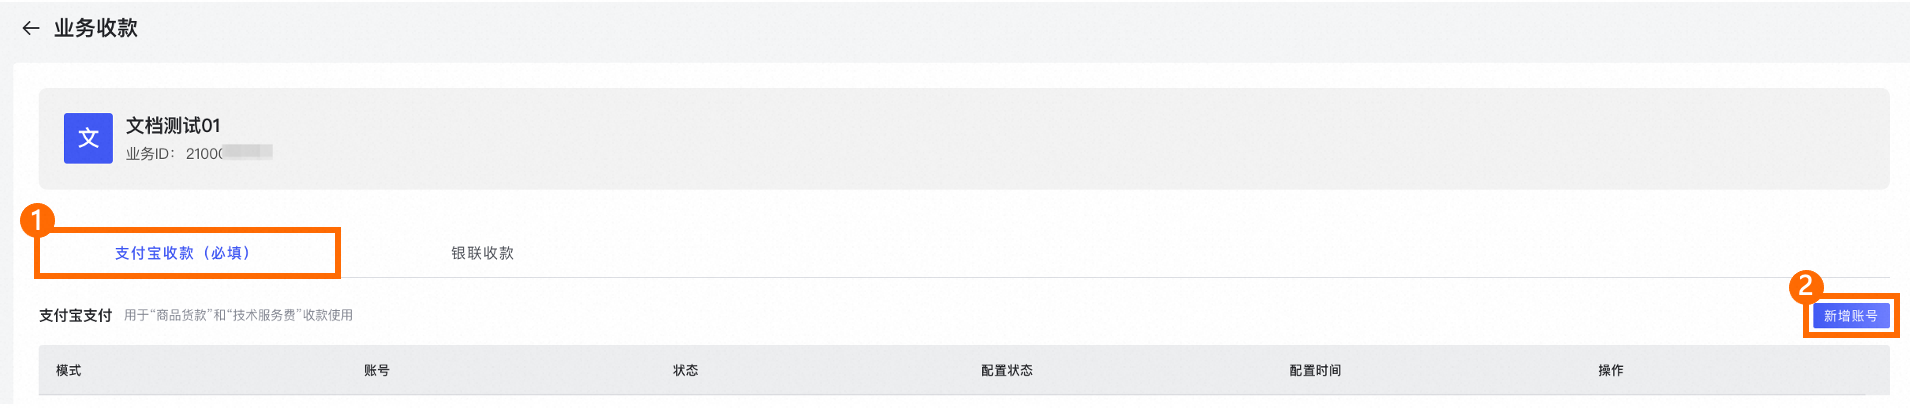
When you configure a store collection account, Alipay Collection (Required) is a required configuration item.
ImportantAlipay collection accounts that are bound to Tmall do not have payment capabilities and cannot be used for withholding agreements. If you want to use the same enterprise Alipay account for both collections and payments, you must use a different enterprise Alipay account or register a new one.
Alipay Collection (Required)
Select the Alipay Collection (Required) tab and click Add Account. The Enable Alipay Secured Transaction page opens.

Complete the Basic Information, Merchant Information, and Legal Person Information sections. Then, read the agreement
, select the checkbox to agree, and click Submit.NoteEnsure that the information you enter is correct and valid to avoid issues with approval and payment collection.
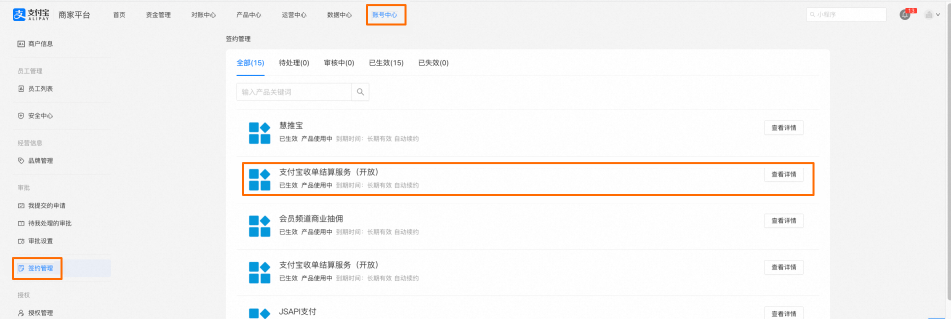
Log on to the Alipay Merchant Center with the enterprise Alipay account used for signing. On the page, complete the signing of the Alipay Acquiring and Settlement Service agreement.
NoteThe following figure shows the signed status.
UnionPay Collection
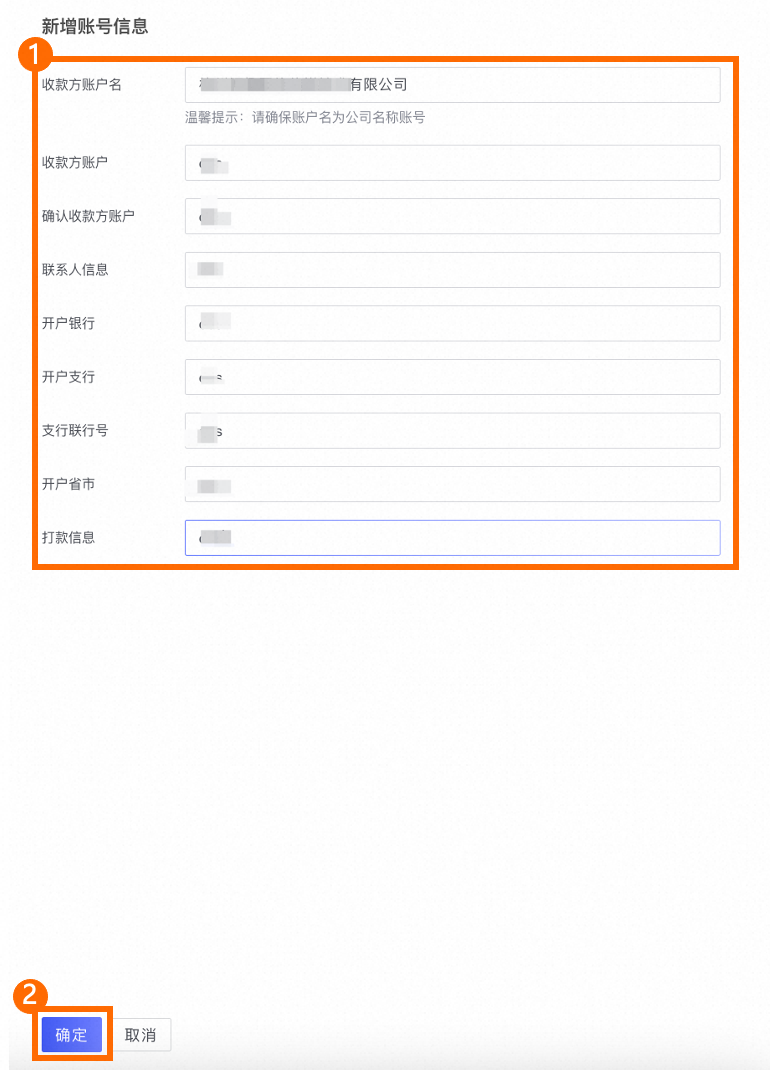
Select the UnionPay Collection tab and click Add Account. The Add Account Information page opens.
Enter the account information. Note that the UnionPay account must be an enterprise account. After you confirm that the information is correct, click OK.
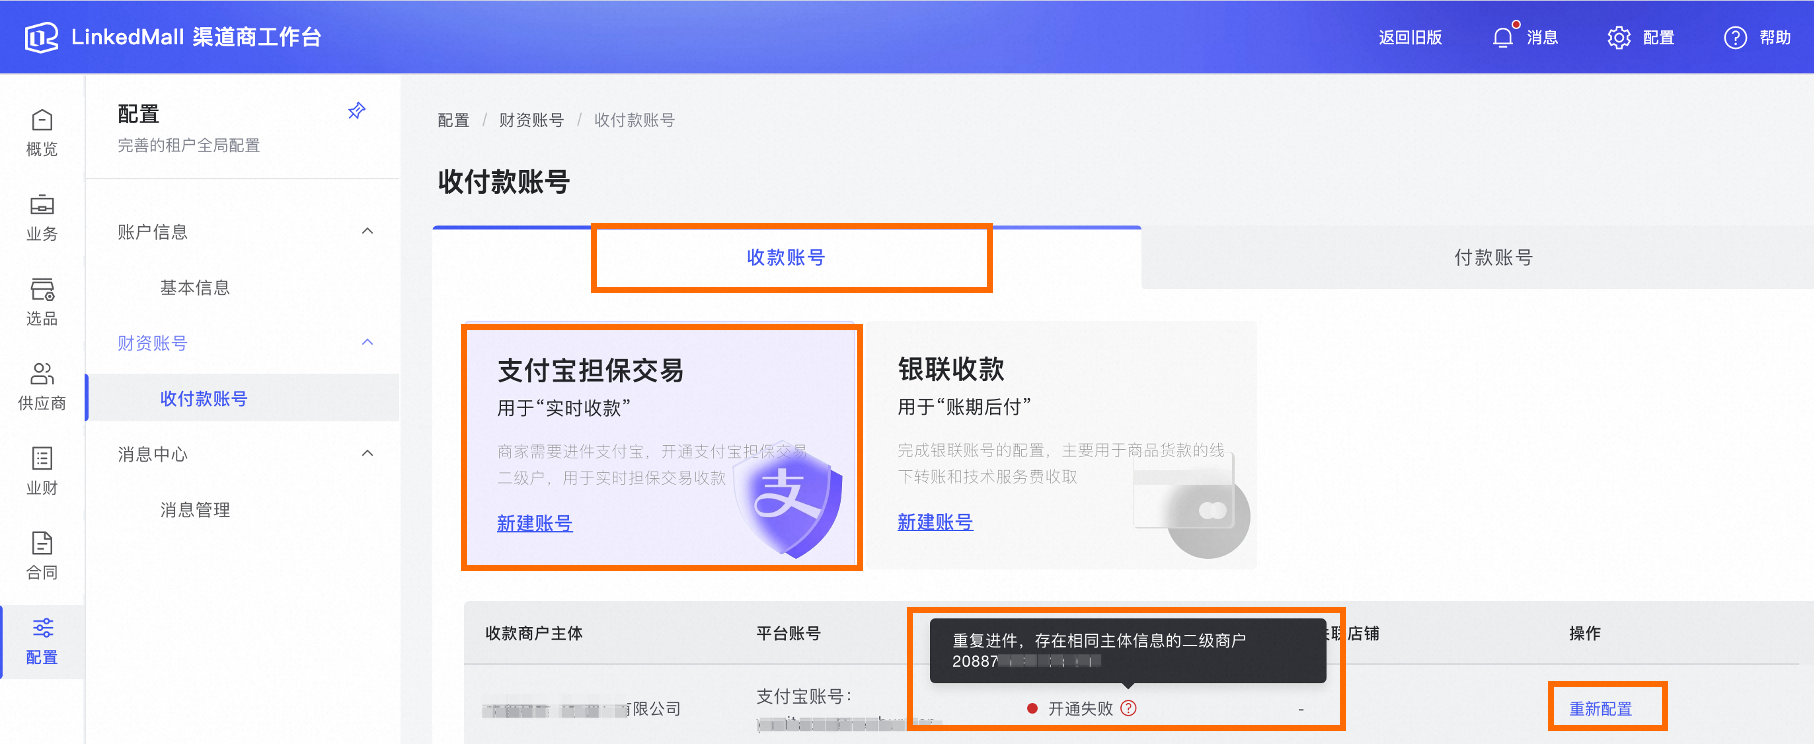
NoteIf your Alipay account has already enabled Secured Transaction in LinkedMall, you can view the submitted account information in the Channel Provider Workbench by choosing . You may see an activation failure with the reason Duplicate Entry, as shown in the following figure.
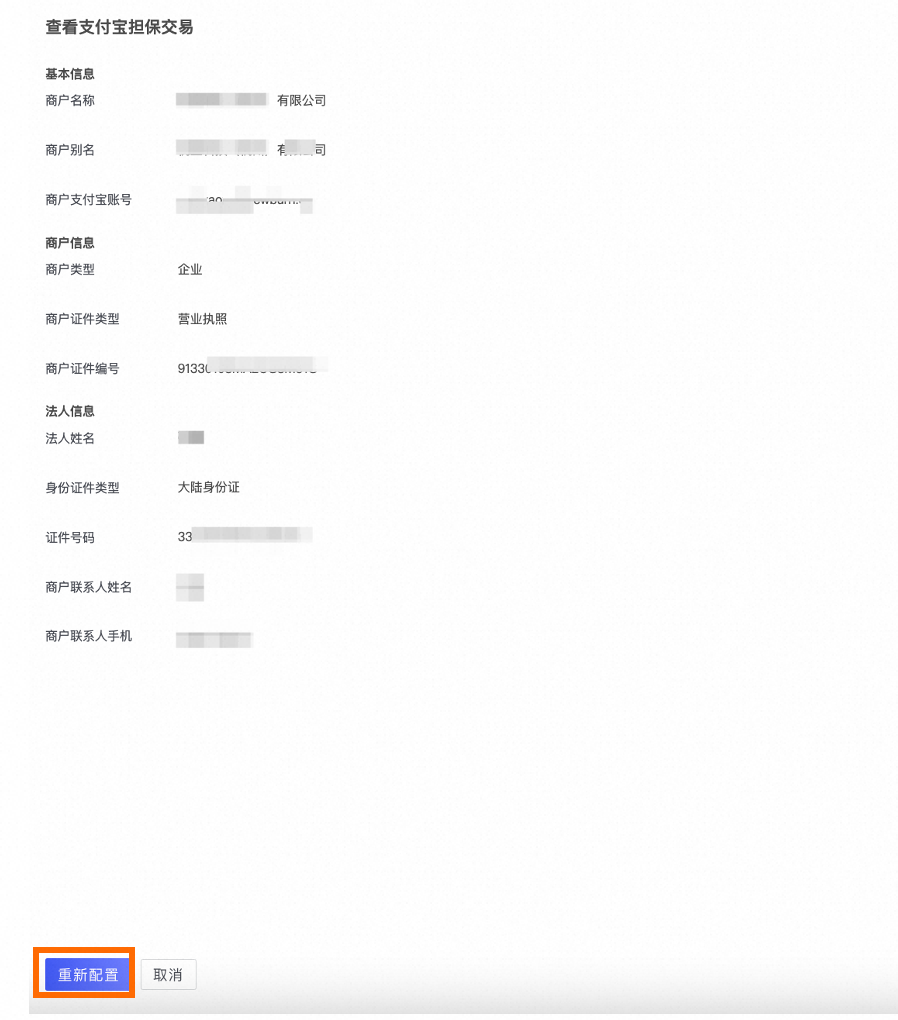
Click Reconfigure as shown in the preceding figure. In the dialog box that appears, confirm the account information and click Reconfigure.
After the configuration is complete, the account status updates to Enabled.
For instructions on enabling the collection account, see the following section, Enable a collection account.
 , select the checkbox to agree, and click Submit.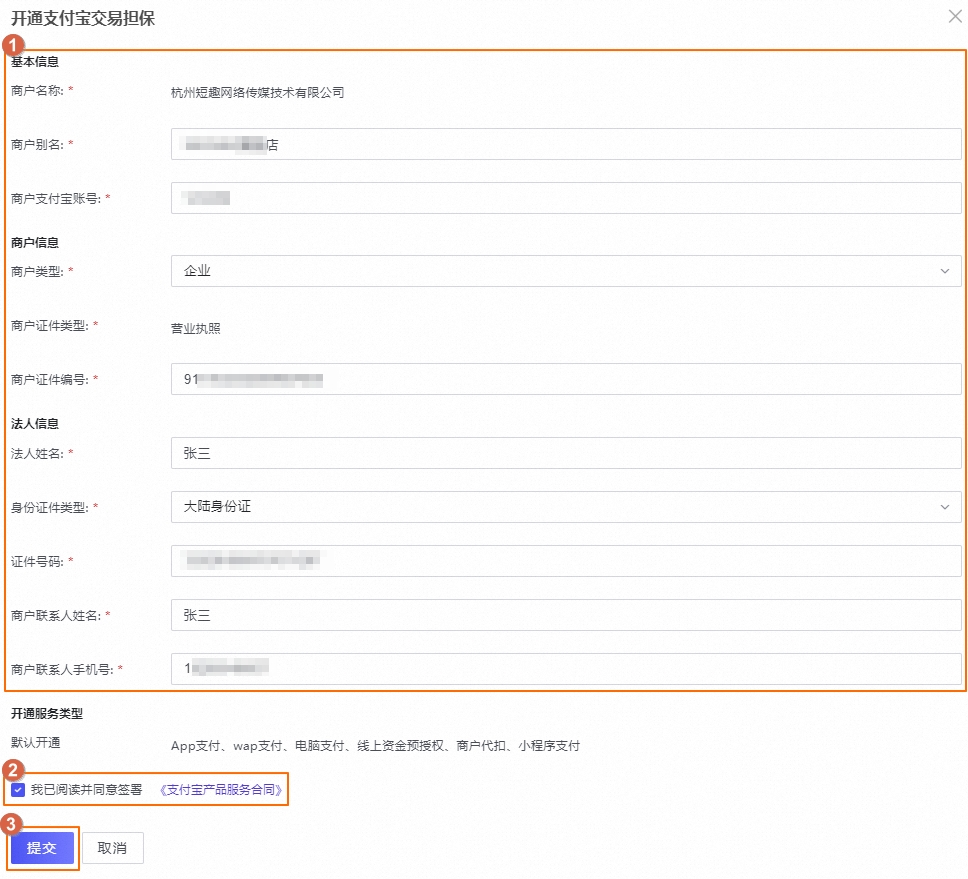
Enable a collection account
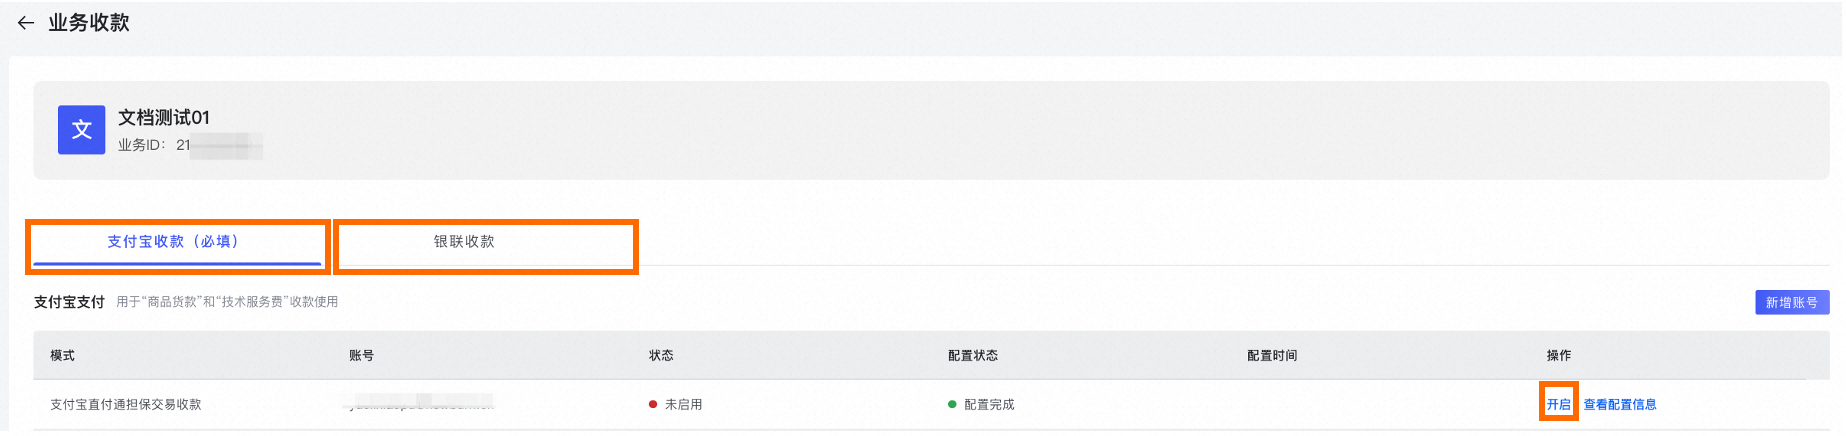
Go to the Channel Provider Workbench. Choose . On the right, click Configure.
Select the Alipay or UnionPay collection account that you want to enable and click Enable on the right.
Carefully read the message in the Prompt dialog box and click OK.
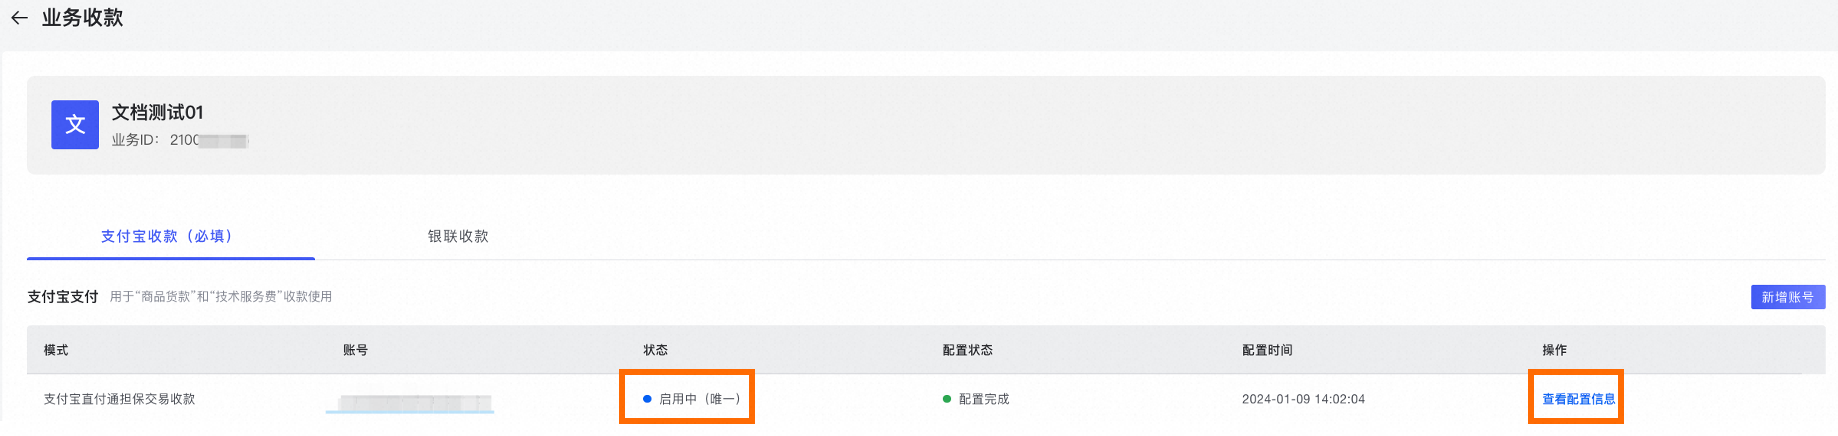
After the account is enabled, the Status updates to Enabling (Unique). Click View Configuration Information to view the details of the current account.

Configure and enable payment accounts
Sign an Alipay withholding agreement
The technical service fee is typically deducted from the Alipay collection account that you enabled through LinkedMall. If this deduction fails, the system attempts to collect the fee from the withholding Alipay account. Before this happens, the LinkedMall operations team will contact you to reconcile the accounts.
Do not cancel the Alipay withholding agreement. This can affect normal business operations.
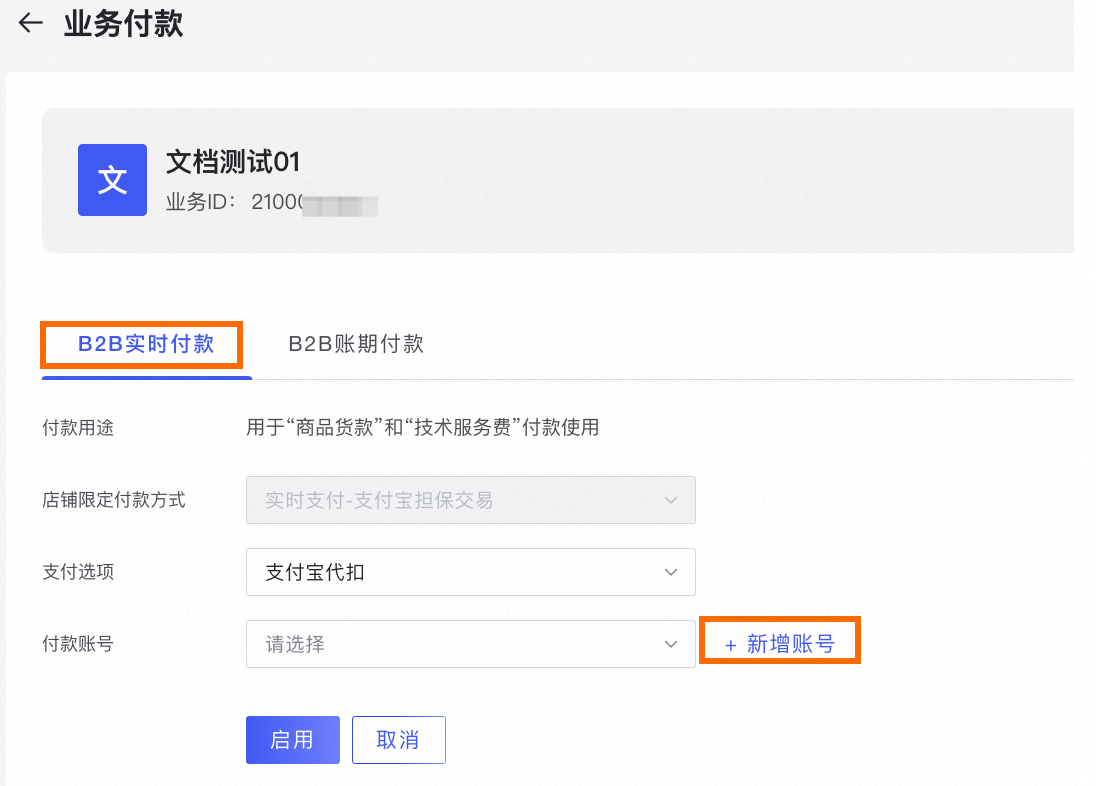
To the right of Alipay Withholding Agreement (Required), click Sign. The Business Payment configuration page opens.
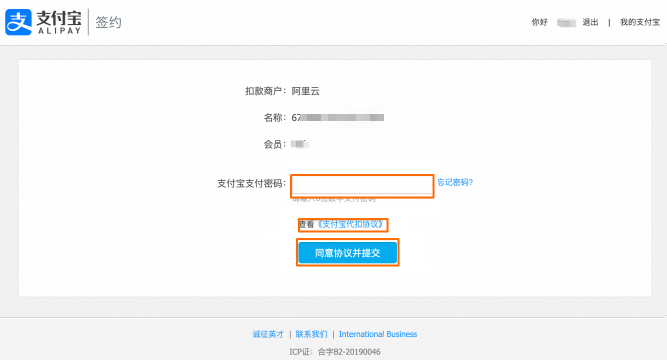
Click the B2B Real-time Payment tab, and then click Add Account. On the Alipay withholding agreement service page that appears, scan the QR code to log on with the enterprise Alipay account that you want to use for the agreement.
ImportantBecause Alipay collection accounts that are bound to Tmall do not have payment capabilities and cannot be used for withholding agreements, do not use this type of Alipay account. Use a different enterprise Alipay account or register a new one for the withholding agreement.
Read the Alipay Withholding Agreement, enter the Alipay Payment Password for the account, and click Agree and Submit.
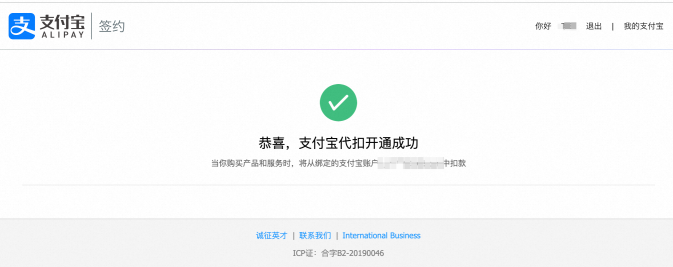
After the agreement is signed, the Alipay page appears as shown in the following figure.
If your Alipay account has already been used for a withholding agreement in LinkedMall, Alipay displays the page shown in the following figure after you scan the QR code. 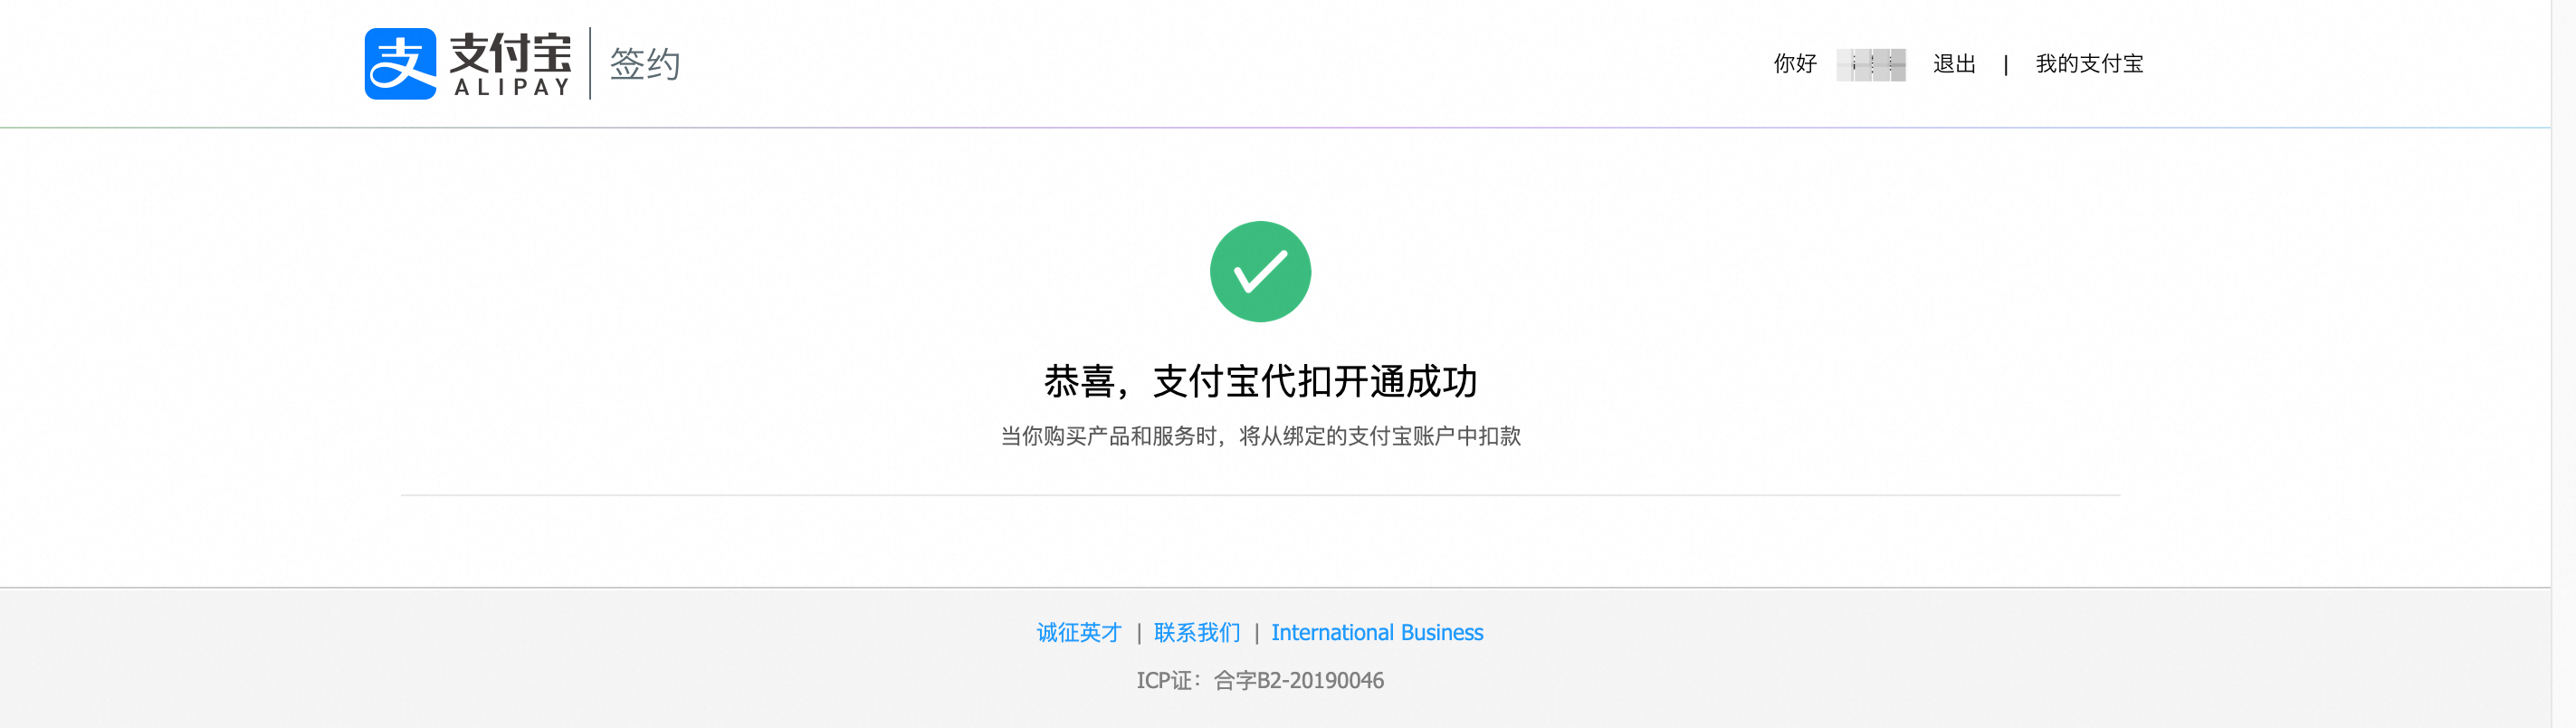
In this case, no accounts are available in the Enable payment account drop-down list.
You must go to the Channel Provider Workbench and choose to perform a contract verification. This feature requires activation. To use it, provide your Enterprise ID and Alipay Account to the LinkedMall operations team to request activation.
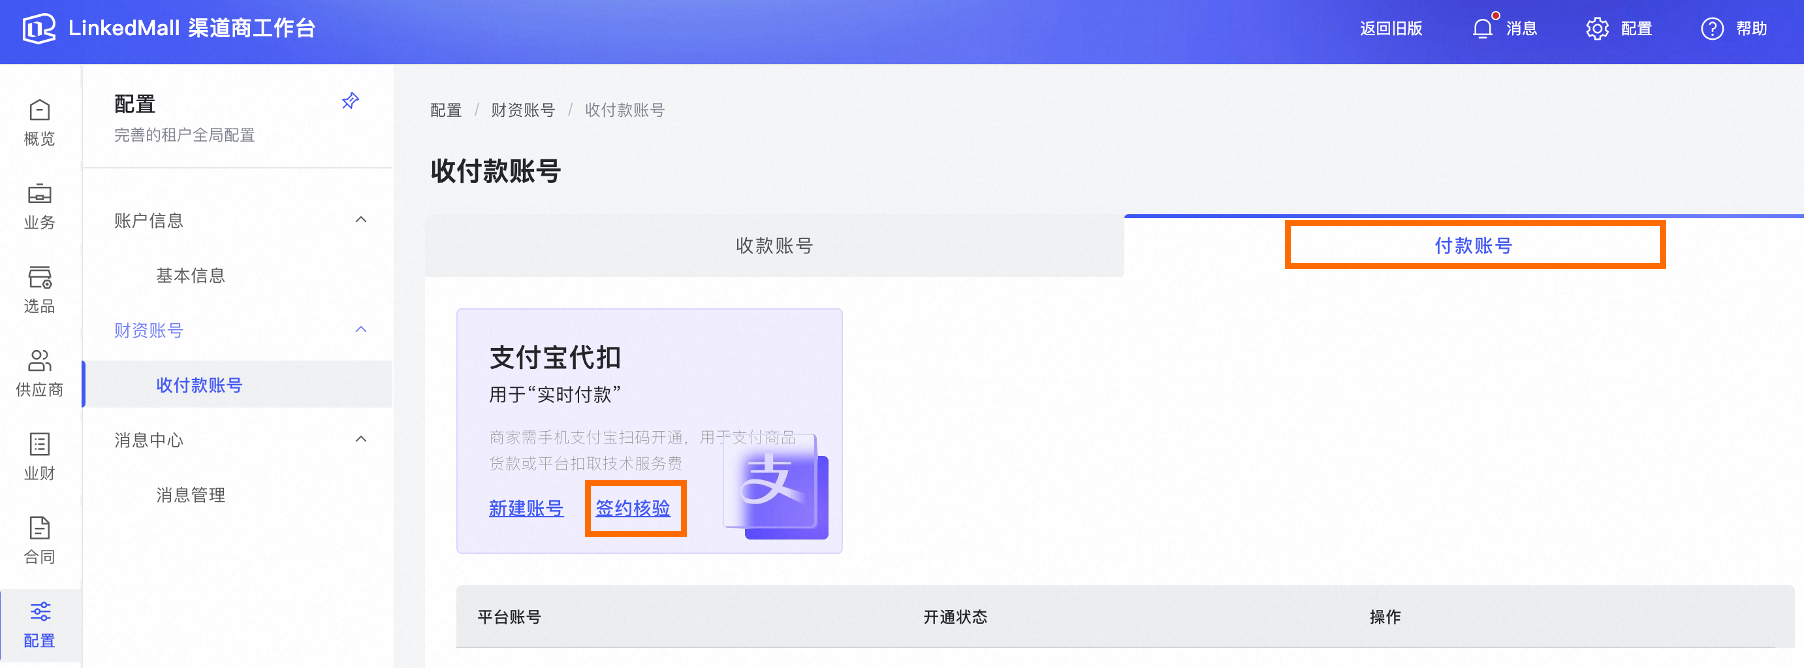
Enter the Withholding Service Agreement Number and click Verify. For information about how to obtain the service agreement number, see the prompt in the following figure.
After the message Verification Successful appears, as shown in the following figure, click Confirm Import.
The status of the new account is Enabled.
For instructions on enabling the payment account, see the following section, Enable a payment account.
Enable a payment account
After you sign the Alipay withholding service agreement, refresh the Business Payment configuration page. From the Payment Account drop-down list, select the Alipay account for which you signed the agreement and click Enable.
Carefully read the message in the Prompt dialog box and click OK.
B2B Real-time Payment
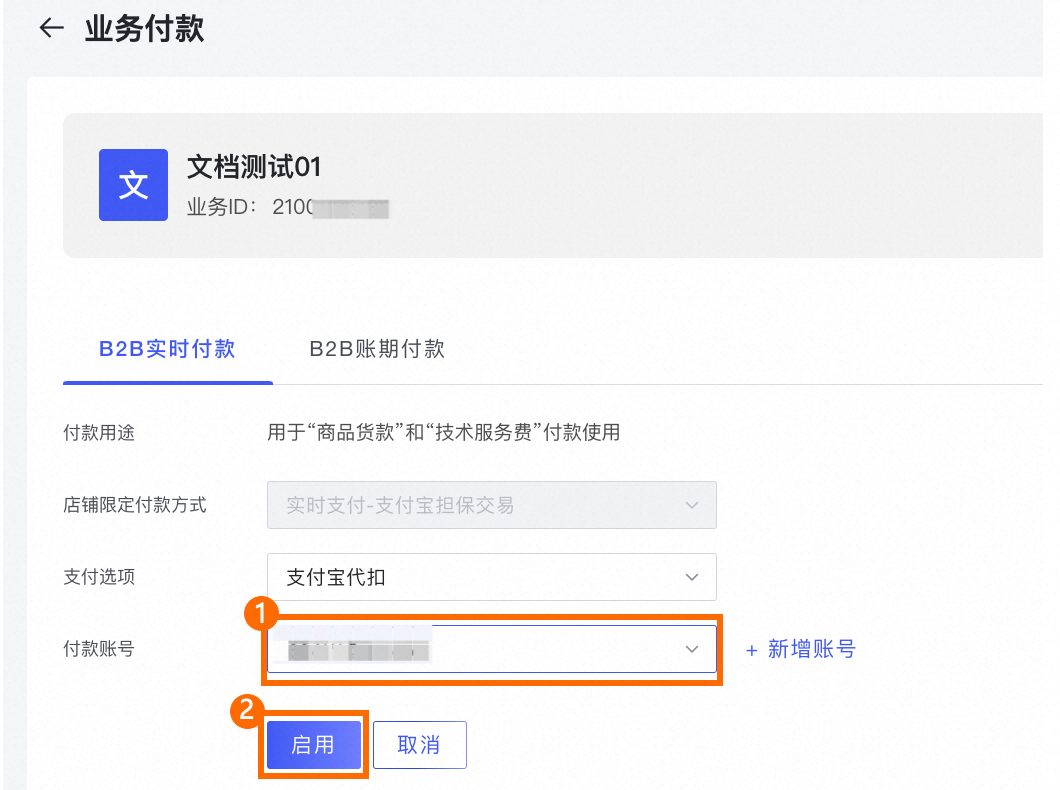
B2B Account Period Payment
For more information, see B2B Real-time Payment.
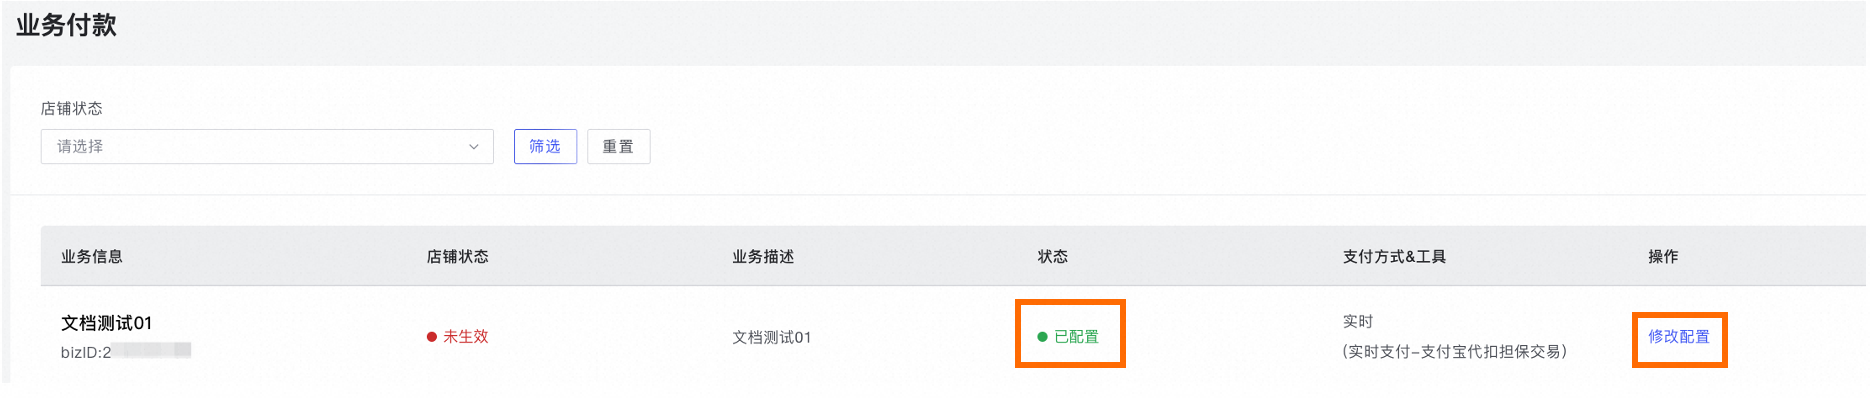
After the configuration is complete, go to the page to view the Status. Click Modify Configuration, which opens the Business Payment page. On this page, you can add or switch payment accounts.
Complete the onboarding
Complete the onboarding process
Go to the Channel Provider Workbench. Choose . On the Inactive Businesses tab, click Continue Onboarding. The Channel Business - Onboarding Wizard page opens.
In the Financial Contract Configuration section, verify that all contracts are signed and financial accounts are configured. Read the Important Reminder, select the checkbox to agree, and then click Next.
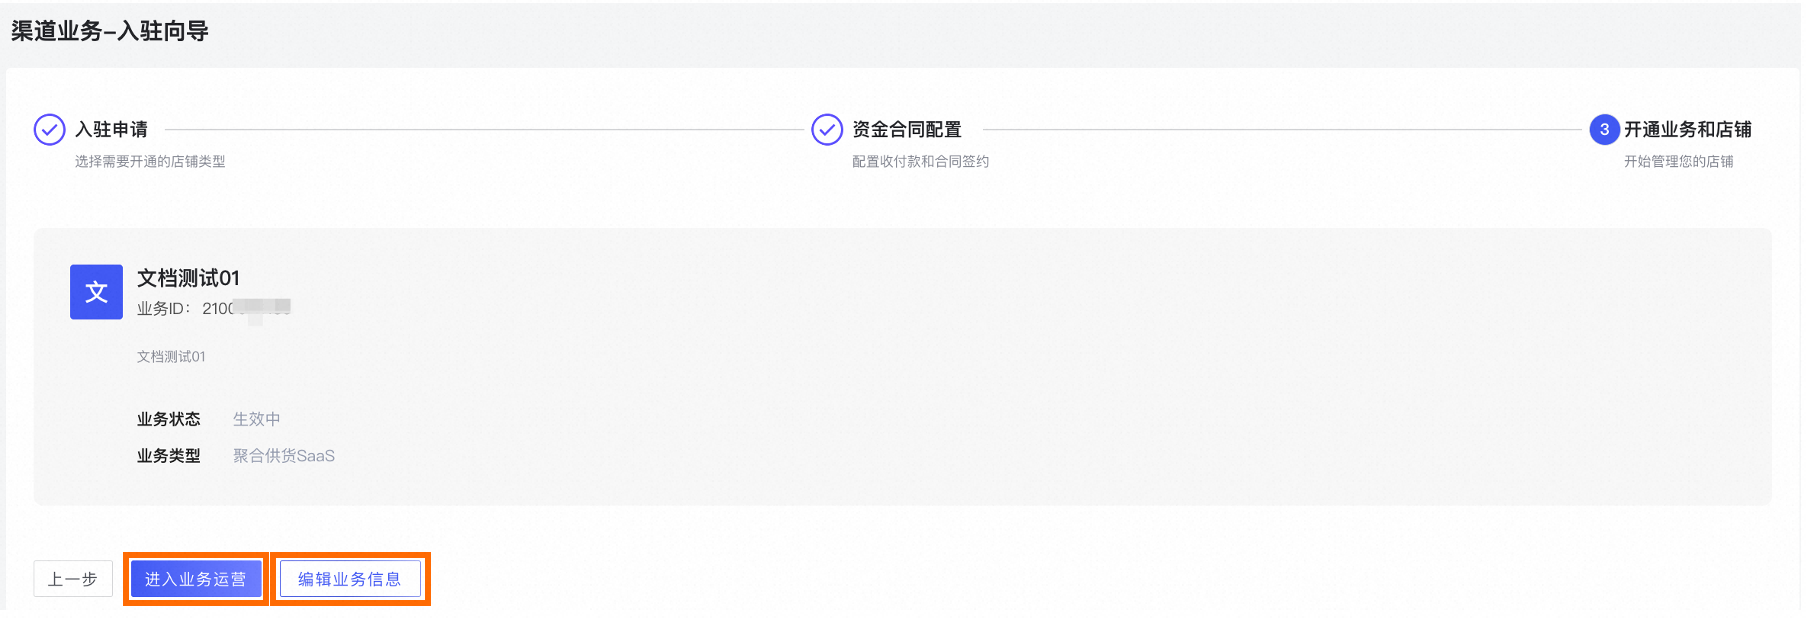
Complete the channel service activation.
Click Go to Business Operations to open the Channel Provider Supply Workbench for the service.
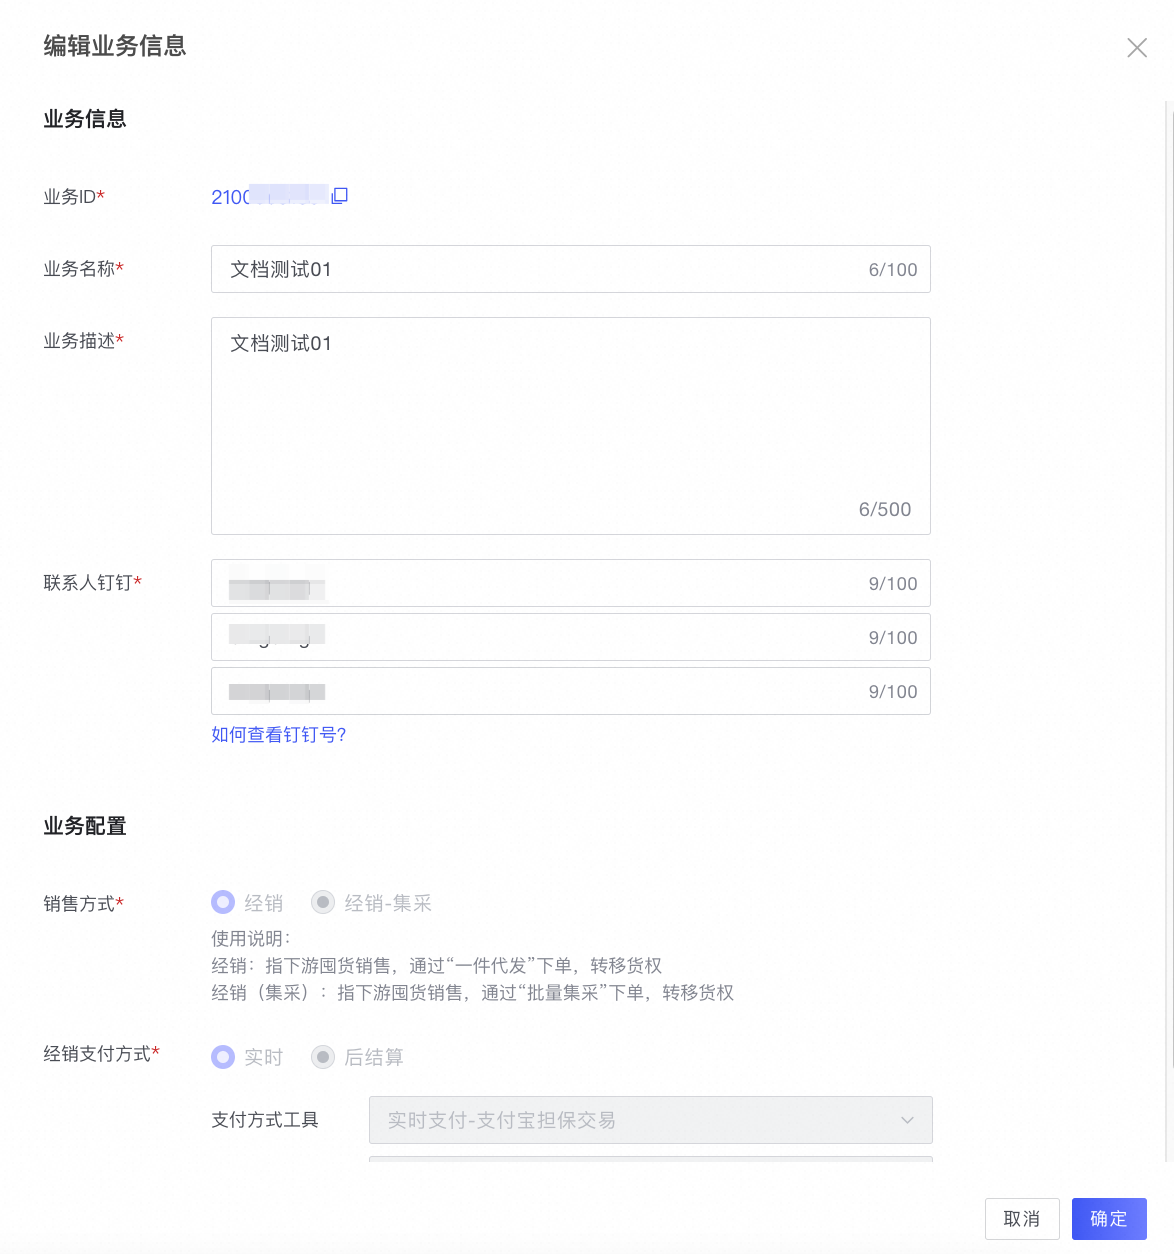
Click Edit Business Information to view and edit the business information.