Quick start

更新时间:
复制 MD 格式

This topic shows you how to quickly get started with PolarDB for MySQL: create a cluster, configure a whitelist, create a database account, and connect to a cluster.

Tutorial

If you have questions about any of the following steps, click the step to view detailed instructions.

1. Create a cluster

Go to the Quick Purchase page of PolarDB to quickly create a PolarDB for MySQL cluster with minimal configuration. Set the parameters in the following table and use the default values for all other settings. For detailed instructions on how to create a cluster, see Create a cluster with custom configurations.

Parameter

Description

Billing Method

Select the billing method for the cluster. For more information, see Billing methods.

  • Subscription: This is an upfront payment model where you pay for fixed resources when you create the cluster. Longer subscriptions offer greater discounts. This model is ideal for long-term, stable workloads.

  • pay-as-you-go: This is a postpaid model. You select fixed-specification resources when you create the cluster, but you do not pay upfront. You are billed based on actual usage. This model is ideal for workloads with flexible demand.

  • Serverless: This is a pay-as-you-go model. When you create a cluster, you do not need to select resources with fixed specifications or pay for the cluster in advance. This model provides PolarDB clusters with dynamic and elastic scaling capabilities, allowing them to automatically adjust resources based on changes in the business workload. This model is generally suitable for scenarios with business fluctuations, uncertain workloads, or unpredictable business scenarios.

Region

Select the region where the cluster is deployed.

Note

The PolarDB cluster and the ECS instance you want to connect must be in the same region to communicate over the internal network.

Database Engine

Select the database engine for the cluster.

  • MySQL 8.0.1

  • MySQL 8.0.2

Note

Quick Purchase supports only MySQL 8.0. To purchase another MySQL version, click the Purchase tab in the upper-left corner.

Service Edition

Select the database edition for the cluster.

  • Enterprise Edition

  • Standard Edition

Note

Enterprise Edition and Standard Edition offer different features. For more information, see Feature comparison between Enterprise Edition and Standard Edition.

Network Type

Configure the VPC and vSwitch for the cluster.

Note
  • If you have an existing VPC that meets your network requirements, select that VPC and its vSwitch. For example, you can use the VPC of an existing ECS instance.

  • If you do not have a suitable VPC, you can use the default VPC and vSwitch.

Deployment Mode (Optional)

Select the number of nodes and the high-availability mode for the cluster. For more information, see High-availability mode (hot standby cluster).

  • Single-node: Contains only one primary node (read/write node).

    • Number of Nodes: 1

    • High-availability mode: Single-AZ (hot standby cluster disabled)

  • Dual-node high-availability: Contains one primary node (read/write node) and one read-only node.

    • Number of Nodes: 2

    • High-availability mode: Single-AZ (hot standby cluster disabled)

  • Cross-zone high-availability: Contains one primary node (read/write node) and one read-only node. Data is distributed across multiple availability zones. The primary and secondary availability zones each store a full copy of the data.

    • Number of Nodes: 2

    • High-availability mode: Multi-AZ (hot standby cluster enabled)

Note

This option is available only for the Subscription and pay-as-you-go billing methods.

Node Specifications

Select a compute node type for the cluster based on your actual requirements. If you need to purchase other types, select the Purchase tab in the upper-left corner.

Storage Capacity (Optional)

Configure the storage capacity of the cluster.

Note

This option is required only when the database edition is Standard Edition.

2. Configure a whitelist

Go to the PolarDB console. In the Clusters list, click the ID of the target cluster to go to its details page. Choose Configuration and Management > Cluster Whitelists to add an IP address whitelist or a security group. For more information, see Configure whitelists for a cluster and Configure a security group.

Note
  • If you use an ECS instance to access PolarDB, and the ECS instance and the PolarDB cluster are in the same VPC, you can add the CIDR block of the VPC to the default group.

  • If you use an ECS instance to access PolarDB, but the ECS instance and the PolarDB cluster are not in the same VPC, you can add the public IP address of the ECS instance to a new IP whitelist group or add the security group of the ECS instance to the cluster whitelist.

  • If you access PolarDB from an on-premises environment, add the public IP address of your on-premises environment to the new IP whitelist group.

    To find the public IP address of your on-premises environment, use one of the following commands:

    • For Linux: Open a terminal and run the curl ifconfig.me command.

    • For Windows: Open Command Prompt and run the curl ip.me command.

    • For macOS: Open a terminal and run the curl ifconfig.me command.

    If your local network uses a proxy, the IP address returned by the preceding commands may not be your actual public IP address. In this case, you can add the 0.0.0.0/0 CIDR block to the whitelist of the PolarDB cluster. After you connect to the cluster, run the SHOW PROCESSLIST; command to obtain the actual public IP address and add it to the cluster whitelist. Then, remove the 0.0.0.0/0 CIDR block from the whitelist.

    xxx        | aurora                | 100.104.xxx.xxx:59236 | information_schema | Sleep   |            47 |          | NULL
    268459868  | polardb_mysql_account | 47.94.74.xxx:39160    | NULL               | Query   |             0 | starting | SHOW PROCESSLIST
  • The 0.0.0.0/0 CIDR block allows access from any IP address and poses a significant security risk. Add this CIDR block only when necessary.

3. Create a database account

Go to the PolarDB console. In the Clusters list, click the ID of the target cluster to go to its details page. Choose Configuration and Management > Accounts to create a database account. For more information, see Create and manage database accounts.

Note

Database accounts can be Privileged Account or Standard Account, each with different privileges. Create the account type that best suits your needs. For more information, see Account privileges.

4. Get the cluster endpoint

Go to the PolarDB console. In the Clusters list, click the ID of the target cluster to go to its details page. Choose Database Connections to get the cluster endpoint. For more information, see Manage endpoints. On the Database Connections page, find the Cluster Endpoint (Recommended) section and click Copy next to the private endpoint.

Note
  • We recommend using the Cluster Endpoint. The default port is 3306.

  • Select a Internal Network or Internet endpoint based on your access environment.

    • If you use ECS to access PolarDB, and ECS and PolarDB are in the same VPC, select Internal Network.

    • If you access a PolarDB cluster from your on-premises environment, select Internet. To apply for a public endpoint, click Application on the right.

  • A Internet endpoint uses the internet. For optimal performance, avoid accessing your PolarDB cluster over the Internet.

  • You cannot use a Internal Network endpoint to connect to a PolarDB cluster from virtual hosts or lightweight servers.

5. Connect to the cluster

Choose a connection method that suits your needs:

Use DMS to connect to the cluster

DMS is a graphical data management service from Alibaba Cloud. You can manage your PolarDB cluster directly in DMS without installing additional tools.

  1. Go to the PolarDB console. In the Cluster List, click the ID of the target cluster to go to the cluster details page. In the upper-right corner of the page, click Log on to Database.image

  2. Enter your database account and database password for the PolarDB for MySQL cluster, then click Log on.image

  3. After you log on, find the PolarDB for MySQL cluster in the Logged-in Instances list in the left navigation pane.image

Use a client to connect to the cluster

You can use any MySQL-compatible client to connect to a PolarDB cluster. The following example uses MySQL Workbench 8.0.29.

  1. Download and install MySQL Workbench.

  2. Open MySQL Workbench and choose Database > Connect to Database.

  3. Enter the connection information and click OK.
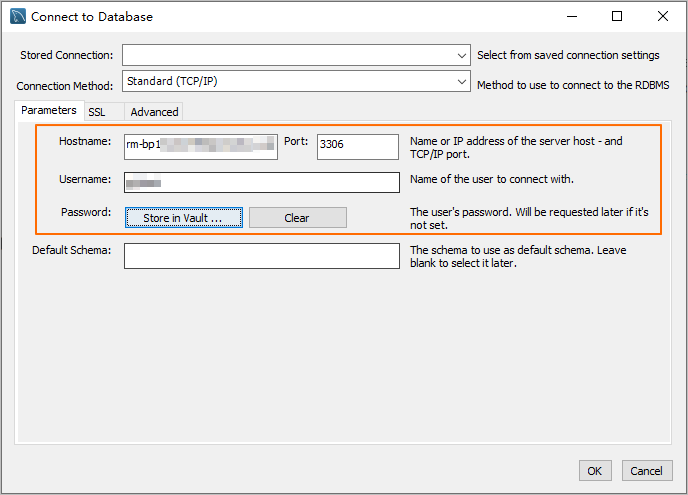
    Connection dialog

    Parameter

    Description

    Example

    Hostname

    The database endpoint.

    pc-2***.rwlb.rds.aliyuncs.com

    Port

    The port number of the database endpoint.

    Note

    The default port is 3306.

    3306

    Username

    The database account.

    polardb_mysql_user

    Password

    The password of the database account.

    Pass***233

Use the command line to connect to the cluster

If a MySQL client is installed on your server, run the following command to connect to the PolarDB for MySQL cluster.

Syntax:

mysql -h<endpoint> -P<port> -u<database_username> -p<database_user_password>

Example:

mysql -h pc-2***.rwlb.rds.aliyuncs.com -P3306 -upolardb_mysql_user -pPass***233

Parameter

Description

Example

-h

The database endpoint.

pc-2***.rwlb.rds.aliyuncs.com

-P

The port number of the database endpoint.

Note
  • The default port is 3306.

  • If the port is the default port, you can omit this parameter.

3306

-u

The database account.

polardb_mysql_user

-p

The password of the database account.

Note

This parameter is required.

  • If you omit this parameter, you are prompted to enter the password after Enter password.

  • If you include this parameter, do not add a space between -p and the password.

Pass***233

Use an application to connect to the cluster

Connecting to a PolarDB for MySQL cluster is the same as connecting to any MySQL database. Replace the endpoint, port, account, and password with your PolarDB cluster values. Examples by language:

Java

Use the MySQL JDBC driver in a Maven project to connect to a PolarDB for MySQL cluster.

  1. Add the MySQL JDBC driver dependency to your pom.xml file:

    <dependency>
        <groupId>mysql</groupId>
        <artifactId>mysql-connector-java</artifactId>
        <version>8.0.27</version>
    </dependency>
  2. Connect to the cluster. Replace <HOST>, <USER>, <PASSWORD>, <DATABASE>, <YOUR_TABLE_NAME>, and <YOUR_TABLE_COLUMN_NAME> with your actual values.

    import java.sql.Connection;
    import java.sql.DriverManager;
    import java.sql.ResultSet;
    import java.sql.Statement;
    
    public class DatabaseConnection {
       public DatabaseConnection() {
       }
    
       public static void main(String[] args) {
          // The endpoint, port, and name of the database to connect to.
          String url = "jdbc:mysql://<HOST>:3306/<DATABASE>?useSSL=false&serverTimezone=UTC";
          // The database account.
          String user = "<USER>";
          // The password of the database account.
          String password = "<PASSWORD>";
    
          try {
             Class.forName("com.mysql.cj.jdbc.Driver");
             Connection conn = DriverManager.getConnection(url, user, password);
             Statement stmt = conn.createStatement();
             // The name of the data table to retrieve.
             ResultSet rs = stmt.executeQuery("SELECT * FROM `<YOUR_TABLE_NAME>`");
    
             while(rs.next()) {
                // The name of the column in the data table to retrieve.
                System.out.println(rs.getString("<YOUR_TABLE_COLUMN_NAME>"));
             }
    
             rs.close();
             stmt.close();
             conn.close();
          } catch (Exception var7) {
             var7.printStackTrace();
          }
    
       }
    }
Python

Use the PyMySQL library with Python 3 to connect to a PolarDB for MySQL cluster.

  1. Install the PyMySQL library:

    pip3 install PyMySQL
  2. Connect to the cluster. Replace <HOST>, <USER>, <PASSWORD>, <DATABASE>, and <YOUR_TABLE_NAME> with your actual values.

    import pymysql
    
    # Database connection parameters
    host = '<HOST>'  # The endpoint of the PolarDB cluster
    port = 3306  # The default port is 3306
    user = '<USER>'  # The database account
    password = '<PASSWORD>'  # The password of the database account
    database = '<DATABASE>'  # The name of the database to connect to
    
    try:
        # Create a database connection
        connection = pymysql.connect(
            host=host,
            port=port,
            user=user,
            passwd=password,
            db=database
        )
    
        # Get the cursor
        with connection.cursor() as cursor:
            # Execute an SQL query
            sql = "SELECT * FROM `<YOUR_TABLE_NAME>`"  # The name of the data table to retrieve
            cursor.execute(sql)
    
            # Get the query results
            results = cursor.fetchall()
            for row in results:
                print(row)
    
    finally:
        # Close the database connection
        if 'connection' in locals() and connection.open:
            connection.close()
    
Go

Use the database/sql package and go-sql-driver/mysql driver (Go 1.23.0) to connect to a PolarDB for MySQL cluster.

  1. Install the go-sql-driver/mysql driver:

    go get -u github.com/go-sql-driver/mysql
  2. Connect to the cluster. Replace <HOST>, <USER>, <PASSWORD>, <DATABASE>, and <YOUR_TABLE_NAME> with your actual values.

    package main
    
    import (
        "database/sql"
        "fmt"
        "log"
        _ "github.com/go-sql-driver/mysql"
    )
    
    func main() {
        // Database connection parameters
        dbHost := "<HOST>"       // The endpoint of the PolarDB cluster
        dbPort := "3306"         // The default port is 3306
        dbUser := "<USER>"       // The database account
        dbPass := "<PASSWORD>"   // The password of the database account
        dbName := "<DATABASE>"   // The name of the database to connect to
    
        // Build the Data Source Name (DSN)
        dsn := fmt.Sprintf("%s:%s@tcp(%s:%s)/%s?charset=utf8mb4&parseTime=True&loc=Local", dbUser, dbPass, dbHost, dbPort, dbName)
    
        // Open a database connection
        db, err := sql.Open("mysql", dsn)
        if err != nil {
            log.Fatalf("Failed to connect to database: %v", err)
        }
        defer db.Close()
    
        // Test the connection
        err = db.Ping()
        if err != nil {
            log.Fatalf("Failed to ping database: %v", err)
        }
    
        // Create a cursor
        var result string
        err = db.QueryRow("SELECT VERSION()").Scan(&result)
        if err != nil {
            log.Fatalf("Failed to execute query: %v", err)
        }
    
        // Print the database version
        fmt.Printf("Connected to database, version: %s\n", result)
    
        // Execute an SQL query
        rows, err := db.Query("SELECT * FROM `<YOUR_TABLE_NAME>`") // The name of the data table to retrieve
        if err != nil {
            log.Fatalf("Failed to execute query: %v", err)
        }
        defer rows.Close()
    }

Cluster management

Node management

Cluster specifications

High availability

Backup and restore

PolarProxy

Monitoring and optimization

Version management

Binary log management

FAQ

ECS connection to PolarDB fails

Troubleshoot as follows:

  1. Check whether the PolarDB cluster is in the running state.

  2. Verify that the database endpoint, port, account, and password are correct. Obtain the database endpoint and port.

  3. Test network connectivity from the ECS instance using ping <database endpoint> or telnet <database endpoint> <port>.

    1. If you are using a private network endpoint:

      1. Check whether the ECS instance and the PolarDB cluster are in the same VPC. If they are not in the same VPC, you cannot use the private network endpoint. Use one of the following solutions to place the ECS instance and the PolarDB cluster in the same VPC:

      2. Check whether the private IP address, IP address range, or security group of the ECS instance is added to the cluster whitelist.

    2. If you are using a public network endpoint, check whether the public IP address or security group of the ECS instance is added to the cluster whitelist.

Note

Virtual hosts and simple application servers cannot connect to PolarDB through a private network endpoint.

On-premises connection to PolarDB fails

Troubleshoot as follows:

  1. Check whether the PolarDB cluster is in the running state.

  2. Verify that the database endpoint, port, account, and password are correct. Obtain the database endpoint and port.

    Note

    The database endpoint must be a public network endpoint. If you are using an ECS instance that is in the same VPC as the PolarDB cluster, you can use a private network endpoint.

  3. Test network connectivity from your on-premises environment using ping <database endpoint> or telnet <database endpoint> <port>.

  4. Check whether the public IP address or IP address range of your on-premises environment is added to the cluster whitelist.

    Obtain your public IP address:

    • Linux operating system: Open the terminal and run the curl ifconfig.me command.

    • Windows operating system: Open the command prompt and run the curl ip.me command.

    • macOS operating system: Open the terminal and run the curl ifconfig.me command.

    If your on-premises network environment uses a proxy server or has other similar configurations, the IP address obtained using the preceding methods may not be your real public IP address. You can add the IP address range 0.0.0.0/0 to the PolarDB cluster whitelist. After you successfully connect to the cluster, run the SHOW PROCESSLIST; command to obtain the real public IP address and add it to the cluster whitelist. Then, remove the IP address range 0.0.0.0/0 from the whitelist.

    image

Cannot connect to a PolarDB cluster with the error "Access denied for user 'xxx'@'xxx' (using password: YES)"

The database account or password is incorrect. Go to the PolarDB console and verify or reset credentials on the Configurations and Management > Account Management page.

Cannot connect to a PolarDB cluster with the error "Unknown MySQL server host 'xxx'"

The database endpoint is incorrect. The correct format is pc-xxxxxx.rwlb.rds.aliyuncs.com. Go to the PolarDB console and verify the endpoint in the Basic Information > Database Connection section.

Cannot connect to a PolarDB cluster with the error "Can't connect to MySQL server on 'xxx'" or "Connection timed out"

The public IP address or IP address range of your environment is likely not in the PolarDB cluster whitelist, or the IP address you entered is incorrect.

Obtain your public IP address:

  • Linux operating system: Open the terminal and run the curl ifconfig.me command.

  • Windows operating system: Open the command prompt and run the curl ip.me command.

  • macOS operating system: Open the terminal and run the curl ifconfig.me command.

If your on-premises network environment uses a proxy server or has other similar configurations, the IP address obtained using the preceding methods may not be your real public IP address. You can add the IP address range 0.0.0.0/0 to the PolarDB cluster whitelist. After you successfully connect to the cluster, run the SHOW PROCESSLIST; command to obtain the real public IP address and add it to the cluster whitelist. Then, remove the IP address range 0.0.0.0/0 from the whitelist.

image