This guide walks you through installing and logging on to the editor, building a simple RPA project, and publishing it as an RPA application.
Overview
Complete the following steps in order:
Install and log on to the editor.
Create a new cloud-based project.
Develop using the visual development mode.
Perform local debugging.
Publish the project as an application.
Prerequisites
Obtain an account with permission to use the Alibaba Cloud RPA editor.
If this is your first time using this product on Alibaba Cloud, you can apply for a free trial, which is valid for one month.
Contact your RPA administrator to assign you an Alibaba Cloud RPA account with editor authorization. For more information, see Administrator assigns accounts.
Prepare a Windows environment to run the RPA editor. The editor currently runs only on Windows. You can use your office computer or a virtual machine, such as an ECS instance or a Wuying Workspace. For more information, see Client resource requirements.
Install and log on to the editor
Log on to the console, and in the upper-right corner, click the
Downloadbutton to obtain the latest version of the Alibaba Cloud RPA installation package.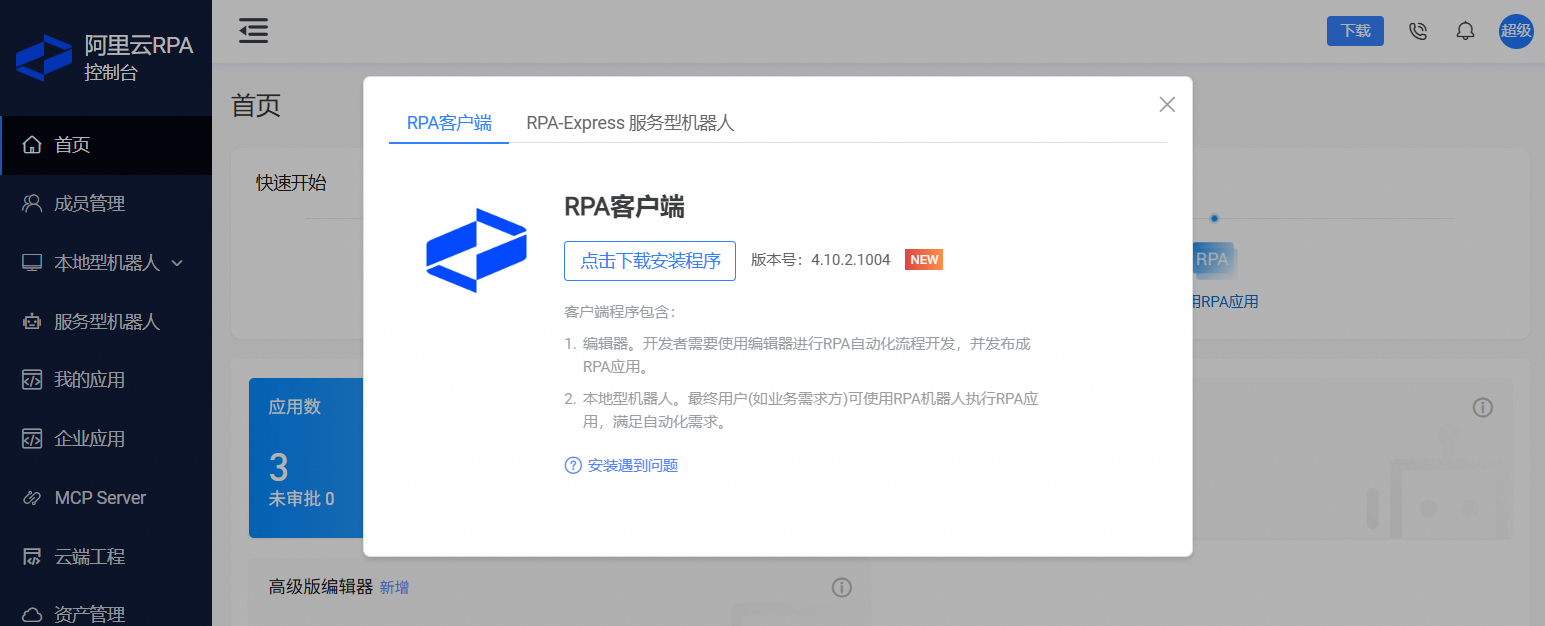
Double-click the downloaded installer, select the editor, and follow the installation prompts. For detailed steps, see Install the client.
Open the editor client to access the logon page.
If you are using Alibaba Cloud RPA on the public cloud, log on according to your account type. For more information, see Log on to the client.
If you are using an on-premises deployment of RPA, click
Switch Server, add your private cloud server address, and then log in.
Create a new cloud-based project
On the editor welcome page, use the new project area in the upper-left corner to create a new cloud-based project and select a visual project template.

A project can be stored as a local project or a cloud-based project. To learn about the differences and their use cases, see Cloud-based projects and local projects.
A project can be developed using the code-based development mode or the visual development mode. To learn which mode to use, see Choose a development mode.
Develop using the visual development mode
This section guides you through developing a simple automated process using the visual development mode. For more information, see visual development mode. If you prefer to build your project with code, see code-based development mode.
For more examples of visual development, see Visual development examples.
Procedure

Step 1: Open the Baidu homepage
Add the
Open New Webpagecomponent after the start node. There are three ways to do this (you can use similar methods to search for other components later):① In the component list on the left of the canvas, find the component in the
Web Pagegroup and drag it onto the canvas.② In the Search Box within the Component List, search for the component by name and drag it onto the canvas.
③ On the canvas, click the Plus sign (+) after the Start Node, search for the component by name, and click to select it.
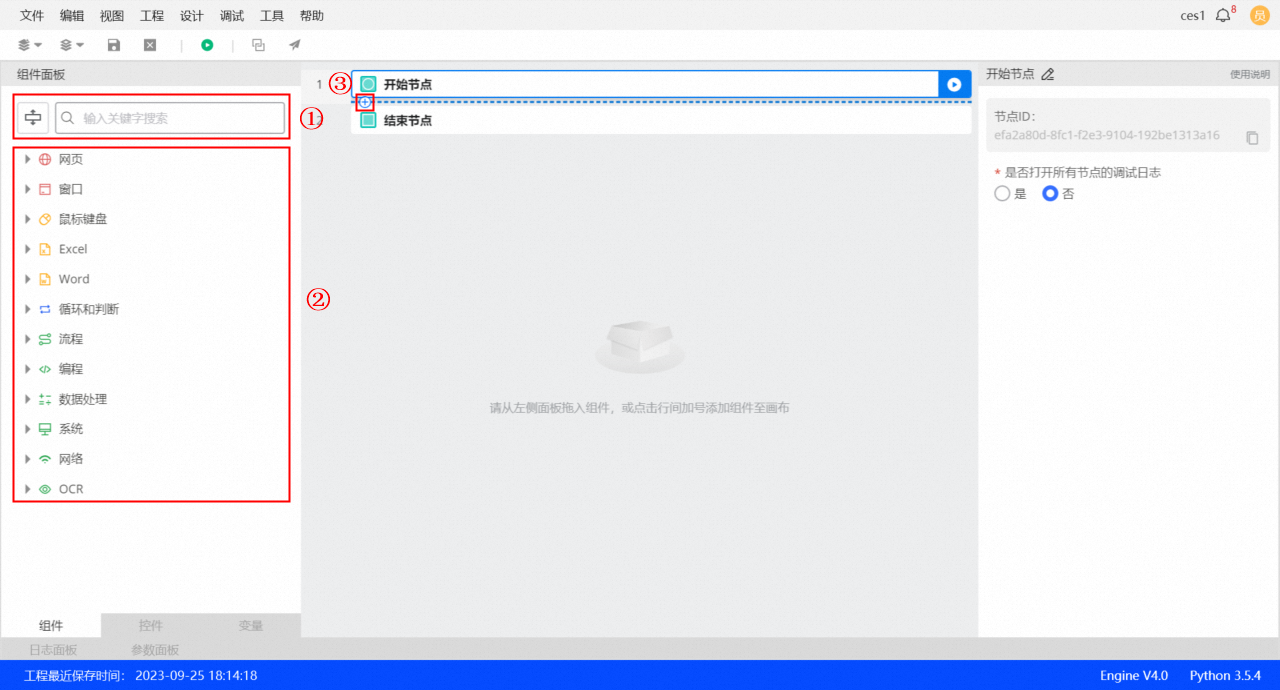
This step launches a browser and opens the Baidu homepage:
Click the
Open New Webpagecomponent. The properties panel for this component is displayed on the right side of the canvas. Configure the properties as shown in the following figure: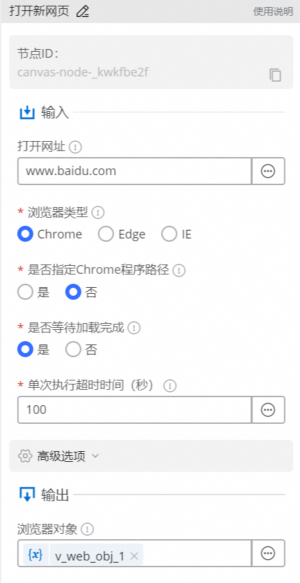
Step 2: Search for "Alibaba Cloud"
This step enters text into the Baidu search box:
After the
Open New Webpagecomponent, add theFill in Input Box (Webpage)component.For
Opened browser object, select the output of the previousOpen new web pagecomponent, which isv_web_obj_1in this example.In
Target Element, click and select
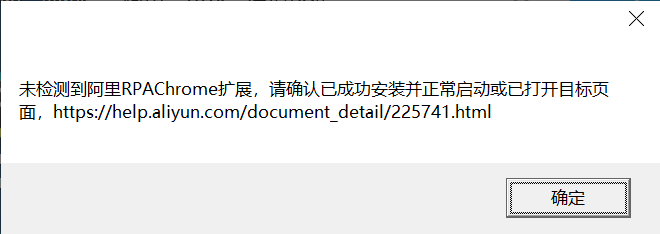
 Capture Elementto capture the input box on the webpage that you want the robot to operate on. For more information, see Capture Element. After the element is captured and saved, select the input box element from the drop-down list.WarningBefore using browser automation, complete the required preparation steps. For Chrome, see Preparation for browser automation.
If you encounter the following error when capturing an element on a Chrome page, see Chrome extension instructions and FAQ.
Configure the properties in the properties panel as shown in the following figure:
This step clicks the Baidu Search button:
After the
Fill in Input Box (Web)component, add theClick Element (Web)component.In
Target element, click the icon and select Capture elementto capture the 'Baidu Search' button on the webpage that you want the robot to click. For more information, see the Capture element documentation. After you capture and save the element, select the button element in the drop-down list.Configure the properties in the properties panel as shown in the following figure:
Step 3: Save the results to a local file
This step launches a local Excel file to store the Baidu search results.
After the
Click Element (Web)component, add theLaunch Excelcomponent.For
Launch Method, selectNew Excel, click, set the file path to the desktop, and name the file 'Baidu_Entry_Record.xlsx'.Configure the properties in the properties panel as shown in the following figure:
This step gets the specific sheet object where the search results will be written.
After the
Start Excelcomponent, add theGet Current Active Sheetcomponent.Configure the properties in the properties panel as shown in the following figure:
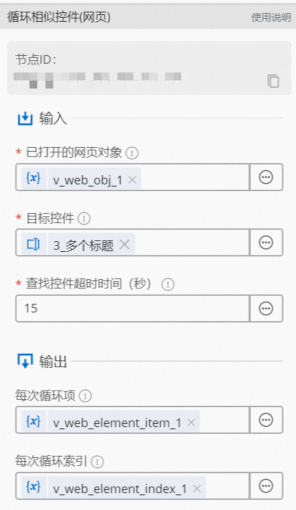
This step iterates through the titles of similar elements, which is a group of elements with similar characteristics.
After the
Get Current Active Sheetcomponent, add theLoop Through Similar Elements (Web Page)component.In the
target element, click and select capture elementto capture similar elements. For more information, see the Capture similar elements document.Configure the properties in the properties panel as shown in the following figure:
This step gets the text from each of the similar elements, which corresponds to the search result titles.
Inside the
Loop Similar Elements (Web Page)component, add theGet Text (Web Page)component.In the
Target Elementfield, selectCurrent Loop Item, which is an output of the outerLoop Similar Elements (Web)component, to locate the specific element from which to retrieve the text.Configure the properties in the properties panel as shown in the following figure:
This step writes the text extracted from the element to the previously activated Excel sheet.
In the
For Each Similar Element (Web Page)component, after theGet Text (Web Page)component, add theWrite a Row to the End of Excelcomponent.To set the format for the content of each row written to an Excel file, in the
Content to Writefield, click and choose to enter the content by editing an expression.In the editor, enter an array:
[v_web_text_1,"RPA robot"], where:v_web_text_1is the output of theGet Text (Web Page)component, a variable that represents the text content of each retrieved title."RPA robot"is a fixed value (constant), written in the second column of each row, to indicate that the value was obtained by an RPA robot.You can adjust this format as needed. If you use a variable, the process writes its current value each time. If you use a constant, the process writes the fixed value each time.
Configure the properties in the properties panel as shown in the following figure:
You have now finished building a simple visual RPA project.
 , set the file path to the desktop, and name the file 'Baidu_Entry_Record.xlsx'.
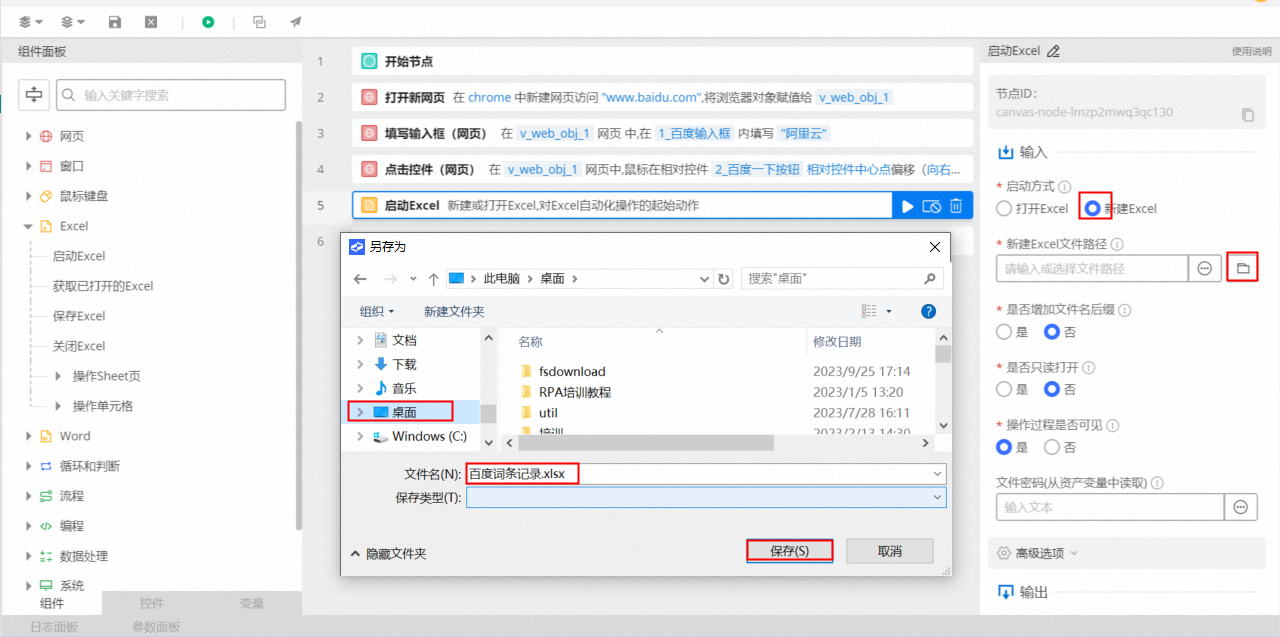
Local debugging
Before you use your automated process in production, debug the project in the editor to ensure it runs as expected when published. Follow these steps:
Click the
button (① in the figure below) in the editor's toolbar to debug the entire process on the canvas from start to finish.To debug only a part of the process, select a component (② in the figure below) and click the debug button that appears above it. This starts the debugging process from that component.
To stop debugging at any time, click the red square button at position ① in the figure.
After a debugging run, an icon appears in the upper-right corner of each component, indicating its execution status.
An
indicates that the component executed successfully.An
indicates that the component failed to execute. Click the Log Panel (③ in the figure below) to view the logs and correct the error.
 button (① in the figure below) in the editor's toolbar to debug the entire process on the canvas from start to finish.
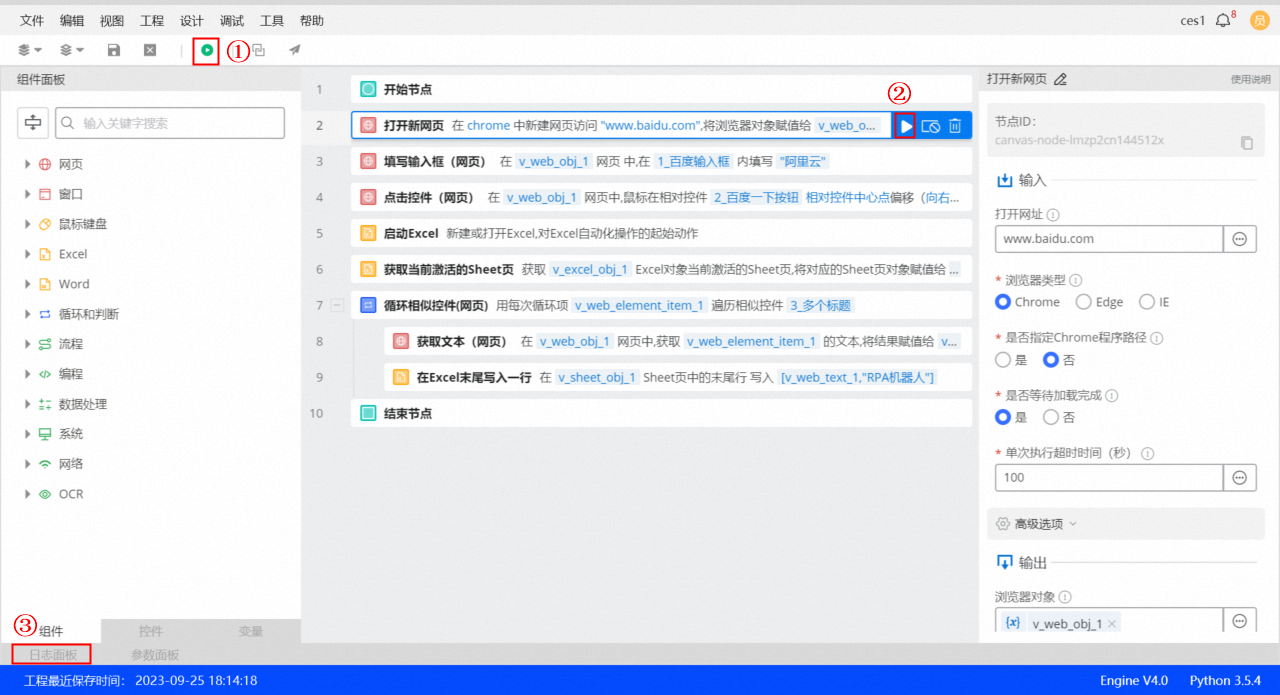
Publish the project as an application
After you build and debug your project, you can publish the RPA project as an RPA application. This makes it available for other robots to request and run. Follow these steps:
Click the
button (① in the figure below) in the editor's toolbar.Fill in the information in the Publish dialog box, and for Publish Address, select
Cloud.Fill in the application description and usage instructions.
Enter the application version information.
NoteAn RPA application version consists of a three-part version number. The developer manually enters the first two parts, and the RPA server automatically increments the final part by 1 upon publishing.
When an RPA robot runs an application, it automatically fetches and executes the latest version of the application available on the server.
After you have filled in all the information, click
OK(as shown in Figure ②) to submit the publishing request.After an RPA administrator approves the request in the console, the application becomes visible in the Enterprise App Store.
An RPA user can then request and run the application from the robot client or using API calls.
You now know how to quickly develop an automated process.