Server Migration Center (SMC) provides a containerized migration feature that enables migration without downtime. This feature lets you containerize servers and business applications from physical machines, mainstream virtualization environments (VMware/Xen/KVM/Hyper-V), and multi-cloud platforms (Alibaba Cloud, AWS, Azure, GCP, and Tencent Cloud). SMC then pushes the resulting images to Alibaba Cloud Container Registry (ACR) and deploys the applications in Container Service for Kubernetes (ACK), completing the containerized migration of your servers and applications.
Introduction
The server-to-container image migration feature has been upgraded to include an application migration mode, which allows for the migration of specific applications. Both machine-level migration mode and application migration mode are now supported.
SMC containerizes servers and business applications through machine-level and application migration, pushing them to Alibaba Cloud Container Registry (ACR) for final deployment in Container Service for Kubernetes (ACK). The following diagram shows the relationships between the involved services and the migration workflow.

Install the SMC client on the source server.
Configure the migration settings and start the migration. After the migration is complete, the service automatically generates a container image and stores it in the personal edition of ACR.
Deploy the application in Container Service for Kubernetes.
The personal edition of Alibaba Cloud Container Registry (ACR) is designed for individual developers and provides basic image hosting and building services.
Container Service for Kubernetes (ACK) provides lifecycle management for enterprise-grade Kubernetes containerized applications, allowing you to easily and efficiently run these applications in the cloud.
Migration scenarios
Machine-level migration
Containerize the system and all application data from a physical server, virtual machine, or cloud platform server into an image and push it to Alibaba Cloud Container Registry (ACR). This is ideal for system-level disaster recovery.
Application migration
Containerize specific applications from a physical server, virtual machine, or cloud platform server into an image and push it to Alibaba Cloud Container Registry (ACR). This is ideal for microservice containerization.
ImportantApplication migration is an invitational preview feature. Contact us to apply for the whitelist. Supported application versions include:
Java Tomcat
Java Tomee
Java JBoss (standalone mode)
ASP.NET Core 3.1 and ASP.NET 5/6/7/8
Limitations
Only servers that run a Linux operating system on the x86 architecture can be migrated to a container image. Supported operating system versions include:
CentOS
Ubuntu
RedHat
Alibaba Cloud Linux
The application migration feature is available only to whitelisted users. To request access, contact us. The supported application versions include:
Java Tomcat
Java TomEE
Java JBoss (standalone mode)
ASP.NET Core 3.1 and .NET 5/6/7/8
You can only migrate images to an image repository in a personal edition instance of Container Registry (ACR).
Containerized migration currently does not support data disk migration. The system excludes the
/mntdirectory and all data disk mount points by default. The resulting target disk contains only one default partition. You do not need to adjust the existing partition structure.To migrate data from a data disk to Alibaba Cloud, you can use FTP or SCP, or manually back up the data to Object Storage Service (OSS) or Apsara File Storage NAS. For more information, see Select a file transfer method and The ossutil 1.0 command-line tool.
When using the application migration mode, do not restart the application process during the migration. If the process ID changes, the migration task will fail.
Costs
While SMC is a free service, using Alibaba Cloud ECS resources, such as creating an intermediate instance during migration, incurs a small fee. For details, see SMC billable items.
The container images generated by containerized migration are stored in the Personal Edition of Alibaba Cloud Container Registry (ACR). This edition is designed for individual developers, is currently available in select regions, and is free to use during the public beta period.
The specific costs of deploying applications in Container Service for Kubernetes (ACK) vary based on the cluster type and cloud product usage.
How it works
The SMC service consists of a client and a console. Containerized migration supports both machine-level migration and application migration modes.
Machine-level migration
This mode containerizes the entire system and all application data from a physical server, virtual machine (VM), or cloud server. The resulting container image is then pushed to Alibaba Cloud Container Registry (ACR).
This mode does not generate an analysis report. Instead, it performs minimal trimming and then packages the entire operating system and application environment. This process creates a larger container image but fully preserves the source environment, enabling support for multiple applications.

Application migration
The application migration feature is available only to whitelisted users. To request access, contact us. Supported application versions include:
Java Tomcat
Java Tomee
Java JBoss (standalone mode)
ASP.NET Core 3.1 and ASP.NET 5/6/7/8
This mode containerizes specific applications from a physical server, VM, or cloud server. The resulting container image is then pushed to Alibaba Cloud Container Registry (ACR).
It generates an analysis report for the specified application and uses it to package only the required application data, resulting in a smaller container image.

The following steps describe the migration process:
The SMC client is installed on the source server. If you import the source server by using the command line or the console's automatic import feature, the system installs the client automatically.
The SMC client runs on the source server and registers the source server with the SMC service using the SMC service domain name.
The SMC service creates a temporary intermediate instance and configures its security group to allow traffic on ports 8080 and 8703.
The intermediate instance uses two data disks to complete the data migration and container image generation. The first data disk stores data from the source server, and the second data disk is used to build the container image.
The SMC client connects to the intermediate instance on port 8080 to establish a communication channel. Then, it transfers disk data from the source server to the data disk of the intermediate instance over port 8703.
For application migration, the client transfers only the specified application and its related data.
The SMC service creates a container image from the disk data on the intermediate instance and uploads the image to Alibaba Cloud Container Registry (ACR).
For application migration, the service creates the container image based on the application, its data, environment variables, and startup commands before uploading it to ACR.
To complete the migration, go to the Container Service for Kubernetes (ACK) console and deploy the application.
Migration impacts
Review the impacts detailed in the table below.
Item | Description |
Intermediate instance | Do not interfere with the intermediate instance. To prevent migration failure, do not stop, start, restart, or release the intermediate instance, or change its billing method during the migration. After the migration is complete, the intermediate instance is automatically released. Note
For more information, see How it works. |
IP address | The IP address will change after migration. If your services rely on specific IP address configurations, you must update the relevant settings, such as DNS records and ICP filings. |
Underlying hardware | The underlying hardware will change after migration. This may invalidate certain application licenses that are bound to specific hardware. Verify the status of your licenses after the migration. |
Prerequisites
You have activated Server Migration Center (SMC). If this is your first time using SMC, you must also grant required permissions, prepare the migration network, and back up your data. For more information, see Before you begin.
To migrate over a private network, you can connect your data center to a VPC by using VPN Gateway, Express Connect, or Smart Access Gateway. If you migrate servers across international regions, migration may be slow due to public network instability. We recommend that you evaluate the migration time and test the transfer speed.
Migration operations
Step 1: Preparations
Follow the on-screen instructions to grant the specified RAM role to the intermediate instance. Server Migration Center (SMC) uses this RAM role to push the generated container image to Container Registry.

Activate Container Registry and create an image repository (Personal Edition). The Personal Edition of Container Registry is for individual developers, supports creating an image repository in some regions, and is free during its public preview. You will then need to specify the Namespace, Repository Name, and Version.
Step 2: Import a migration source
A migration source is a physical server, a virtual machine (VM), or a cloud host from another cloud platform that you want to migrate.
CLI import
-
The source server must have public network access. If the source server is behind a firewall, see What are the SMC endpoints? to obtain the SMC endpoints and ports, and then add them to your firewall allowlist.
-
If your source server cannot access the public network or you want to use a private network for a faster migration, see private network migration.
-
Go to the Container Migration page in the SMC console.
On the Containerized migration page, click Import Migration Source.
Configure the parameters as prompted and copy the activation code command. The following table describes the parameters.
Parameter
Description
Migration Source Type
Select an option based on your source server:
Physical servers/VMs/Cloud servers of other cloud platforms.
ECS Instance
Import Method
Select Use CLI to Import Server.
Migration Source Quota
The number of migration sources that can be activated by the activation code. Valid values: 1 to 1,000. Default value: 200.
Validity Period
The validity period of the activation code, in days. Valid values: 1 to 90. Default value: 90.
Activation Code
Generate the activation code and copy the command.
-
Click Generate.
Click the Linux Shell tab.
-
Click Copy to copy the activation code command.
Log on to the source server and run the copied command with administrator privileges to import it.
-
Log on to the Linux source server.
-
Paste and run the copied command with administrator privileges to import the migration source.

If a message similar to
Import Source Server [s-bp18x8751kgz2oyh****] Successfully!is displayed, it indicates a successful import.
-
On the Containerized migration page of the SMC console, check the status of the migration source in the Real-time Migration Status column.
If the status is Migration Source Online, the migration source is imported successfully.
If the migration source is in any other status, the import failed. Troubleshoot the issue and then re-import the migration source.
Troubleshoot the issue based on the error message in the console or by checking the log file in the SMC client directory. The SMC client is installed in the /smc directory by default.
For common issues and solutions, see SMC FAQ and Troubleshooting.
Console import
Only Alibaba Cloud ECS instances can be imported using this method.
The source server must be in the Running state, and Cloud Assistant must be available. For more information, see View the status of Cloud Assistant and handle exceptions.
If you use a RAM user to import a migration source, you must grant the RAM user the following permissions:
The
AliyunECSReadOnlyAccesspermission, which grants read-only access to ECS. For more information, see Manage RAM user permissions.The
AliyunECSAssistantFullAccesspermission, which grants full management permissions on Cloud Assistant. For more information, see Manage RAM user permissions.
-
Go to the Container Migration page in the SMC console.
On the Containerized migration page, click Import Migration Source.
Configure the parameters based on the migration source type.
Parameter
Description
Migration Source Type
Select ECS Instance.
Import Method
Select Import through Console.
Region
Select the region of the source server.
Instance
Search for and select the ECS instances to migrate by instance ID, name, or IP address. You can select multiple instances for a batch import.
Tag (Optional)
Bind key-value tags to the migration task to facilitate search and management. For more information, see Manage migration sources and tasks by using tags and Implement fine-grained access control by using tags.
You can bind a maximum of 20 tags to a migration task.
Resource Group (Optional)
Use resource groups to organize migration resources by business department, project, or other dimensions.
After configuring the parameters, click Import.
SMC automatically starts Cloud Assistant to perform the import. The import process takes 3 to 10 minutes.
On the Containerized migration page of the SMC console, check the status of the migration source in the Real-time Migration Status column.
If the status is Migration Source Online, the migration source is imported successfully.
If the migration source is in any other status, the import failed. Troubleshoot the issue and then re-import the migration source.
Troubleshoot the issue based on the error message in the console or by checking the log file in the SMC client directory. The SMC client is installed in the /smc directory by default.
For common issues and solutions, see SMC FAQ and Troubleshooting.
SMC client import
For more information about the SMC client, see SMC Client User Guide.
The SMC client must run on the source server. By default, public network access is enabled. If the source server is behind a firewall, see What are the SMC endpoints? to obtain the SMC endpoints and ports, and then add them to your firewall allowlist.
If your source server cannot access the public network or you want to use a private network for a faster migration, see private network migration.
-
Go to the Container Migration page in the SMC console.
On the Containerized migration page, click Import Migration Source.
-
On the Import Source Servers page, configure the parameters as described in the following table.
Parameter
Description
Migration Source Type
Physical servers/VMs/Cloud servers of other cloud platforms.
Import Method
Select Use Client to Import Server.
You must manually download and install the SMC client on the source server.
Description
-
In the Description section, follow the prompts to download, install, and activate the SMC client that matches the operating system (Linux or Windows) and architecture (32-bit or 64-bit) of your source server.
-
Click Generate and copy the activation code.
You must enter the activation code when you install the client.
-
Import the migration source.
ImportantDo not close the SMC client during the migration. Otherwise, the migration source will lose its connection to the SMC console and the migration will fail.
-
Use a remote connection tool that supports file transfer, such as WinSCP, to upload the SMC client to the Linux source server, or run the command provided in the import instructions to download the SMC client directly on the source server.
-
Remotely connect to the Linux source server and decompress the SMC client package.
The following command uses the
Linux 64-bit General-purpose Editionas an example. If you use a different version of the SMC client, replace the package name in the command with the name of the file you downloaded.tar -zxvf go2aliyun_client.tar.gzNoteThe Linux 64-bit ARM Edition supports the g6r general-purpose instance family and the c6r compute-optimized instance family. For more information about instance families, see Enterprise-level Arm-based compute instance families.
-
(Optional) Exclude files or directories from the migration.
ImportantIf you enable block replication for the migration, you cannot exclude files or directories.
-
Obtain an activation code or an AccessKey pair.
-
(Recommended) Obtain an activation code: In the Description section of the SMC console, click Generate and copy the activation code.
-
Obtain an AccessKey pair: An AccessKey pair for an Alibaba Cloud account consists of an AccessKey ID and an AccessKey secret. If you have not created an AccessKey pair, create one first. For more information, see Create an AccessKey pair.
-
-
In the SMC client directory, run the following commands to start the SMC client.
The go2aliyun_client2.6.5_linux_x86_64 directory is used as an example. The directory name varies based on the client version. Make sure to replace it with the name of the directory created after you download and decompress the package.
cd go2aliyun_client2.6.5_linux_x86_64 sudo chmod +x go2aliyun_client sudo ./go2aliyun_client -
Enter the activation code or AccessKey pair as prompted. The following example shows how to enter an activation code:

After you enter the activation code or AccessKey pair, the following prompts may appear:
-
If a snapshot driver is not installed on the source system, the SMC client prompts you to install one. You can choose whether to install it based on your migration plan.
-
If you plan to enable block replication when you create the migration task, enter
yesto automatically install the snapshot driver. -
If you do not plan to enable block replication, enter
no.
ImportantIf the snapshot driver fails to install, do not enable block replication when you create the migration task. Otherwise, the migration will fail.
-
-
Most mainstream source systems have rsync installed by default. If rsync is not installed, the SMC client prompts you to install it. Enter
yesto automatically install rsync, as shown in the following figure. -
If SELinux is enabled on the source system, the SMC client prompts you to disable it. Enter
yesto automatically disable SELinux, as shown in the following figure.
If a message similar to
Import Source Server [s-bp11npxndknsycqj****] Successfully!is displayed, it indicates a successful import.NoteIf the import fails, troubleshoot the issue based on the displayed message. Then, run the following commands in sequence to exit the background process and import the migration source again. For information about common issues and solutions, see SMC FAQ and Troubleshooting.
sudo ./go2aliyun_client --abort sudo ./go2aliyun_client -
-
On the Containerized migration page of the SMC console, check the status of the migration source in the Real-time Migration Status column.
If the status is Migration Source Online, the migration source is imported successfully.
If the migration source is in any other status, the import failed. Troubleshoot the issue and then re-import the migration source.
Troubleshoot the issue based on the error message in the console or by checking the log file in the SMC client directory. The SMC client is installed in the /smc directory by default.
For common issues and solutions, see SMC FAQ and Troubleshooting.


Step 3: Migration configuration
-
In the Actions column of the migration source that you want to manage, click Start Migration.
Configure the parameters and click Start Migration.
Configure basic parameters.
Parameter
Description
Destination Region
The destination Alibaba Cloud region for the source server. For more information, see Regions and zones.
Namespace (Required)
Select the namespace for the container image repository that will store the resulting container image. If a namespace does not exist, see Manage namespaces and quotas to create one.
Repository Name (Required)
Select the repository to store the container image generated by the migration. If a repository does not exist, see Build repositories and images to create one.
Version (Required)
Enter a version for the container image. Example: v1.
The version name must be 1 to 128 characters in length.
The version name can contain only lowercase letters (a-z), digits (0-9), periods (.), underscores (_), and hyphens (-).
The version name cannot start or end with a period (.) or a hyphen (-).
Intermediate instance RAM role (Required)
Select the RAM role to attach to the intermediate instance. If a RAM role does not exist, create one as described in Step 1: Prepare for migration.
Migration Mode
Migrate All Instances
Containerizes the entire system and application data from a physical machine or virtual machine and migrates it to Alibaba Cloud Container Registry (ACR) Personal Edition.
This mode does not generate an analysis report. It packages the entire operating system environment after minimal trimming, which results in a larger container image. However, the runtime environment is identical to the source system and can support multiple applications.
This mode is suitable for system-level disaster recovery scenarios.
Application Migration
Migrates specific applications from a physical machine or virtual machine to Alibaba Cloud Container Registry (ACR) Personal Edition. This mode minimizes the size of the generated container image, resulting in a smaller container image.
This mode generates an analysis report for the specified application and packages the application data based on the report, producing a smaller container image.
Currently, this mode supports Java Tomcat, Tomee, JBoss, and ASP.NET applications. Ensure that the application you want to migrate is a supported type.
This mode is suitable for microservice containerization scenarios.
Select Applications to Be Migrated
Select the application that you want to migrate.
The drop-down list displays only supported applications. If your application is not in the list, it cannot be migrated.
The application ID is generated by SMC in the format
${application_id} (Process: ${pid}). For example:java-tomcat-5924e694(Process: 2360).
After the analysis is completed, you need to confirm the analysis results.:
Deselected: The migration starts automatically after the analysis is complete.
Selected: You must confirm the analysis results. After the analysis is complete, the task is paused. You must confirm the results to continue the migration. The analysis report is stored on the source server at a path similar to
/smc/app2container/java-tomcat-5924e694/analysis.json.
Execution Method
Select how to run the migration task:
Migrate Now: Starts the migration immediately after the task is created. Migrate Now is the default option.
Create Only: Creates the migration task but does not start it. You must manually start the task by clicking Run in the Actions column.
Network Type
Select the network for transferring migration data to the intermediate instance. By default, data is transferred over the public network. The intermediate instance is created in the selected Virtual Private Cloud (VPC) and vSwitch and is assigned a public IP address.
Public Network (Default)
Migration data is transferred to the intermediate instance over the public network. This mode requires the source server to have public internet access. You can choose whether to specify a Virtual Private Cloud (VPC) and vSwitch.
-
Specify a VPC and vSwitch: The migration job creates an intermediate instance in the VPC and vSwitch that you specify.
-
Do not specify a VPC and vSwitch: The migration job creates an intermediate instance in a new VPC and vSwitch that are automatically created by the system.
VPC
Migration data is transferred to the intermediate instance over a private connection within a VPC. This mode requires you to connect the source server to the Alibaba Cloud VPC and specify a VPC and vSwitch.
NoteIf you can directly access a VPC in an Alibaba Cloud region from an on-premises data center (IDC), virtual machine (VM) environment, or cloud host, we recommend that you use this method. Private network transfer is faster and more stable than public network transfer, improving migration efficiency. You can connect the source server to the cloud VPC by using a VPN gateway, an Express Connect circuit, or a Smart Access Gateway. For more information, see Connect a VPC to a data center or another cloud.
In the dialog box that appears, carefully read the migration notes, and then click Got It.
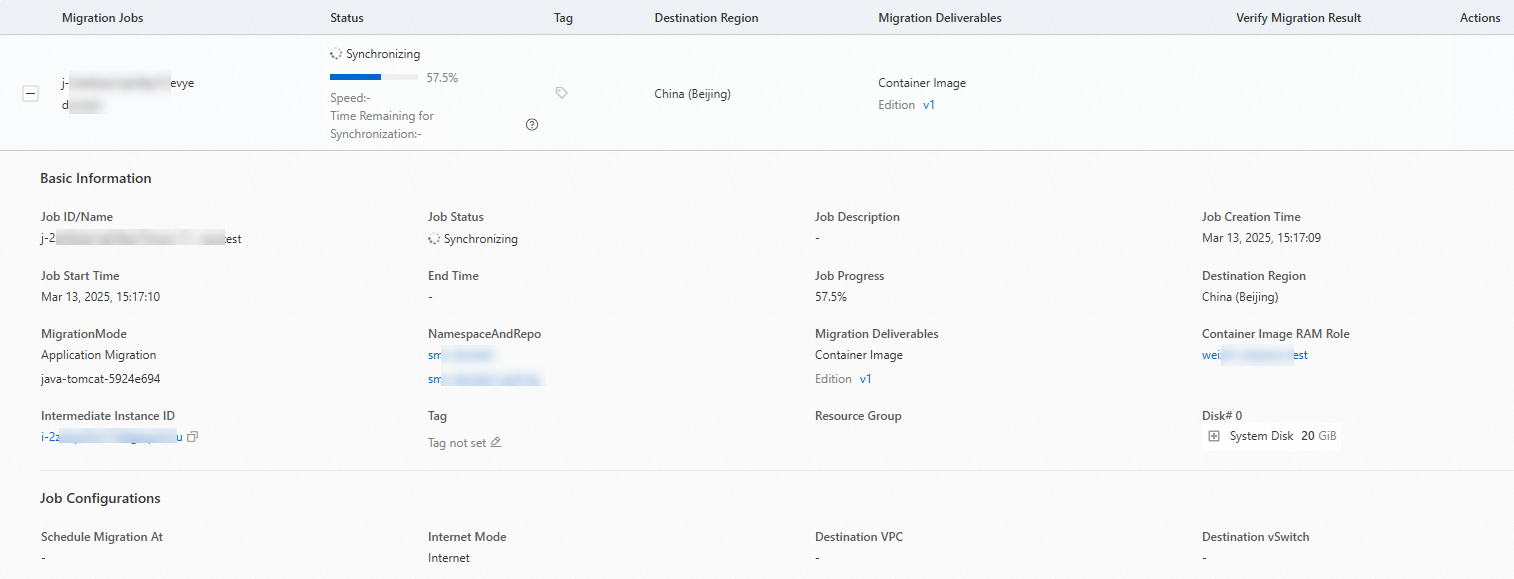
On the Containerized migration page, monitor the real-time status of the migration.
Data transmission time depends on factors such as the source data size and network bandwidth. Wait for the migration task to complete.
Note-
Speed: The amount of uncompressed migration data transferred per second. If the Compression Ratio for the migration job is greater than 0, the displayed speed is higher than the actual network transfer speed of the compressed data.
-
Time Remaining for Synchronization: Calculated as (Total Data Volume - Transferred Data Volume) / Speed.
-
If the transfer speed is too slow for your schedule, consider temporarily increasing the fixed bandwidth of the source and destination servers. For more information, see Estimate migration time and test transfer speed.
-

Verify the migration results
When the Real-time Migration Status is Completed, the migration is successful.
A successful migration generates an Alibaba Cloud container image. You can use this image to deploy a container application. Follow these steps:
In the Actions column of the migration source, click Deploy Application. You are redirected to the ACK cluster list page.
Select an existing ACK cluster or create a new one. For more information, see Create a cluster.
Navigate to the cluster. In the left-side navigation pane, choose Workloads > Deployments. Click create from image to create an application. Select the container image generated by the migration. For more information, see Create a stateless workload Deployment.
Example startup command for machine-level migration mode
When you deploy the application in an ACK cluster, you must add scripts to start the services from the source server and expose the required development ports. You can configure this in the application's lifecycle hooks or in the application's YAML file. Customize the script based on your actual requirements. The following example shows the
commandsection in a YAML file:spec: containers: - args: - | cd /www/server/panel && chmod +x /www/server/panel/init.sh && echo 3 | sh init.sh && tail -f /dev/null command: - /bin/sh - '-c' image: 'registry-vpc.cn-hangzhou.aliyuncs.com/zi***h/sa***:v1'Application migration mode
Run
netstat -lptnon the source server to view the application's service ports, and then configure port mapping when you deploy the application in the ACK cluster.
After migrating the server, you must validate the data to ensure its integrity and correctness. For more information, see How do I check the system after migrating a Linux server?.
NoteIf a domain name is already mapped to the source server, map the domain name to the public IP address of the new instance. For more information, see Add a website resolution.
If the Real-time Migration Status is Error, the migration task has failed. You must troubleshoot the issue and then retry the migration:
In the Actions column, click Troubleshoot Errors. Resolve the issue based on the error code and error message. For more information, see SMC FAQ and troubleshooting.
After resolving the issue, in the Actions column, click Retry Migration Job. The migration task resumes from where it left off.
ImportantIf the intermediate instance has been released, you must restart the migration. For more information, see What do I do if I accidentally release an intermediate instance?.

Clean up resources
Migrate to an image
During the migration, SMC creates a temporary pay-as-you-go intermediate instance named No_Delete_SMC_Transition_Instance in your destination Alibaba Cloud account to facilitate the migration. The migration result determines whether you need to manually release the instance:
-
Successful migration: SMC automatically releases the intermediate instance. No manual cleanup is required.
-
Migration error: The intermediate instance is not released and continues to incur charges. To avoid unnecessary charges, you can release the instance in one of the following ways:
-
If you no longer need the migration task, click the migration source ID. In the Actions column for the migration task, click Cancel Migration Job to delete the migration task and automatically clean up the intermediate instance.
-
Manually release the intermediate instance.
-
Migrate to a destination instance
During the migration, SMC creates a temporary pay-as-you-go intermediate disk named SMC_Temp_Disk and attaches it to the destination instance to facilitate the migration. The migration result determines whether you need to manually release the intermediate disk:
-
Successful migration: SMC automatically releases the intermediate disk. No manual cleanup is required.
-
Migration error: The intermediate disk is not released and continues to incur charges. To avoid unnecessary charges, you can release the disk in one of the following ways:
-
If you no longer need the migration task, click the migration source ID. In the Actions column for the migration task, click Cancel Migration Job to delete the migration task and automatically clean up the intermediate disk.
-
Manually release the intermediate disk.
-