OpenAPI integration
To integrate service-based robots with OpenAPI, you primarily use task and robot APIs.
Tasks
The sequence diagram below shows the recommended integration method. This approach reduces coupling and improves overall processing efficiency. For more information about task management for service-based robots, see Task management.

Notes:
For Step 1, see the CreateTask API.
Step 5
You can configure whether a task requires a callback when you call the CreateTask API.
A callback is triggered when the task status changes. For more information about task statuses, see Task statuses. For details about the callback content for each status, see CreateTask.
Callback retry policy
The RPA server has a 5-second timeout when calling your API.
If the callback fails after three retries, the RPA server does not resend the information.
You can poll the ListTasks API to retrieve the task status and ensure eventual consistency.
Steps 6 and 7 require you to add corresponding steps or code to your automation workflow.
If your system has high real-time requirements, we recommend you use the workflow shown in the preceding diagram.
If your system does not have high real-time requirements, or you prefer not to expose additional APIs from your existing system, you can use a simplified approach.
In the automation workflow, save the result to
task_result. For usage and limitations, see task_result.Your system periodically polls to check the task status and retrieve the
task_resultcontent. You can use the ListTasks and ListTaskDetails APIs in combination for this purpose.
Robots
The primary integration task is the bulk creation of service-based robots. For more information, see the "Manage service-based robots in bulk" section in this topic. For details about other integrations, see the related service-based robot APIs.
Permissions
There are two types of permissions:
Permission type |
Description |
Permissions to call service-based robot APIs |
To call service-based robot APIs (see API overview), the account must have permissions for the "service-based robot" menu. Only an AccessKey pair from an account with these permissions can be used for API calls. For the configuration process, see Console roles. |
Data permissions (robots, RPA applications) |
Unlike on-premises robots, service-based robots do not provide granular data permission control for specific robots or RPA applications. Instead, access permissions are controlled by your upper-layer system. |
Bulk robot management
Bulk creation
Prepare an Elastic Desktop Service image. You can prepare a cloud desktop image in two ways.
Recommended method: Contact our support team and request that they share the latest cloud desktop image, with the service-based robot client pre-installed, to your account. After the image is shared, you can view it in the Image Center of the Elastic Desktop Service (Enterprise Edition) console, as shown in the following figure. This image is based on Windows Server 2019 with some adjustments.
Alternative method: Prepare your own image, which requires specific configurations and adjustments.
Method 1: Perform bulk operations in the console
When you create cloud desktops in the Elastic Desktop Service console, select the shared image on the Custom Purchase page, as shown in the following figure:
In the RPA console, go to the Service Robot > Robot List page to register cloud desktops in bulk. You can select and register up to 50 cloud desktops at a time.
Method 2: Use OpenAPI to create and register in bulk. This requires calling APIs for both Elastic Desktop Service and RPA service-based robots, as the following sequence diagram shows:

Step 1: Call the CreateDesktops API to create one or more cloud desktops. When you create cloud desktops without a template, note the following parameters:
RegionId: Specify a region where service-based robots are supported on Elastic Desktop Service. For more information, see Select a robot type.DesktopAttachment.ImageId: Use the ID of the shared image.DesktopAttachment.SystemDiskSize: The system disk size must accommodate the software required for your business scenario.DesktopAttachment.DesktopTypeThe cloud desktop specifications must match the requirements of your business scenario.
If you use the "EDS & RPA Joint Cloud Desktop Specifications", enter the corresponding joint specifications.
EndUserId: Specify the user to add to the cloud desktop (a convenience user). If you specify this parameter, all cloud desktops created in this batch are associated with this convenience user. This user must also be the same as the Windows user specified in Step 4. If this parameter is left empty, you can configure it later in Step 2 and Step 3.WarningService-based robots do not support Windows multi-session. We recommend associating a single convenience user with each cloud desktop. Associating multiple users may cause runtime errors due to Windows session switching.
(Optional) Step 2 and Step 3: Call the CreateUsers and ModifyUserEntitlement APIs, respectively.
ImportantThis applies to scenarios where each cloud desktop must use a different user account.
In Step 4, you must pass the account information for each cloud desktop.
Step 4: Call the AddRobots API to register robots in bulk. This API has a limit on the number of robots that can be registered in a single call. For more information, see the API description. If the number of robots to register exceeds the limit, your system must split the operation into batches.
Step 6: The registration process typically takes less than one minute. You can call the ListRobots API to check the registration result.
Image creation
When you create robots in bulk, we recommend standardizing the robot runtime environment by using a cloud desktop image. You can create a custom image based on the image we share with you and add your required software.
The base image runs on Windows Server 2019 and comes pre-installed with the service-based robot client and Chrome browser (with the RPA robot's Chrome extension configured).
To learn how to create a cloud desktop image, see Create a custom image from a cloud desktop. After you install your required software and before you create the custom image, consider the following points:
Handle personal user data used by the software.
Verify which software configuration information to keep and which to remove. For example, software that requires a license key may have restrictions if multiple clients use the same license.
When you create a cloud desktop image, the contents of the
C:\Usersfolder are automatically cleared. For more information, see Create a custom image from a cloud desktop. We do not recommend disabling this cleanup option, so you must confirm its impact on your software.
Disable the automatic update feature for all installed software. The configuration for this feature varies by software, so you may need to find the relevant documentation.
Stability best practices
Target applications can be unpredictable and are often a black box due to their inherent limitations. Ensuring stable operation requires careful consideration of many factors. The following are general recommendations.
Cloud desktop allocation
Many applications, especially web applications, detect their environment by checking for fingerprints. To avoid issues, do not switch between different target application accounts on the same cloud desktop. We recommend a "one cloud desktop, one account" approach.
We also recommend selecting cloud desktop specifications and configurations that balance stability and cost based on your business needs. For automating Chrome browser scenarios, specifications of 2 vCPU and 4 GiB of memory are a common minimum. For desktop client automation scenarios, specifications of 4 vCPU/8 GiB or 8 vCPU/16 GiB are often used. The optimal choice depends on the resource consumption of your specific software and automation workflow. Always validate your choice with tests during the development phase.
Standardizing the runtime environment
Standardizing the runtime environment includes several key areas:
Windows system settings, such as input methods, resolution, and DPI (display scaling).
The service-based robot client.
The software environment, including installation and configuration.
You can enforce standardization by using cloud desktop images and Elastic Desktop Service policies.
Cloud desktop images, as described in the previous sections.
Key configurations in Elastic Desktop Service policies include:
Fixed resolution. If your automation workflow uses computer vision (CV) controls or image-based operations, we recommend setting a fixed resolution for the cloud desktop, as shown in the following figure. For instructions, see User experience policies.
Enable screen recording.
ImportantScreen recording is critical for troubleshooting. We recommend you enable this feature.
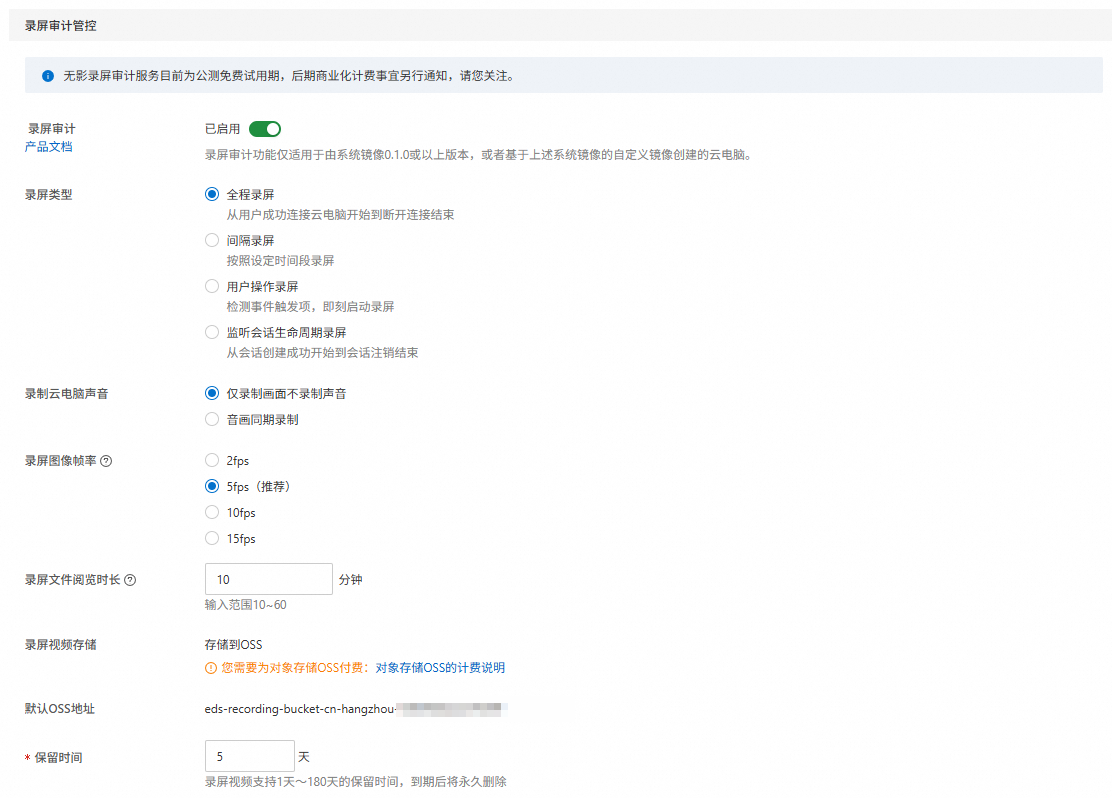
The following table describes the recommended settings. For more information, see Security policies.
Parameter
Description
Screen recording type
Select "Full screen recording" to capture the entire robot operation process.
Frame rate
Use the default setting. This setting directly affects the size of the recording file.
Retention period
Specifies how long to store screen recording files in OSS. Configure this based on your retention requirements.
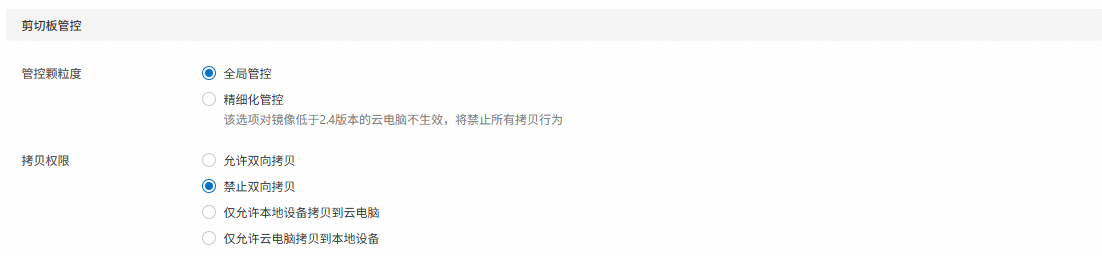
Disable clipboard.
ImportantWe recommend selecting "Forbid Bidirectional Copy." This setting prevents interaction between the local clipboard and the cloud desktop clipboard when a user logs in with the Elastic Desktop Service client, which could cause automation workflow failures.
Network configuration
This section describes network configurations for Elastic Desktop Service.
Public bandwidth. By default, new cloud desktops use basic bandwidth. We recommend changing to premium bandwidth. For more information, see Manage public bandwidth.
WarningRPA scenarios require premium bandwidth to ensure network stability.
To estimate bandwidth needs, we recommend starting with the pay-by-traffic billing method. After monitoring actual usage over a period, you can decide whether to switch to a different billing model to reduce costs.
Public egress IP. If the target application has specific requirements for the cloud desktop's public egress IP, you can use services like Cloud Enterprise Network (CEN) or externally purchased IPs.
Ongoing maintenance
After deploying service-based robots to production, ongoing maintenance typically includes the following tasks:
Maintenance item |
Recommendation |
The target application is updated (for example, a browser-based website). |
Modify the automation workflow (RPA application). After publishing the new workflow, when you call the CreateTask API without specifying an RPA application version, the robot automatically runs the latest version. You can also specify a version to run. |
The target application is updated (for example, a Windows client application that requires a version upgrade to use a new feature). |
|
The service-based robot client requires an upgrade. |
|
The operating system requires an update (for example, a critical security patch). |
|
Considerations for changing a cloud desktop image:
Software environment after the change
WarningChanging the system image is like resetting the cloud desktop to its initial state. Software and personal data on the system disk or data disk are cleared. Before you change the image, back up any data that you want to persist.
Changing the image also affects applications that support saved login states. After the image is changed, you must log in to the target applications again. Carefully assess the business impact of this action.
Service-based robot after the change
The ID of the service-based robot installed on the cloud desktop remains the same after the image change.
You must register the service-based robot again before you can use it. We recommend performing this operation during a maintenance window when no tasks are running.
ImportantRecommended procedure:
Delete the RPA service-based robot on the cloud desktop whose image you want to replace.
You can perform this operation in bulk from the RPA console - Service Robot page.
Alternatively, call the DeleteRobots API.
Change the cloud desktop image.
You can do this from the Elastic Desktop Service console. For more information, see Change the image of a cloud desktop or a desktop pool.
Alternatively, call the RebuildDesktops API.
Re-register the cloud desktop as an RPA service-based robot.
You can perform this operation in bulk from the RPA console - Service Robot page.
Alternatively, call the AddRobots API.
After the robot reconnects, it can receive tasks normally.