
本文将介绍如何使用 Druid 连接池、MySQL Connector/J 和 OceanBase 数据库构建一个应用程序,实现基本的数据库操作,包括创建表、插入数据、更新数据、删除数据、查询数据和删除表等。

前提条件
您已安装 OceanBase 数据库并且创建了 MySQL 模式租户。
您已安装 JDK 1.8 和 Maven。
您已安装 Eclipse。
说明本文档运行代码使用的工具是 Eclipse IDE for Java Developers 2022-03 版本,您也可以根据个人喜好选择适合自己的工具运行的示例代码。
操作步骤
本文中给出的操作步骤是在 Windows 环境下使用 Eclipse IDE for Java Developers 2022-03 编译和运行该项目的步骤。如果您使用的是其他操作系统环境或编译器,那么操作步骤可能会略有不同。
将
druid-mysql-client项目导入到 Eclipse 中。获取 OceanBase 数据库 URL。
修改
druid-mysql-client项目中的数据库连接信息。运行
druid-mysql-client项目。
步骤一:将 druid-mysql-client 项目导入到 Eclipse 中
打开 Eclipse,在菜单栏上选择File->Open Projects from File System。
在弹出的对话框中,点击Directory按钮选择项目所在的目录,然后点击Finish完成导入。
说明当使用 Eclipse 导入 Maven 项目时,Eclipse 会自动检测项目中的
pom.xml文件,并根据文件中描述的依赖关系自动下载所需的依赖库,并将它们添加到项目中。
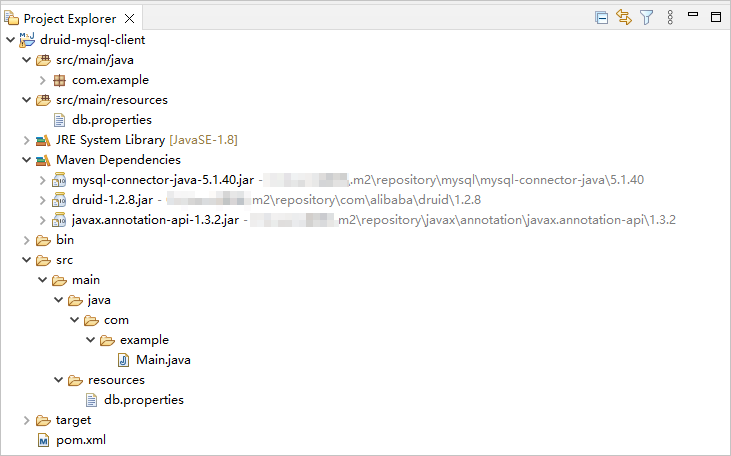
查看项目情况。
步骤二:获取 OceanBase 数据库 URL
联系 OceanBase 数据库部署人员或者管理员获取相应的数据库连接串。
示例如下:
obclient -hxxx.xxx.xxx.xxx -P3306 -utest_user001 -p****** -Dtest更多连接串的信息,请参见 获取连接参数。
根据 OceanBase 数据库连接串信息填写下面 URL 的对应信息。
jdbc:mysql://$host:$port/$database_name?user=$user_name&password=$password&useSSL=false参数说明:
$host:OceanBase 数据库连接的域名。$port:OceanBase 数据库连接端口,MySQL 模式租户默认是 3306。$database_name:需要访问的数据库名称。$user_name:租户的连接账号。$password:提供账户密码。
更多有关 MySQL Connector/J 连接属性信息,请参见 Configuration Properties。
示例如下:
jdbc:mysql://xxx.xxx.xxx.xxx:3306/test?user=test_user001&password=******&useSSL=false
步骤三:修改 druid-mysql-client 项目中的数据库连接信息
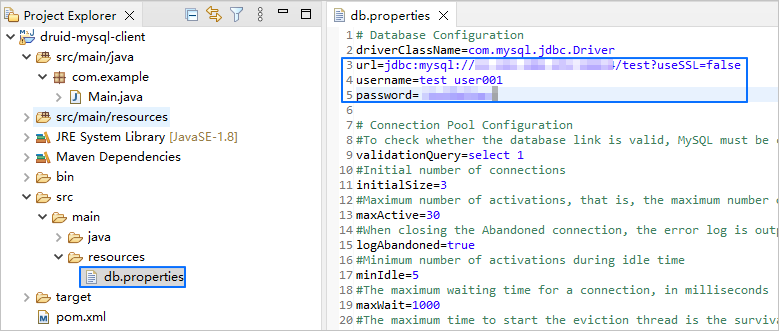
根据步骤二:获取 OceanBase 数据库 URL中获取的信息修改druid-mysql-client/src/main/resources/db.properties文件中的数据库连接信息。
示例如下:
OBServer 节点的 IP 地址为
xxx.xxx.xxx.xxx。访问端口使用的是 3306。
需要访问的数据库名称为
test。租户的连接账户是
test_user001。密码是
******。
代码如下:
...
url=jdbc:mysql://xxx.xxx.xxx.xxx:3306/test?useSSL=false
username=test_user001
password=******
...
步骤四:运行 druid-mysql-client 项目
在项目导航器视图中,找到并展开druid-mysql-client/src/main/java目录。
右键点击Main.java文件,然后选择Run As->Java Application。
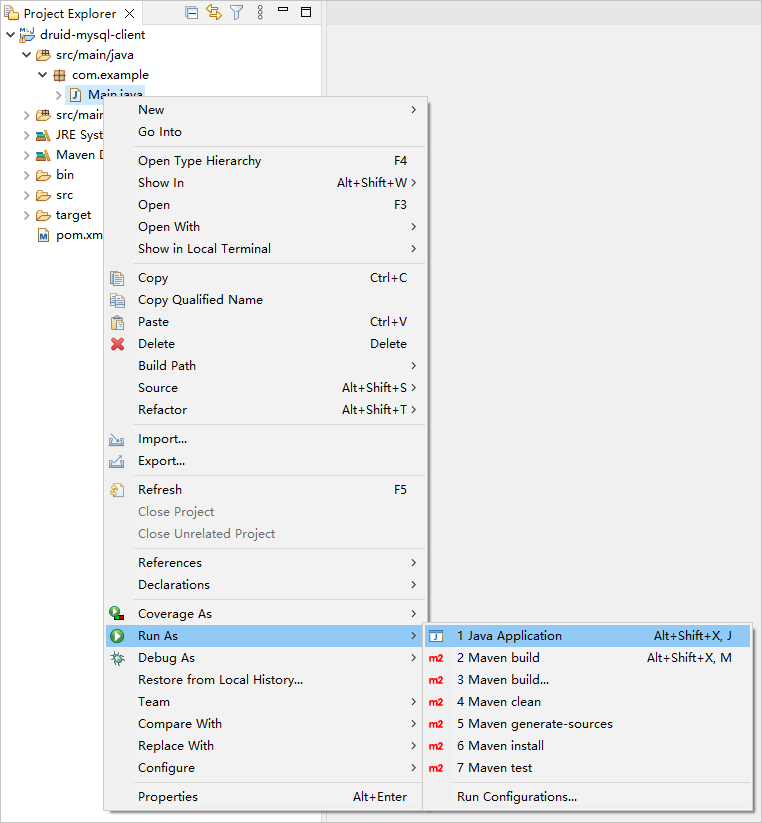
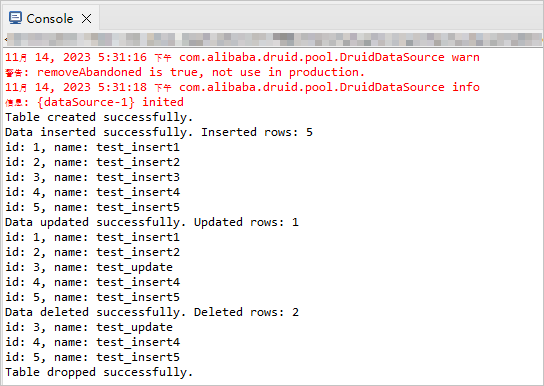
在 Eclipse 的控制台窗口中来查看输出结果。

项目代码介绍
点击 druid-mysql-client 下载项目代码,是一个名称为druid-mysql-client.zip的压缩包。
解压后,得到一个名为druid-mysql-client的文件夹。目录结构如下所示:
druid-mysql-client
├── src
│   └── main
│       ├── java
│       │   └── com
│       │       └── example
│       │           └── Main.java
│       └── resources
│           └── db.properties
└── pom.xml
文件说明:
src:源代码根目录。main:主代码目录,包含应用程序的主要逻辑。java:Java 源代码目录。com:Java 包目录。example:示例项目的包目录。Main.java:主类程序示例文件,包含创建表、插入、删除、更新和查询数据等逻辑。resources:资源文件目录,包含配置文件等。db.properties:连接池的配置文件,包含了数据库连接的相关参数。pom.xml:Maven 项目的配置文件,用于管理项目的依赖和构建设置。
pom.xml 代码介绍
pom.xml文件是 Maven 项目的配置文件,定义了项目的依赖项、插件和构建规则等信息。Maven 是一个 Java 项目管理工具,可以自动下载依赖项、编译和打包项目等操作。
本文pom.xml文件的代码主要包括以下几个部分:
文件声明语句。
声明本文件是一个 XML 文件,使用的 XML 版本是
1.0,字符编码方式是UTF-8。代码如下:
<?xml version="1.0" encoding="UTF-8"?>配置 POM 的命名空间和 POM 模型版本。
通过
xmlns指定 POM 的命名空间为http://maven.apache.org/POM/4.0.0。通过
xmlns:xsi指定 XML 命名空间http://www.w3.org/2001/XMLSchema-instance。通过
xsi:schemaLocation指定 POM 的命名空间为http://maven.apache.org/POM/4.0.0和 POM 的 XSD 文件的位置为http://maven.apache.org/xsd/maven-4.0.0.xsd。通过
<modelVersion>元素指定了该 POM 文件使用的 POM 模型版本为4.0.0。
代码如下:
<project xmlns="http://maven.apache.org/POM/4.0.0"
         xmlns:xsi="http://www.w3.org/2001/XMLSchema-instance"
         xsi:schemaLocation="http://maven.apache.org/POM/4.0.0 http://maven.apache.org/xsd/maven-4.0.0.xsd">
  <modelVersion>4.0.0</modelVersion>

 <!-- 其他配置 -->

</project>
配置基本信息。
通过
<groupId>指定项目所属组织为com.example。通过
<artifactId>指定项目的名称为druid-mysql-client。通过
<version>项目的版本号为1.0-SNAPSHOT。
代码如下:
    <groupId>com.example</groupId>
    <artifactId>druid-mysql-client</artifactId>
    <version>1.0-SNAPSHOT</version>
配置项目源文件的属性。
指定 Maven 的编译器插件为
maven-compiler-plugin,并设置了源代码和目标 Java 版本都为 8。这意味着项目的源代码使用 Java 8 特性编写,且编译后的字节码也将兼容 Java 8 运行时环境。这样设置可以确保项目在编译和运行时能够正确地处理 Java 8 的语法和特性。说明Java 1.8 和 Java 8 是同一个版本的不同命名方式。
代码如下:
    <build>
        <plugins>
            <plugin>
                <groupId>org.apache.maven.plugins</groupId>
                <artifactId>maven-compiler-plugin</artifactId>
                <configuration>
                    <source>8</source>
                    <target>8</target>
                </configuration>
            </plugin>
        </plugins>
    </build>
配置项目所依赖组件。
添加
mysql-connector-java依赖库,用于与数据库进行交互:通过
<groupId>指定依赖项所属的组织为mysql。通过
<artifactId>指定依赖项的名称为mysql-connector-java。通过
<version>指定依赖项的版本号为5.1.40。
代码如下:
        <dependency>
            <groupId>mysql</groupId>
            <artifactId>mysql-connector-java</artifactId>
            <version>5.1.40</version>
        </dependency>
添加
druid依赖库:通过
<groupId>指定依赖项所属的组织为com.alibaba。通过
<artifactId>指定依赖项的名称为druid。通过
<version>指定依赖项的版本号为1.2.8。
代码如下:
        <dependency>
            <groupId>com.alibaba</groupId>
            <artifactId>druid</artifactId>
            <version>1.2.8</version>
        </dependency>
db.properties 代码介绍
db.properties是本文示例的连接池配置文件,其中包含了连接池的配置属性。这些属性包括数据库 URL、用户名、密码、连接池其他可选项。
本文db.properties文件的代码主要包括以下几个部分:
配置数据库连接参数。
指定数据库驱动程序的类名为
com.oceanbase.jdbc.Driver。指定数据库连接的 URL,包括主机 IP、端口号、需要访问的 Schema。
指定数据库的用户名。
指定数据库的密码。
代码如下:
driverClassName=com.oceanbase.jdbc.Driver
url=jdbc:oceanbase://$host:$port/$database_name?useSSL=false
username=$user_name
password=$password
参数解释:
$host:OceanBase 数据库连接的域名。$port:OceanBase 数据库连接端口,MySQL 模式租户默认是 3306。$database_name:需要访问的数据库名称。$user_name:租户的连接账号。$password:提供账户密码。
配置其他连接池的参数。
指定验证连接的 SQL 语句
select 1。指定连接池的初始连接数量为 3,表示在启动连接池时,会创建 3 个初始连接。
指定连接池的最大活动连接数为 30,表示连接池中最多可以同时存在 30 个连接。
指定是否打印废弃连接的日志为
true,表示当回收废弃连接时,会在错误日志中输出信息。在测试环境中可以设置为true,而在线上环境中设置为false,以避免对性能产生影响。指定连接池的最小空闲连接数为 5,表示当连接池中的空闲连接数少于 5 个时,连接池会自动创建新的连接。
指定获取连接时的最大等待时间 1000,单位为毫秒,表示如果连接池中的连接都被占用,且等待时间超过 1000 毫秒,则获取连接操作将会抛出超时异常。
指定连接在空闲时的最小保持时间为 300000,单位为毫秒,表示连接在空闲 300000 毫秒(5 分钟)后,如果没有被使用,会被回收。
指定是否回收废弃的连接为
true,表示当连接超过removeAbandonedTimeout定义的时间时,会被回收。指定废弃连接的超时时间为 300,单位为秒,表示超过 300 秒(5 分钟)未被使用的连接将被回收。
指定空闲连接回收线程的运行间隔时间为 10000,单位为毫秒,表示每隔 10000 毫秒(10 秒),空闲连接回收线程会执行一次空闲连接的回收操作。
指定获取连接时是否验证连接的可用性为
false。设置为false可以提高性能,但也可能导致获得的连接不可用。指定返回连接时是否验证连接的可用性为
false。设置为false可以提高性能,但也可能导致返回的连接不可用。指定连接在空闲时是否进行验证为
true。设置为true时,连接池会定期执行validationQuery来验证连接的可用性。指定是否启用长连接保活功能为
false。设置为false表示不启用长连接保活。指定了连接的空闲时间阈值为 60000,单位为毫秒,表示如果连接的空闲时间超过了设定的阈值 60000 毫秒(即 1 分钟),连接保活机制会对该连接进行检测,以确保连接的可用性。如果连接在阈值时间内有任何操作,连接的空闲时间会重新计算。
代码如下:
validationQuery=select 1
initialSize=3
maxActive=30
logAbandoned=true
minIdle=5
maxWait=1000
minEvictableIdleTimeMillis=300000
removeAbandoned=true
removeAbandonedTimeout=300
timeBetweenEvictionRunsMillis=10000
testOnBorrow=false
testOnReturn=false
testWhileIdle=true
keepAlive=false
keepAliveBetweenTimeMillis=60000
具体的属性(参数)配置取决于项目需求和数据库的特点,建议您根据实际情况进行调整和配置。
Druid 连接池常用配置参数:
参数 | 描述 |
url | 指定连接数据库的 URL,包括数据库类型、主机名、端口号、数据库名称等信息。 |
username | 指定连接数据库所需的用户名。 |
password | 指定连接数据库所需的密码。 |
driverClassName | 指定数据库驱动类名。如果不显式地进行配置 |
initialSize | 指定初始化连接池时创建的连接数量。在应用启动时,连接池会创建指定数量的连接并放入连接池中。 |
maxActive | 指定连接池中最大的活动连接数量。当连接池的活动连接数量达到最大值时,后续的连接请求将等待,直到有连接被释放。 |
maxIdle | 指定连接池中最大的空闲连接数量(该属性已被弃用)。当连接池的空闲连接数量达到最大值时,多余的连接将被关闭。 |
minIdle | 指定连接池中最小的空闲连接数量。当连接池的空闲连接数量低于最小值时,连接池会创建新的连接。 |
maxWait | 指定获取连接的最大等待时间,超过此时间将抛出异常。如果设置为正数,则表示等待的毫秒数,超过此时间将抛出异常。 |
poolPreparedStatements | 指定是否缓存 |
validationQuery | 指定连接验证的 SQL 查询语句。当连接被从连接池中取出时,会执行此查询语句来验证连接是否有效。 |
timeBetweenEvictionRunsMillis | 指定连接池检测空闲连接的间隔时间,单位为毫秒。如果连接的空闲时间超过了 |
minEvictableIdleTimeMillis | 指定连接池中连接的最小空闲时间,超过此时间将被回收,单位为毫秒。如果设置为负数,则表示连接不会被回收。 |
testWhileIdle | 指定是否在空闲时对连接进行测试。如果设置为 |
testOnBorrow | 指定是否在获取连接时对连接进行测试。如果设置为 |
testOnReturn | 指定是否在归还连接时对连接进行测试。如果设置为 |
filters | 指定连接池中预定义的一系列过滤器。这些过滤器可以按照特定的顺序对连接进行预处理和后处理操作,以提供额外的功能和增强连接池的性能。常见的过滤器包括:
通过将这些过滤器配置在 |
Main.java 代码介绍
Main.java文件是本文示例程序的的主程序,通过这个示例,可以了解如何使用数据源、连接对象和各种数据库操作方法来与数据库进行交互。
本文Main.java文件的代码主要包括以下几个部分:
导入必要的类和接口。
声明当前代码所属的包名为
com.example。导入 Java 的
IOException类,用于处理输入输出异常。导入 Java 的
InputStream类,用于从文件或其他来源获取输入流。导入 Java 的
Connection接口,用于表示与数据库的连接。导入 Java 的
ResultSet接口,用于表示数据库查询结果的数据集。导入 Java 的
SQLException类,用于处理 SQL 异常。导入 Java 的
Statement接口,用于执行 SQL 语句。导入 Java 的
PreparedStatement接口,用于预编译的 SQL 语句。导入 Java 的
Properties类,用于处理属性文件。导入 Java 的
DataSource接口,用于管理数据库连接。导入 Alibaba Druid 连接池的
DruidDataSourceFactory类,用于创建 Druid 数据源。
代码如下:
package com.example;

import java.io.IOException;
import java.io.InputStream;
import java.sql.Connection;
import java.sql.ResultSet;
import java.sql.SQLException;
import java.sql.Statement;
import java.sql.PreparedStatement;
import java.util.Properties;
import javax.sql.DataSource;
import com.alibaba.druid.pool.DruidDataSourceFactory;
创建一个
Main类,并定义main方法。定义一个
Main类和main方法,main方法用于演示如何使用连接池从数据库中执行一系列的操作。具体步骤如下:定义一个名为
Main的公共类,作为程序的入口点。类名需要与文件名保持一致。定义了一个公共静态方法
main,作为程序的入口点,接收命令行参数。使用异常处理机制来捕获和处理可能发生的异常。
调用
loadPropertiesFile方法,加载属性文件并返回Properties对象。调用
createDataSource()方法,根据属性文件中的配置创建数据源对象。使用
try-with-resources语句,获取数据库连接,并在连接使用完后自动关闭连接。调用
createTable()方法,创建表。调用
insertData()方法,插入数据。调用
selectData()方法,查询数据。调用
updateData()方法,更新数据。再次调用
selectData()方法,查询已更新的数据。调用
deleteData()方法,删除数据。再次调用
selectData()方法,查询删除后的数据。调用
dropTable()方法,删除表。
代码如下:
public class Main {

    public static void main(String[] args) {
        try {
            Properties properties = loadPropertiesFile();
            DataSource dataSource = createDataSource(properties);
            try (Connection conn = dataSource.getConnection()) {
                // Create table
                createTable(conn);
                // Insert data
                insertData(conn);
                // Query data
                selectData(conn);

                // Update data
                updateData(conn);
                // Query the updated data
                selectData(conn);

                // Delete data
                deleteData(conn);
                // Query the data after deletion
                selectData(conn);

                // Drop table
                dropTable(conn);
            }
        } catch (Exception e) {
            e.printStackTrace();
        }
    }

    // 定义用于获取和使用属性文件中的配置信息的方法
    // 定义用于获取数据源对象的方法
    // 定义用于创建表的方法
    // 定义用于插入数据的方法
    // 定义用于更新数据的方法
    // 定义用于删除数据的方法
    // 定义用于查询数据的方法
    // 定义用于删除表的方法
}
定义用于获取和使用属性文件中的配置信息的方法。
定义一个私有的静态方法
loadPropertiesFile(),用于加载属性文件并返回一个Properties对象。具体步骤如下:定义一个私有的静态方法
loadPropertiesFile(),它返回一个Properties对象并声明可能会抛出IOException异常。创建一个
Properties对象,用于存储属性文件中的键值对。使用
try-with-resources语句,通过类加载器获取属性文件db.properties的输入流is。使用
load方法,将输入流中的属性加载到properties对象中。返回加载后的
properties对象。
代码如下:
    private static Properties loadPropertiesFile() throws IOException {
        Properties properties = new Properties();
        try (InputStream is = Main.class.getClassLoader().getResourceAsStream("db.properties")) {
            properties.load(is);
        }
        return properties;
    }
定义用于获取数据源对象的方法。
定义一个私有的静态方法
createDataSource(),用于根据属性文件中的配置创建一个DataSource对象,用于管理和获取数据库连接。具体步骤如下:定义一个私有的静态方法
createDataSource(),它接收一个Properties对象作为参数,并声明可能会抛出Exception异常。调用
DruidDataSourceFactory类的createDataSource()方法,传入属性properties,返回一个DataSource对象。
代码如下:
    private static DataSource createDataSource(Properties properties) throws Exception {
        return DruidDataSourceFactory.createDataSource(properties);
    }
定义用于创建表的方法。
定义一个私有的静态方法
createTable(),用于在数据库中创建数据表。具体步骤如下:定义一个私有的静态方法
createTable(),它接收一个Connection对象作为参数,并声明可能会抛出SQLException异常。使用
try-with-resources语句,通过连接对象conn的createStatement()方法,创建一个Statement对象stmt。定义一个字符串变量
sql,存储创建表的 SQL 语句。使用
executeUpdate()方法执行 SQL 语句,创建数据表。打印出创建表成功的提示信息。
代码如下:
    private static void createTable(Connection conn) throws SQLException {
        try (Statement stmt = conn.createStatement()) {
            String sql = "CREATE TABLE test_druid (id INT, name VARCHAR(20))";
            stmt.executeUpdate(sql);
            System.out.println("Table created successfully.");
        }
    }
定义用于插入数据的方法。
定义一个私有的静态方法
insertData(),用于向数据库中插入数据。具体步骤如下:定义一个私有的静态方法
insertData(),它接收一个Connection对象作为参数,并声明可能会抛出SQLException异常。定义一个字符串变量
insertDataSql,存储插入数据的 SQL 语句。定义一个整型变量
insertedRows,初始值为 0,用于记录插入数据的行数。使用
try-with-resources语句,通过连接对象conn的prepareStatement()方法和插入数据的 SQL 语句,创建一个PreparedStatement对象insertDataStmt。使用
for循环语句,迭代 5 次,表示插入 5 条数据。使用
setInt()方法,设置第一个参数的值为循环变量i。使用
setString()方法,设置第二个参数的值为字符串test_insert加上循环变量i的值。使用
executeUpdate()方法执行插入数据的 SQL 语句,并将返回的操作行数累加到insertedRows变量中。
打印出插入数据成功的提示信息,以及插入的总行数。
返回插入的总行数。
代码如下:
    private static int insertData(Connection conn) throws SQLException {
        String insertDataSql = "INSERT INTO test_druid (id, name) VALUES (?, ?)";
        int insertedRows = 0;
        try (PreparedStatement insertDataStmt = conn.prepareStatement(insertDataSql)) {
            for (int i = 1; i < 6; i++) {
                insertDataStmt.setInt(1, i);
                insertDataStmt.setString(2, "test_insert" + i);
                insertedRows += insertDataStmt.executeUpdate();
            }
            System.out.println("Data inserted successfully. Inserted rows: " + insertedRows);
        }
        return insertedRows;
    }
定义用于更新数据的方法。
定义一个私有的静态方法
updateData(),用于更新数据库中的数据。具体步骤如下:定义一个私有的静态方法
updateData(),它接收一个Connection对象作为参数,并声明可能会抛出SQLException异常。使用
try-with-resources语句,通过连接对象conn的prepareStatement()方法和更新数据的 SQL 语句,创建一个PreparedStatement对象pstmt。使用
setString()方法,设置第一个参数的值为字符串test_update。使用
setInt()方法,设置第二个参数的值为整型值 3。使用
executeUpdate()方法执行更新数据的 SQL 语句,并将返回的操作行数赋值给updatedRows变量。打印出更新数据成功的提示信息,以及更新的总行数。
代码如下:
    private static void updateData(Connection conn) throws SQLException {
        try (PreparedStatement pstmt = conn.prepareStatement("UPDATE test_druid SET name = ? WHERE id = ?")) {
            pstmt.setString(1, "test_update");
            pstmt.setInt(2, 3);
            int updatedRows = pstmt.executeUpdate();
            System.out.println("Data updated successfully. Updated rows: " + updatedRows);
        }
    }
定义用于删除数据的方法。
定义一个私有的静态方法
deleteData(),用于删除数据库中的数据。具体步骤如下:定义一个私有的静态方法
deleteData(),它接收一个Connection对象作为参数,并声明可能会抛出SQLException异常。使用
try-with-resources语句,通过连接对象conn的prepareStatement()方法和删除数据的 SQL 语句,创建一个PreparedStatement对象pstmt。使用
setInt()方法,设置第一个参数的值为整型值 3。使用
executeUpdate()方法执行删除数据的 SQL 语句,并将返回的操作行数赋值给deletedRows变量。打印出删除数据成功的提示信息,以及删除的总行数。
代码如下:
    private static void deleteData(Connection conn) throws SQLException {
        try (PreparedStatement pstmt = conn.prepareStatement("DELETE FROM test_druid WHERE id < ?")) {
            pstmt.setInt(1, 3);
            int deletedRows = pstmt.executeUpdate();
            System.out.println("Data deleted successfully. Deleted rows: " + deletedRows);
        }
    }
定义用于查询数据的方法。
定义一个私有的静态方法
selectData(),用于从数据库中查询数据。具体步骤如下:定义一个私有的静态方法
selectData(),它接收一个Connection对象作为参数,并声明可能会抛出SQLException异常。使用
try-with-resources语句,通过连接对象conn的createStatement()方法,创建一个Statement对象stmt。定义一个字符串变量
sql,存储查询数据的 SQL 语句。使用
executeQuery()方法执行查询数据的 SQL 语句,并将返回的结果集赋值给resultSet变量。使用
while循环语句,遍历结果集中的每一行数据。使用
getInt()方法,获取当前行的id字段的整型值,并赋值给id变量。使用
getString()方法,获取当前行的name字段的字符串值,并赋值给name变量。打印出当前行的
id和name字段的值。
代码如下:
    private static void selectData(Connection conn) throws SQLException {
        try (Statement stmt = conn.createStatement()) {
            String sql = "SELECT * FROM test_druid";
            ResultSet resultSet = stmt.executeQuery(sql);
            while (resultSet.next()) {
                int id = resultSet.getInt("id");
                String name = resultSet.getString("name");
                System.out.println("id: " + id + ", name: " + name);
            }
        }
    }
定义用于删除表的方法。
定义一个私有的静态方法
dropTable(),用于删除数据库中的表。具体步骤如下:定义一个私有的静态方法
dropTable(),它接收一个Connection对象作为参数,并声明可能会抛出SQLException异常。使用
try-with-resources语句,通过连接对象conn的createStatement()方法,创建一个Statement对象stmt。定义一个字符串变量
sql,存储删除表的 SQL 语句。使用
executeUpdate()方法执行删除表的 SQL 语句。打印出删除表成功的提示信息。
代码如下:
    private static void dropTable(Connection conn) throws SQLException {
        try (Statement stmt = conn.createStatement()) {
            String sql = "DROP TABLE test_druid";
            stmt.executeUpdate(sql);
            System.out.println("Table dropped successfully.");
        }
    }
完整的代码展示
pom.xml
<?xml version="1.0" encoding="UTF-8"?>
<project xmlns="http://maven.apache.org/POM/4.0.0"
         xmlns:xsi="http://www.w3.org/2001/XMLSchema-instance"
         xsi:schemaLocation="http://maven.apache.org/POM/4.0.0 http://maven.apache.org/xsd/maven-4.0.0.xsd">
    <modelVersion>4.0.0</modelVersion>

    <groupId>com.example</groupId>
    <artifactId>druid-mysql-client</artifactId>
    <version>1.0-SNAPSHOT</version>
    <build>
        <plugins>
            <plugin>
                <groupId>org.apache.maven.plugins</groupId>
                <artifactId>maven-compiler-plugin</artifactId>
                <configuration>
                    <source>8</source>
                    <target>8</target>
                </configuration>
            </plugin>
        </plugins>
    </build>

    <dependencies>
        <dependency>
            <groupId>mysql</groupId>
            <artifactId>mysql-connector-java</artifactId>
            <version>5.1.40</version>
        </dependency>
        <dependency>
            <groupId>com.alibaba</groupId>
            <artifactId>druid</artifactId>
            <version>1.2.8</version>
        </dependency>
    </dependencies>
</project>
db.properties
Database Configuration
driverClassName=com.mysql.jdbc.Driver
url=jdbc:mysql://$host:$port/$database_name?useSSL=false
username=$user_name
password=$password

Connection Pool Configuration
#To check whether the database link is valid, MySQL must be configured to select 1; Oracle is select 1 from dual
validationQuery=select 1
#Initial number of connections
initialSize=3
#Maximum number of activations, that is, the maximum number of Connection pool
maxActive=30
#When closing the Abandoned connection, the error log is output. When the link is recycled, the console prints information. The test environment can add true, while the online environment is false. Will affect performance.
logAbandoned=true
#Minimum number of activations during idle time
minIdle=5
#The maximum waiting time for a connection, in milliseconds
maxWait=1000
#The maximum time to start the eviction thread is the survival time of a link (previous value: 25200000, the converted result of this time is: 2520000/1000/60/60=7 hours)
minEvictableIdleTimeMillis=300000
#Whether to recycle after exceeding the time limit
removeAbandoned=true
#Exceeding the time limit (in seconds), currently 5 minutes. If any business processing time exceeds 5 minutes, it can be adjusted appropriately.
removeAbandonedTimeout=300
Run the idle connection collector Destroy thread every 10 seconds to detect the interval time between connections, based on the judgment of testWhileIdle
timeBetweenEvictionRunsMillis=10000
#When obtaining a link, not verifying its availability can affect performance.
testOnBorrow=false
#Check whether the link is available when returning the link to the Connection pool.
testOnReturn=false
#This configuration can be set to true, without affecting performance and ensuring security. The meaning is: Detect when applying for a connection. If the idle time is greater than timeBetweenEviceRunsMillis, execute validationQuery to check if the connection is valid.
testWhileIdle=true
#Default false, if configured as true, connection detection will be performed in the DestroyConnectionThread thread (timeBetweenEvaluation once)
keepAlive=false
#If keepAlive rule takes effect and the idle time of the connection exceeds it, the connection will only be detected
keepAliveBetweenTimeMillis=60000
Main.java
package com.example;

import java.io.IOException;
import java.io.InputStream;
import java.sql.Connection;
import java.sql.ResultSet;
import java.sql.SQLException;
import java.sql.Statement;
import java.sql.PreparedStatement;
import java.util.Properties;
import javax.sql.DataSource;
import com.alibaba.druid.pool.DruidDataSourceFactory;

public class Main {

    public static void main(String[] args) {
        try {
            Properties properties = loadPropertiesFile();
            DataSource dataSource = createDataSource(properties);
            try (Connection conn = dataSource.getConnection()) {
                // Create table
                createTable(conn);
                // Insert data
                insertData(conn);
                // Query data
                selectData(conn);

                // Update data
                updateData(conn);
                // Query the updated data
                selectData(conn);

                // Delete data
                deleteData(conn);
                // Query the data after deletion
                selectData(conn);

                // Drop table
                dropTable(conn);
            }
        } catch (Exception e) {
            e.printStackTrace();
        }
    }

    private static Properties loadPropertiesFile() throws IOException {
        Properties properties = new Properties();
        try (InputStream is = Main.class.getClassLoader().getResourceAsStream("db.properties")) {
            properties.load(is);
        }
        return properties;
    }

    private static DataSource createDataSource(Properties properties) throws Exception {
        return DruidDataSourceFactory.createDataSource(properties);
    }

    private static void createTable(Connection conn) throws SQLException {
        try (Statement stmt = conn.createStatement()) {
            String sql = "CREATE TABLE test_druid (id INT, name VARCHAR(20))";
            stmt.executeUpdate(sql);
            System.out.println("Table created successfully.");
        }
    }

    private static int insertData(Connection conn) throws SQLException {
        String insertDataSql = "INSERT INTO test_druid (id, name) VALUES (?, ?)";
        int insertedRows = 0;
        try (PreparedStatement insertDataStmt = conn.prepareStatement(insertDataSql)) {
            for (int i = 1; i < 6; i++) {
                insertDataStmt.setInt(1, i);
                insertDataStmt.setString(2, "test_insert" + i);
                insertedRows += insertDataStmt.executeUpdate();
            }
            System.out.println("Data inserted successfully. Inserted rows: " + insertedRows);
        }
        return insertedRows;
    }

    private static void updateData(Connection conn) throws SQLException {
        try (PreparedStatement pstmt = conn.prepareStatement("UPDATE test_druid SET name = ? WHERE id = ?")) {
            pstmt.setString(1, "test_update");
            pstmt.setInt(2, 3);
            int updatedRows = pstmt.executeUpdate();
            System.out.println("Data updated successfully. Updated rows: " + updatedRows);
        }
    }

    private static void deleteData(Connection conn) throws SQLException {
        try (PreparedStatement pstmt = conn.prepareStatement("DELETE FROM test_druid WHERE id < ?")) {
            pstmt.setInt(1, 3);
            int deletedRows = pstmt.executeUpdate();
            System.out.println("Data deleted successfully. Deleted rows: " + deletedRows);
        }
    }

    private static void selectData(Connection conn) throws SQLException {
        try (Statement stmt = conn.createStatement()) {
            String sql = "SELECT * FROM test_druid";
            ResultSet resultSet = stmt.executeQuery(sql);
            while (resultSet.next()) {
                int id = resultSet.getInt("id");
                String name = resultSet.getString("name");
                System.out.println("id: " + id + ", name: " + name);
            }
        }
    }

    private static void dropTable(Connection conn) throws SQLException {
        try (Statement stmt = conn.createStatement()) {
            String sql = "DROP TABLE test_druid";
            stmt.executeUpdate(sql);
            System.out.println("Table dropped successfully.");
        }
    }
}
相关文档
更多 MySQL Connector/J 的信息,请参见 Overview of MySQL Connector/J。