本文中含有需要您注意的重要提示信息,忽略该信息可能对您的业务造成影响,请务必仔细阅读。
本文档指导开发者完成阿里云移动推送iOS SDK的集成配置,包含SDK初始化、通知权限申请、消息接收处理等核心流程。
一、前提条件
已完成EMAS应用创建并获取凭证
苹果推送证书配置
已完成APNs证书制作与上传
开发环境要求
Xcode 12.0+
iOS 12.0+
CocoaPods 1.11.0+
二、集成步骤
2.1 添加SDK依赖
版本升级须知
如果您当前版本低于
1.9.9.3,请勿直接升级到2.2.0、2.2.1、3.0.0,否则将导致设备ID重置。如果您的 AppKey 为早期创建的双端应用(Android和iOS是同一个AppKey),则暂不支持升级至3.0.0 及以上版本。建议您为 Android 和 iOS 平台分别创建独立应用,获取各自的 AppKey,并使用最新版 SDK 重新接入。
方式一:Cocoapods集成(推荐)
创建/修改Podfile:
source 'https://github.com/CocoaPods/Specs.git' source 'https://github.com/aliyun/aliyun-specs.git' platform :ios, '11.0' use_frameworks! target 'YourTarget' do pod 'AlicloudPush', '~> 3' end说明在Xcode项目的根目录中,定位并编辑Podfile文件,以添加AlicloudPush依赖项。如果根目录中没有Podfile文件,可以通过在终端中运行
pod init命令来创建一个新的Podfile。如果您的计算机上尚未安装CocoaPods,请先参考CocoaPods官网完成安装。执行安装命令:
pod repo update AliyunRepo
pod install

# 如果您尚未添加阿里云Cocoapods仓库,请先执行以下命令添加仓库
# pod repo add AliyunRepo https://github.com/aliyun/aliyun-specs.git
方式二:手动集成
参考快速入门文档下载最新SDK包
解压并添加Framework:
将
CloudPushSDK.xcframework和AlicloudELS.xcframework拖入工程。详细操作步骤如下图所示。

依赖说明
版本3.0.0及以上:
包含CloudPushSDK 和 AlicloudELS 两个依赖库。
版本2.2.0至3.0.0:
包含CloudPushSDK一个依赖库。
版本2.2.0以下:
包含CloudPushSDK、UTDID 和 AlicloudUtils 三个依赖库。
Xcode兼容性
使用较低版本的 Xcode 时,可能需要手动添加以下系统库以确保兼容性:
libresolv.tbd
CoreTelephony.framework
SystemConfiguration.framework
libsqlite3.tbd
链接设置
如果在运行时遇到问题,可以尝试在以下位置添加 -ObjC 链接标志:
打开项目设置。
导航到 TARGETS。
选择 Build Settings。
找到 Linking 部分。
在 Other Linker Flags 中添加 -ObjC。
2.2 SDK初始化
在AppDelegate中完成初始化。示例代码如下:
import CloudPushSDK

@main
class AppDelegate: UIResponder, UIApplicationDelegate {
    func application(_ application: UIApplication, didFinishLaunchingWithOptions launchOptions: [UIApplication.LaunchOptionsKey: Any]?) -> Bool {

        CloudPushSDK.setLogLevel(MPLogLevel.info);

        // SDK初始化
        CloudPushSDK.start(withAppkey: "您的AppKey", appSecret: "您的AppSecret") { res in
            if res.success {
                print("SDK初始化成功 | DeviceID: \(CloudPushSDK.getDeviceId() ?? "N/A")")
            } else {
                print("初始化失败: \(res.error?.localizedDescription ?? "未知错误")")
            }
        }

        return true
    }
}#import "CloudPushSDK/CloudPushSDK.h"
@implementation AppDelegate
- (BOOL)application:(UIApplication *)application didFinishLaunchingWithOptions:(NSDictionary *)launchOptions {
[CloudPushSDK setLogLevel:MPLogLevelInfo];
// SDK初始化
[CloudPushSDK startWithAppkey:@"您的AppKey"
appSecret:@"您的AppSecret"
callback:^(CloudPushCallbackResult *result) {
if (result.success) {
NSLog(@"SDK初始化成功 | DeviceID: %@", [CloudPushSDK getDeviceId]);
} else {
NSLog(@"初始化失败: %@", result.error);
}
}];
return YES;
}
@end2.3 配置APNs推送能力
开启推送权限,向苹果服务器申请推送令牌,并上报到阿里云推送服务器。
Xcode工程配置:
Target → Signing & Capabilities → 添加 Push Notifications 和 Background Modes 两个Capability
Background Modes → 勾选Remote notifications

请求用户授权,参考代码如下。
// 请求用户授权
func setupAPNs() {
    let center = UNUserNotificationCenter.current()
    center.requestAuthorization(options: [.alert, .sound, .badge]) { granted, error in
        DispatchQueue.main.async {
            if granted {
                UIApplication.shared.registerForRemoteNotifications()
            }
            print("推送权限状态: \(granted ? "已授权" : "被拒绝")")
        }
    }
}

// APNS设备注册成功回调
func application(_ application: UIApplication,
               didRegisterForRemoteNotificationsWithDeviceToken deviceToken: Data) {
    CloudPushSDK.registerDevice(deviceToken) { result in
        let status = result.success ? "成功" : "失败"
        print("DeviceToken上报\(status)")
    }
}- (void)setupAPNs {
UNUserNotificationCenter *center = [UNUserNotificationCenter currentNotificationCenter];
[center requestAuthorizationWithOptions:(UNAuthorizationOptionAlert | UNAuthorizationOptionSound | UNAuthorizationOptionBadge)
completionHandler:^(BOOL granted, NSError * _Nullable error) {
dispatch_async(dispatch_get_main_queue(), ^{
if (granted) {
[[UIApplication sharedApplication] registerForRemoteNotifications];
}
NSLog(@"推送权限状态: %@", granted ? @"已授权" : @"被拒绝");
});
}];
}
// APNS设备注册成功回调
- (void)application:(UIApplication *)application didRegisterForRemoteNotificationsWithDeviceToken:(NSData *)deviceToken {
[CloudPushSDK registerDevice:deviceToken withCallback:^(CloudPushCallbackResult *result) {
NSString *status = result.success ? @"成功" : @"失败";
NSLog(@"DeviceToken上报%@", status);
}];
}2.4 消息处理
消息是通过阿里云自有通道发送的一条包含标题和内容的透传信息。此类消息不会触发手机的铃声或震动,只有在App在线时才能接收。当App收到消息后,开发者可以根据消息内容执行相应的代码逻辑。
// 订阅消息
NotificationCenter.default.addObserver(self,
                                     selector: #selector(onMessageReceived(_:)),
                                     name: NSNotification.Name("CCPDidReceiveMessageNotification"),
                                     object: nil)

@objc func onMessageReceived(_ notification: Notification) {
    guard let data = notification.object as? [String: Any],
          let title = data["title"] as? String,
          let content = data["content"] as? String else {
        return
    }
    print("Receive message title: \(title), content: \(content)")
}// 订阅消息
[[NSNotificationCenter defaultCenter] addObserver:self
selector:@selector(onMessageReceived:)
name:@"CCPDidReceiveMessageNotification"
object:nil];
- (void)onMessageReceived:(NSNotification *)notification {
NSDictionary *data = [notification object];
NSString *title = data[@"title"];
NSString *content = data[@"content"];
NSLog(@"Receive message title: %@, content: %@.", title, content);
}2.5 通知处理
通知是通过苹果服务器推送到用户的苹果手机上,并可以在锁屏状态下展示。接收通知不要求用户的App保持在线,只需手机连接到网络即可完成通知的接收和显示。开发者可以通过以下方式在App内处理通知:
前台通知回调
当App处于前台时,系统会将通知回调给开发者实现的代理方法。开发者可以在此方法中根据需要执行相应的代码逻辑,并决定是否展示通知。
点击通知回调
用户点击通知时,系统会打开并跳转到App,同时将点击事件回调给开发者实现的代理方法。
静默通知回调
当发送静默通知时,系统会在App处于前台或后台时,将通知回调给开发者实现的代理方法。
示例代码
以下是Swift和Objective-C中实现这些功能的示例代码:
import UIKit
import CloudPushSDK
import UserNotifications

@main
class AppDelegate: UIResponder, UIApplicationDelegate, UNUserNotificationCenterDelegate {

    func application(_ application: UIApplication, didFinishLaunchingWithOptions launchOptions: [UIApplication.LaunchOptionsKey: Any]?) -> Bool {
        // 初始化SDK
        // ......

        // 设置通知中心代理
        UNUserNotificationCenter.current().delegate = self

        return true
    }

    // MARK: - UNUserNotificationCenterDelegate

    func userNotificationCenter(_ center: UNUserNotificationCenter,
                              willPresent notification: UNNotification,
                              withCompletionHandler completionHandler: @escaping (UNNotificationPresentationOptions) -> Void) {
        print("收到前台通知回调")
        handleUserInfo(userInfo: notification.request.content.userInfo)

        // 设置通知展示方式
        completionHandler([.alert, .sound])
    }

    func userNotificationCenter(_ center: UNUserNotificationCenter,
                              didReceive response: UNNotificationResponse,
                              withCompletionHandler completionHandler: @escaping () -> Void) {
        print("收到点击通知回调")
        handleUserInfo(userInfo: response.notification.request.content.userInfo)
        completionHandler()
    }

    func application(_ application: UIApplication,
                   didReceiveRemoteNotification userInfo: [AnyHashable : Any],
                   fetchCompletionHandler completionHandler: @escaping (UIBackgroundFetchResult) -> Void) {
        print("收到静默通知回调")
        handleUserInfo(userInfo: userInfo)
        completionHandler(.newData)
    }

    func handleUserInfo(userInfo: [AnyHashable : Any]) {
        // 通过字典获取通知携带的自定义kv,例如:
        // let customValue = userInfo["customKey"] as? String

        guard let aps = userInfo["aps"] as? [String: Any],
              let alert = aps["alert"] as? [String: String],
              let title = alert["title"],
              let body = alert["body"] else {
            return
        }

        print("通知内容: title=\(title), body=\(body)")

        // 通知点击上报
        CloudPushSDK.sendNotificationAck(userInfo)
    }

    // ......
}#import "AppDelegate.h"
#import "CloudPushSDK/CloudPushSDK.h"
#import <UserNotifications/UserNotifications.h>
@interface AppDelegate () <UNUserNotificationCenterDelegate>
@end
@implementation AppDelegate
- (BOOL)application:(UIApplication *)application didFinishLaunchingWithOptions:(NSDictionary *)launchOptions {
// 初始化SDK
// ......
// 设置通知中心代理
[UNUserNotificationCenter currentNotificationCenter].delegate = self;
return YES;
}
#pragma mark - 接收通知
- (void)userNotificationCenter:(UNUserNotificationCenter *)center willPresentNotification:(UNNotification *)notification withCompletionHandler:(void (^)(UNNotificationPresentationOptions))completionHandler {
NSLog(@"收到前台通知回调");
[self handleUserInfo:notification.request.content.userInfo];
// 这里开发者可以根据需要决定是否弹出通知
completionHandler(UNNotificationPresentationOptionAlert | UNNotificationPresentationOptionSound);
}
- (void)userNotificationCenter:(UNUserNotificationCenter *)center didReceiveNotificationResponse:(UNNotificationResponse *)response withCompletionHandler:(void (^)(void))completionHandler {
NSLog(@"收到点击通知回调");
[self handleUserInfo:response.notification.request.content.userInfo];
completionHandler();
}
- (void)application:(UIApplication *)application didReceiveRemoteNotification:(NSDictionary *)userInfo fetchCompletionHandler:(void (^)(UIBackgroundFetchResult))completionHandler {
NSLog(@"收到静默通知回调");
[self handleUserInfo:userInfo];
completionHandler(UIBackgroundFetchResultNewData);
}
- (void)handleUserInfo:(NSDictionary *)userInfo {
// 可以通过字典获取通知携带的自定义kv,例如:
// NSString *customValue = userInfo[@"customKey"];
NSString *title = userInfo[@"aps"][@"alert"][@"title"];
NSString *body = userInfo[@"aps"][@"alert"][@"body"];
NSLog(@"通知内容: title=%@, body=%@", title, body);
// 通知点击上报
[CloudPushSDK sendNotificationAck:userInfo];
}
// ......
@end2.6 成功运行验证
在真机或模拟器上运行应用后,请检查Xcode控制台输出。确认是否出现类似以下日志信息:
2025-03-11 11:26:33.854 INFO [CloudPushSDK] Initialization successful
====================
DeviceId: a1b693a9fced4c22aab3cdfe3fbe5a05
DeviceToken: 76aa3065ca246c81ad1b640715f45f3f8d16fea38ca4fb2917cf34b7249bd803
SdkVersion: 3.0.0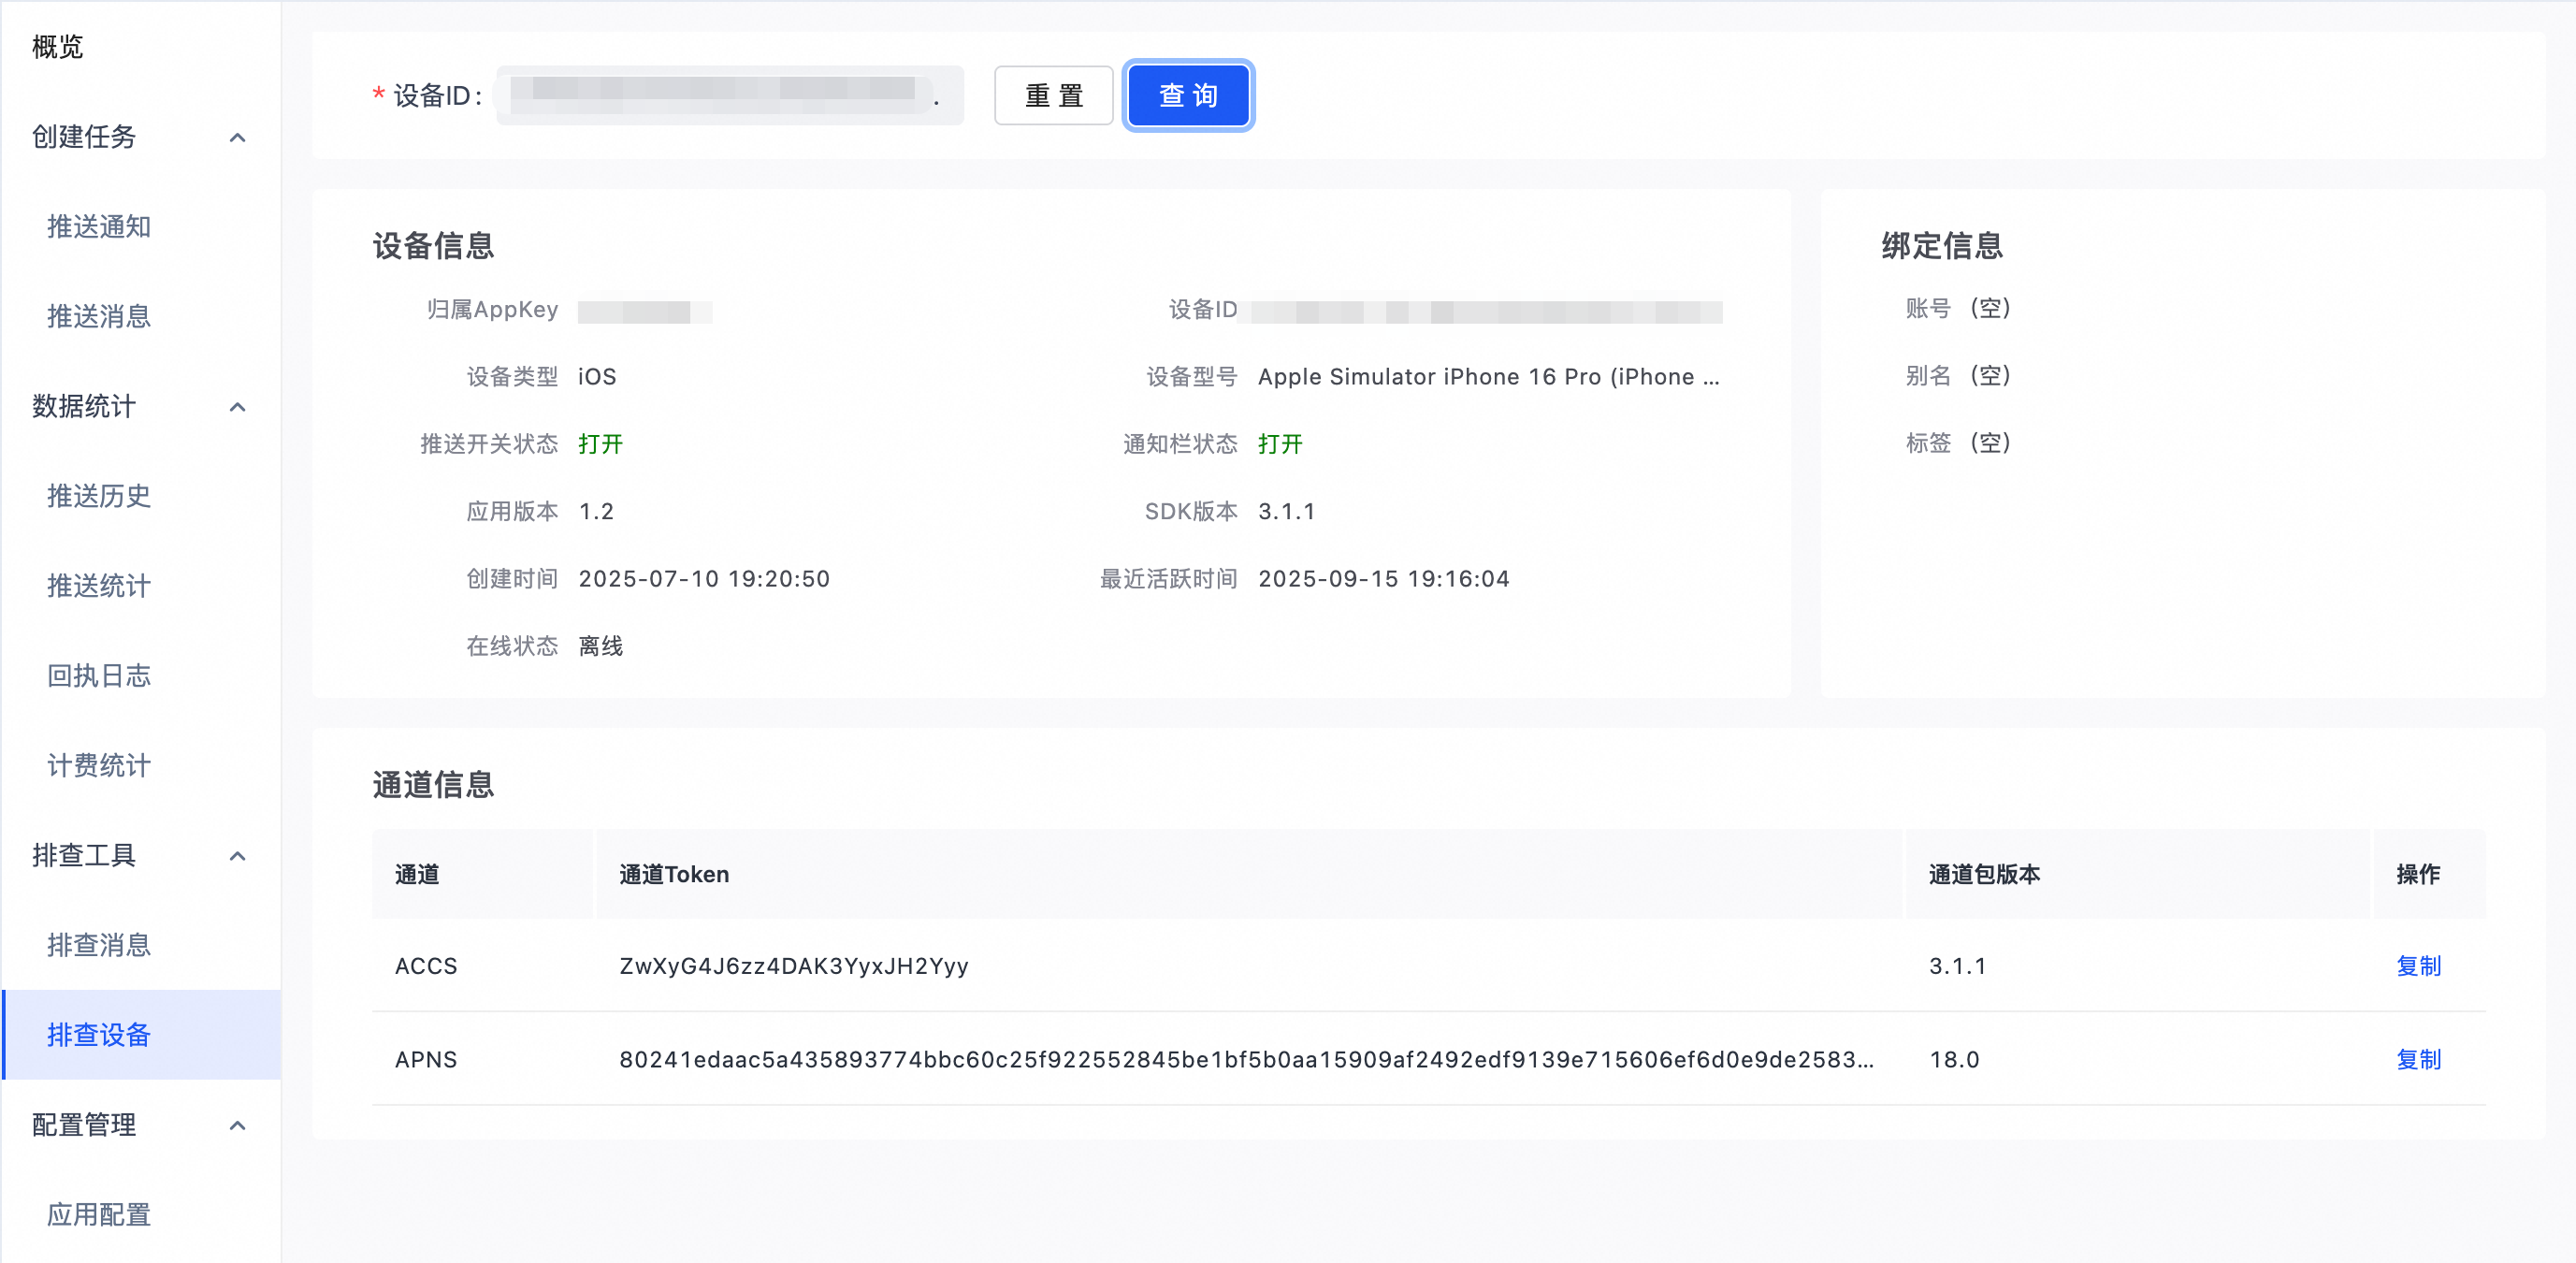
====================此日志表明SDK已成功初始化。接下来,您可以在EMAS推送控制台中查询设备信息。如果能查询到相应的设备信息,表示初始化成功。
ACCS:表示阿里云自有通道注册成功。APNS:表示苹果推送服务注册成功。
确保上述两个通道信息均显示成功,以验证推送服务已正确配置。