除了上一篇文档中涉及到的LLM请求路由能力,ASM还在多个方面对可观测能力进行了增强,用来适应LLM场景中更加高级的观测需求。本文将介绍如何使用ASM的访问日志和监控指标来观测LLM请求信息。
为了展示更加丰富的效果,本文演示建立在完整完成了流量路由:使用ASM高效管理LLM流量中所有步骤的基础上。若您只完成了步骤一和步骤二,使用步骤二的测试命令发送测试请求即可,查看可观测数据使用的命令与本文相同。
步骤一:使用访问日志观测LLM请求
配置访问日志
ASM对LLM请求日志进行了增强,您只需要在自定义访问日志格式中做相应的配置,即可在访问日志中查看这些信息。具体操作,请参见自定义数据面访问日志。
登录ASM控制台,在左侧导航栏,选择。
在网格管理页面,单击目标实例名称,然后在左侧导航栏,选择。
在全局的日志设置中,新增三个字段,如下图:

具体文本内容如下:
request_model				FILTER_STATE(wasm.asm.llmproxy.request_model:PLAIN)
request_prompt_tokens			FILTER_STATE(wasm.asm.llmproxy.request_prompt_tokens:PLAIN)
request_completion_tokens		FILTER_STATE(wasm.asm.llmproxy.request_completion_tokens:PLAIN)
这三个字段含义分别为:
request_model:当前LLM请求的实际model,比如qwen-turbo或qwen1.5-72b-chat。
request_prompt_tokens:当前请求的输入token数量。
request_completion_tokens:当前请求输出的token数量。
当前的大模型服务提供商大都以token消耗量来计费。用户可以基于此数据,精准的查看当前token的消耗请求,以及请求具体使用了哪些模型。
验证
使用ACK的kubeconfig分别执行以下两个命令。
kubectl exec deployment/sleep -it -- curl --location 'http://dashscope.aliyuncs.com' \
--header 'Content-Type: application/json' \
--data '{
    "messages": [
        {"role": "user", "content": "请介绍你自己"}
    ]
}'
kubectl exec deployment/sleep -it -- curl --location 'http://dashscope.aliyuncs.com' \ --header 'Content-Type: application/json' \ --header 'user-type: subscriber' \ --data '{ "messages": [ {"role": "user", "content": "请介绍你自己"} ] }'执行以下命令查看访问日志。
kubectl logs deployments/sleep -c istio-proxy | tail -2预期输出:
{"bytes_received":"85","bytes_sent":"617","downstream_local_address":"47.93.xxx.xx:80","downstream_remote_address":"192.168.34.235:39066","duration":"7640","istio_policy_status":"-","method":"POST","path":"/compatible-mode/v1/chat/completions","protocol":"HTTP/1.1","request_id":"d0e17f66-f300-411a-8c32-xxxxxxxxxxxxx","requested_server_name":"-","response_code":"200","response_flags":"-","route_name":"-","start_time":"2024-07-12T03:20:03.993Z","trace_id":"-","upstream_cluster":"outbound|80||dashscope.aliyuncs.com","upstream_host":"47.93.xxx.xx:443","upstream_local_address":"192.168.34.235:38476","upstream_service_time":"7639","upstream_response_time":"7639","upstream_transport_failure_reason":"-","user_agent":"curl/8.8.0","x_forwarded_for":"-","authority_for":"dashscope.aliyuncs.com","request_model":"qwen1.5-72b-chat","request_prompt_tokens":"3","request_completion_tokens":"55"}
{"bytes_received":"85","bytes_sent":"809","downstream_local_address":"47.93.xxx.xx:80","downstream_remote_address":"192.168.34.235:41090","duration":"2759","istio_policy_status":"-","method":"POST","path":"/compatible-mode/v1/chat/completions","protocol":"HTTP/1.1","request_id":"d89faada-6af3-4ac3-b4fd-xxxxxxxxxxxxx","requested_server_name":"-","response_code":"200","response_flags":"-","route_name":"vip-route","start_time":"2024-07-12T03:20:30.854Z","trace_id":"-","upstream_cluster":"outbound|80||dashscope.aliyuncs.com","upstream_host":"47.93.xxx.xx:443","upstream_local_address":"192.168.34.235:38476","upstream_service_time":"2759","upstream_response_time":"2759","upstream_transport_failure_reason":"-","user_agent":"curl/8.8.0","x_forwarded_for":"-","authority_for":"dashscope.aliyuncs.com","request_model":"qwen-turbo","request_prompt_tokens":"11","request_completion_tokens":"90"}
对日志内容进行格式化和内容处理后结果分别如下。
{
    "duration": "7640",
    "response_code": "200",
    "authority_for": "dashscope.aliyuncs.com",  --实际访问的大模型provider
    "request_model": "qwen1.5-72b-chat",    	--当前请求使用的模型
    "request_prompt_tokens": "3",		--当前请求的输入token数
    "request_completion_tokens": "55"		--当前请求的输出token数
}
{ "duration": "2759", "response_code": "200", "authority_for": "dashscope.aliyuncs.com", --实际访问的大模型provider "request_model": "qwen-turbo", --当前请求使用的模型 "request_prompt_tokens": "11", --当前请求的输入token数 "request_completion_tokens": "90" --当前请求的输出token数 }
ASM已经和阿里云日志服务进行了集成,您可以通过访问日志观测到请求级别的LLM调用情况。您也可以直接将日志采集并存储起来,基于这些访问日志可以定制特定的告警规则以及更加清晰的日志大盘。具体操作,请参见启用数据平面日志采集。
步骤二:新增指标,展示当前工作负载消耗的token数
访问日志是细粒度的信息记录,监控指标可以代表更加宏观的数据。ASM的网格代理支持以监控指标的形式输出工作负载级别的token消耗数,您可以通过这些指标实时观测到当前工作负载的token消耗情况。
ASM新增两个指标:
asm_llm_proxy_prompt_tokens:输入token数。
asm_llm_proxy_completion_tokens:输出token数。
这两个指标默认具有以下维度:
llmproxy_source_workload:发出请求的工作负载名称。
llmproxy_source_workload_namespace:请求源所在的命名空间。
llmproxy_destination_service:目标provider。
llmproxy_model:当前请求的模型。
修改工作负载配置,输出新增指标
本步骤以default命名空间下的sleep deployment为例。
使用ACK的kubeconfig创建asm-llm-proxy-bootstrap-config.yaml。
apiVersion: v1 kind: ConfigMap metadata: name: asm-llm-proxy-bootstrap-config data: custom_bootstrap.json: | "stats_config": { "stats_tags":[ { "tag_name": "llmproxy_source_workload", "regex": "(\\|llmproxy_source_workload=([^|]*))" }, { "tag_name": "llmproxy_source_workload_namespace", "regex": "(\\|llmproxy_source_workload_namespace=([^|]*))" }, { "tag_name": "llmproxy_destination_service", "regex": "(\\|llmproxy_destination_service=([^|]*))" }, { "tag_name": "llmproxy_model", "regex": "(\\|llmproxy_model=([^|]*))" } ] }执行以下命令,创建名为asm-llm-proxy-bootstrap-config的ConfigMap。
kubectl apply -f asm-llm-proxy-bootstrap-config.yaml执行以下命令,修改sleep的deployment,为Pod增加一个annotation。
kubectl patch deployment sleep -p '{"spec":{"template":{"metadata":{"annotations":{"sidecar.istio.io/bootstrapOverride":"asm-llm-proxy-bootstrap-config"}}}}}'
验证
分别执行以下两条命令,发起测试请求。
kubectl exec deployment/sleep -it -- curl --location 'http://dashscope.aliyuncs.com' \
--header 'Content-Type: application/json' \
--data '{
    "messages": [
        {"role": "user", "content": "请介绍你自己"}
    ]
}'
kubectl exec deployment/sleep -it -- curl --location 'http://dashscope.aliyuncs.com' \ --header 'Content-Type: application/json' \ --header 'user-type: subscriber' \ --data '{ "messages": [ {"role": "user", "content": "请介绍你自己"} ] }'执行以下命令,查看sleep应用的Sidecar输出的Prometheus指标。
kubectl exec deployments/sleep -it -c istio-proxy -- curl localhost:15090/stats/prometheus | grep llmproxy预期输出:
asm_llm_proxy_completion_tokens{llmproxy_source_workload="sleep",llmproxy_source_workload_namespace="default",llmproxy_destination_service="dashscope.aliyuncs.com",llmproxy_model="qwen1.5-72b-chat"} 72 asm_llm_proxy_completion_tokens{llmproxy_source_workload="sleep",llmproxy_source_workload_namespace="default",llmproxy_destination_service="dashscope.aliyuncs.com",llmproxy_model="qwen-turbo"} 85 asm_llm_proxy_prompt_tokens{llmproxy_source_workload="sleep",llmproxy_source_workload_namespace="default",llmproxy_destination_service="dashscope.aliyuncs.com",llmproxy_model="qwen1.5-72b-chat"} 3 asm_llm_proxy_prompt_tokens{llmproxy_source_workload="sleep",llmproxy_source_workload_namespace="default",llmproxy_destination_service="dashscope.aliyuncs.com",llmproxy_model="qwen-turbo"} 11可以看到sidecar已经输出了对应的指标。并且携带了4个默认的维度。
ASM已经集成了ARMS服务,您可以通过配置采集规则将这些指标采集到ARMS Prometheus中,进行更详细的分析及展示。具体操作,请参见将监控指标采集到可观测监控Prometheus版。
步骤三:给服务网格原生指标新增LLM相关维度
服务网格默认提供了诸多指标,可以展示HTTP或TCP协议的详细信息,并且这些指标提供了丰富的维度,ASM也已经根据这些指标以及维度内置了功能强大的Prometheus Dashboard。
但是这些指标目前并不具有LLM请求的信息,为此ASM进行了优化,您可以通过自定义指标维度,为已有指标添加LLM请求信息。
配置自定义维度:model
本小节以REQUEST_COUNT指标为例,为其增加model维度。
登录ASM控制台,在左侧导航栏,选择。
在网格管理页面,单击目标实例名称,然后在左侧导航栏,选择。
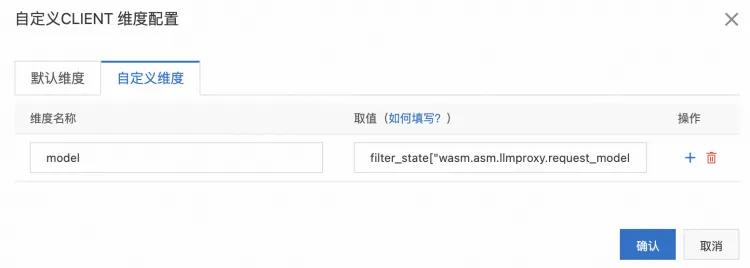
单击REQUEST_COUNT的编辑维度,选择自定义维度标签,添加自定义维度:model,取值为:
filter_state["wasm.asm.llmproxy.request_model"]。

验证
分别执行以下两条命令,发起测试请求。
kubectl exec deployment/sleep -it -- curl --location 'http://dashscope.aliyuncs.com' \
--header 'Content-Type: application/json' \
--data '{
    "messages": [
        {"role": "user", "content": "请介绍你自己"}
    ]
}'
kubectl exec deployment/sleep -it -- curl --location 'http://dashscope.aliyuncs.com' \ --header 'Content-Type: application/json' \ --header 'user-type: subscriber' \ --data '{ "messages": [ {"role": "user", "content": "请介绍你自己"} ] }'执行以下命令,查看sleep应用的Sidecar输出的Prometheus指标。
kubectl exec deployments/sleep -it -c istio-proxy -- curl localhost:15090/stats/prometheus | grep llmproxy预期输出:
istio_requests_total{reporter="source",source_workload="sleep",source_canonical_service="sleep",source_canonical_revision="latest",source_workload_namespace="default",source_principal="unknown",source_app="sleep",source_version="",source_cluster="cce8d2c1d1e8d4abc8d5c180d160669cc",destination_workload="unknown",destination_workload_namespace="unknown",destination_principal="unknown",destination_app="unknown",destination_version="unknown",destination_service="dashscope.aliyuncs.com",destination_canonical_service="unknown",destination_canonical_revision="latest",destination_service_name="dashscope.aliyuncs.com",destination_service_namespace="unknown",destination_cluster="unknown",request_protocol="http",response_code="200",grpc_response_status="",response_flags="-",connection_security_policy="unknown",model="qwen1.5-72b-chat"} 1 istio_requests_total{reporter="source",source_workload="sleep",source_canonical_service="sleep",source_canonical_revision="latest",source_workload_namespace="default",source_principal="unknown",source_app="sleep",source_version="",source_cluster="cce8d2c1d1e8d4abc8d5c180d160669cc",destination_workload="unknown",destination_workload_namespace="unknown",destination_principal="unknown",destination_app="unknown",destination_version="unknown",destination_service="dashscope.aliyuncs.com",destination_canonical_service="unknown",destination_canonical_revision="latest",destination_service_name="dashscope.aliyuncs.com",destination_service_namespace="unknown",destination_cluster="unknown",request_protocol="http",response_code="200",grpc_response_status="",response_flags="-",connection_security_policy="unknown",model="qwen-turbo"} 1可以看出,请求的model已经作为一个指标被添加到了istio_requests_total中。
得到上述监控指标后,您可以在ARMS配置分析规则,进行更细致的分析。例如:
访问某个模型的请求成功率。
某个model或者provider的平均响应延迟。
总结
本文在流量路由:使用ASM高效管理LLM流量的基础上,介绍了如何使用ASM对LLM流量进行细粒度以及宏观的观测。在服务网格原生的可观测能力上,您只需要稍加修改集群中的配置就可以实现多维度的可观测功能。ASM会持续增强LLM流量的可观测能力,为您提供更加细致和灵活的方案。
