
实时计算Flink版基于Flink CDC,通过开发YAML作业的方式有效地实现了将数据从源端同步到目标端的数据摄入工作。本文介绍如何快速构建一个Flink CDC数据摄入作业将MySQL库中的所有数据同步到StarRocks中。
前提条件
已创建Flink工作空间,详情请参见开通实时计算Flink版。
上下游存储
已创建RDS MySQL实例,详情请参见快速创建RDS MySQL实例。
已创建StarRocks实例,详情请参见操作步骤。
说明RDS MySQL和StarRocks需要与Flink工作空间在相同VPC下,否则需要打通网络并配置RDS MySQL的IP白名单,详情请参见如何访问跨VPC的其他服务?、如何访问公网?和如何设置白名单?。
背景信息
假设MySQL实例中有一个order_dw_mysql库,里面有名称为orders、orders_pay和product_catalog的3张业务表。此时,如果您希望开发一个Flink CDC数据摄入作业,将这些表和数据都同步到StarRocks的order_dw_sr数据库中,则可以按照以下步骤进行:
步骤一:准备RDS MySQL测试数据
创建数据库和账号。
为目标实例创建名称为order_dw_mysql数据库和具有对应数据库读写权限的普通账号。具体操作请参见创建数据库和账号和管理数据库。
通过DMS登录RDS MySQL。
详情请参见通过DMS登录RDS MySQL。
在已登录的SQL Console窗口,输入如下命令后单击执行,创建三张业务表并插入数据。
CREATE TABLE `orders` (
  order_id bigint not null primary key,
  user_id varchar(50) not null,
  shop_id bigint not null,
  product_id bigint not null,
  buy_fee numeric(20,2) not null,
  create_time timestamp not null,
  update_time timestamp not null default now(),
  state int not null
);


CREATE TABLE `orders_pay` (
  pay_id bigint not null primary key,
  order_id bigint not null,
  pay_platform int not null,
  create_time timestamp not null
);


CREATE TABLE `product_catalog` (
  product_id bigint not null primary key,
  catalog_name varchar(50) not null
);

-- 准备数据
INSERT INTO product_catalog VALUES(1, 'phone_aaa'),(2, 'phone_bbb'),(3, 'phone_ccc'),(4, 'phone_ddd'),(5, 'phone_eee');

INSERT INTO orders VALUES
(100001, 'user_001', 12345, 1, 5000.05, '2023-02-15 16:40:56', '2023-02-15 18:42:56', 1),
(100002, 'user_002', 12346, 2, 4000.04, '2023-02-15 15:40:56', '2023-02-15 18:42:56', 1),
(100003, 'user_003', 12347, 3, 3000.03, '2023-02-15 14:40:56', '2023-02-15 18:42:56', 1),
(100004, 'user_001', 12347, 4, 2000.02, '2023-02-15 13:40:56', '2023-02-15 18:42:56', 1),
(100005, 'user_002', 12348, 5, 1000.01, '2023-02-15 12:40:56', '2023-02-15 18:42:56', 1),
(100006, 'user_001', 12348, 1, 1000.01, '2023-02-15 11:40:56', '2023-02-15 18:42:56', 1),
(100007, 'user_003', 12347, 4, 2000.02, '2023-02-15 10:40:56', '2023-02-15 18:42:56', 1);

INSERT INTO orders_pay VALUES
(2001, 100001, 1, '2023-02-15 17:40:56'),
(2002, 100002, 1, '2023-02-15 17:40:56'),
(2003, 100003, 0, '2023-02-15 17:40:56'),
(2004, 100004, 0, '2023-02-15 17:40:56'),
(2005, 100005, 0, '2023-02-15 18:40:56'),
(2006, 100006, 0, '2023-02-15 18:40:56'),
(2007, 100007, 0, '2023-02-15 18:40:56');
步骤二:开发Flink CDC数据摄入作业
登录实时计算管理控制台。
单击控制台,进入对应的项目空间。
在左侧导航栏选择。
单击
 后,单击从模板新建,选择MySQL到Starrocks数据同步,单击下一步。
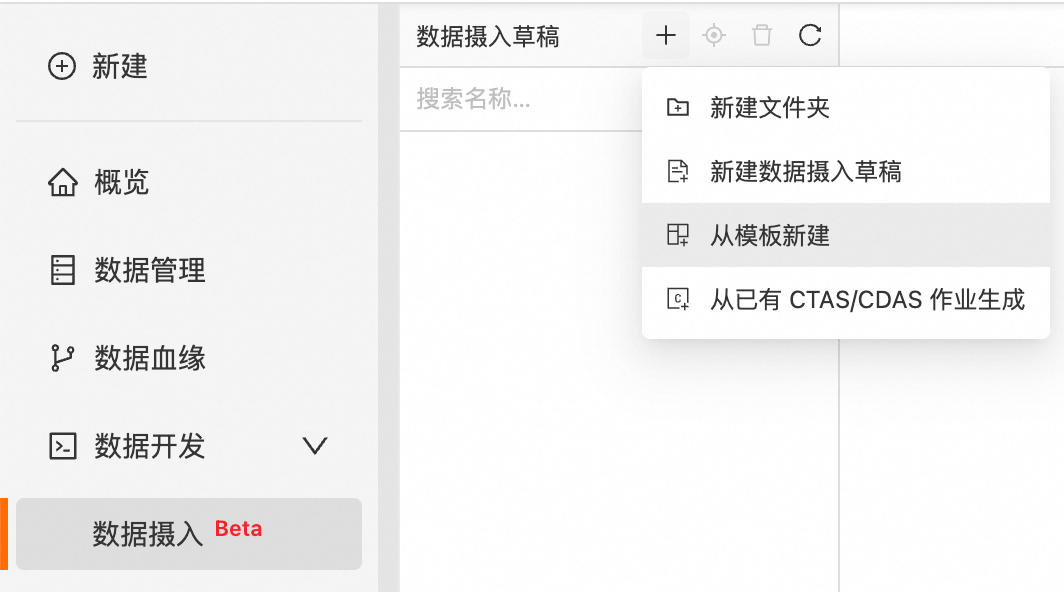
填写作业名称,存储位置和选择引擎版本后,单击确定。
配置YAML作业代码信息。
将MySQL中order_dw_mysql数据库下的所有表同步到starrocks的order_dw_sr数据库中,代码示例如下。
source: type: mysql hostname: rm-bp1rk934iidc3****.mysql.rds.aliyuncs.com port: 3306 username: ${secret_values.mysqlusername} password: ${secret_values.mysqlpassword} tables: order_dw_mysql.\.* server-id: 5405-5415 sink: type: starrocks name: StarRocks Sink jdbc-url: jdbc:mysql://fe-c-b76b6aa51807****-internal.starrocks.aliyuncs.com:9030 load-url: fe-c-b76b6aa51807****-internal.starrocks.aliyuncs.com:8030 username: ${secret_values.starrocksusername} password: ${secret_values.starrockspassword} table.create.properties.replication_num: 1 sink.buffer-flush.interval-ms: 5000 # 每 5 秒钟刷入一次数据 route: - source-table: order_dw_mysql.\.* sink-table: order_dw_sr.<> replace-symbol: <> description: route all tables in source_db to sink_db pipeline: name: Sync MySQL Database to StarRocks关于MySQL和StarRocks的本示例需要的配置信息说明如下表所示,数据摄入更多参数详情请参见MySQL和StarRocks。
说明YAML作业仅支持项目变量。使用变量可以避免明文展示密码等信息,详情请参见变量管理。
类别
参数
说明
示例值
source
hostname
MySQL数据库的IP地址或者Hostname。
建议填写专有网络VPC地址。
rm-bp1rk934iidc3****.mysql.rds.aliyuncs.comport
MySQL数据库服务的端口号。
3306
username
MySQL数据库服务的用户名和密码。填写您步骤一:准备RDS MySQL测试数据中创建的账号和密码信息。
${secret_values.mysqlusername}password
${secret_values.mysqlpassword}tables
MySQL表名。支持正则表达式以读取多个表的数据。
本文将同步order_dw_mysql数据库所有表及数据。
order_dw_mysql.\.*
server-id
数据库客户端的一个数字ID。
5405-5415
sink
jdbc-url
JDBC连接的URL。
指定FE(Front End)的IP和查询端口,格式为
jdbc:mysql://ip:port。您可以在E-MapReduce控制台实例详情页签,查看目标实例的FE内网地址和查询端口。
jdbc:mysql://fe-c-b76b6aa51807****-internal.starrocks.aliyuncs.com:9030load-url
连接到FE节点的HTTP服务URL。
您可以在E-MapReduce控制台实例详情页签,查看目标实例的FE内网地址和HTTP端口。
fe-c-b76b6aa51807****-internal.starrocks.aliyuncs.com:8030username
StarRocks连接用户名和密码。
此处需要填写为您开通StarRocks时填写的用户名和密码信息。
说明本示例使用变量,可以避免明文展示密码等信息,详情请参见变量管理。
${secret_values.starrocksusername}password
${secret_values.starrockspassword}sink.buffer-flush.interval-ms
内部缓冲区的刷新时间间隔。
由于本示例的数据量较小,我们将间隔设定得较短(5 秒一次),以便尽快观测到结果。
5000
route
source-table
指定需要路由的上游表。
可以使用正则表达式匹配多张表,如
order_dw_mysql.\.*代表对order_dw_mysql数据库中的全部表进行路由处理。order_dw_mysql.\.*
sink-table
指定数据路由的目标位置。
可以使用
replace-symbol的符号代替每张上游表名,以实现多对多的路由关系。更多路由配置规则可参考Route模块。
order_dw_sr.<>
replace-symbol
在使用模式匹配功能时,用于指代上游表名的字符串。
<>
单击部署。
步骤三:启动Flink CDC数据摄入作业
在数据摄入页面,单击部署后,在弹出的对话框中,单击确定。
在页面,单击目标YAML作业操作中的启动。
单击启动。
本示例选择为无状态启动,参数配置详情请参见作业启动。作业启动后,您可以在作业运维页面观察作业的运行信息和状态。
步骤四:在StarRocks上查看同步结果
当YAML作业处于运行中后,您就可以在StarRocks查看数据同步情况。
在左侧导航栏,单击SQL Editor,在数据库页签,单击
 按钮。
按钮。您会看到default_catalog下出现名称为order_dw_sr的数据库。
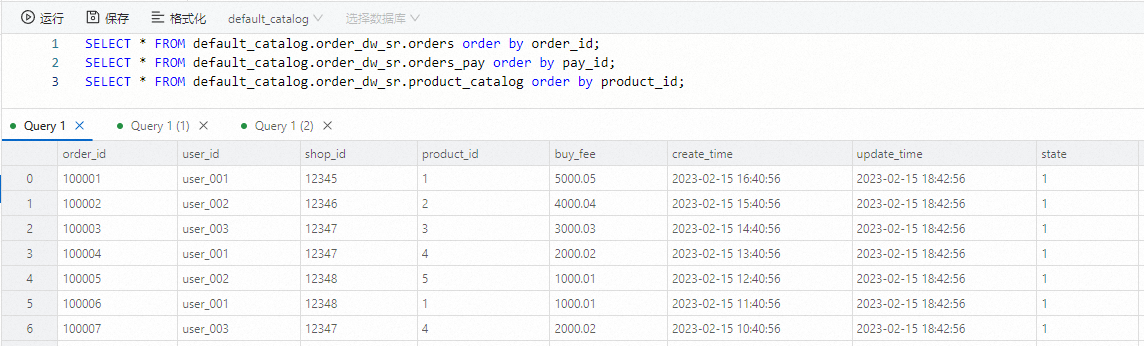
在查询列表页签,单击+文件,新建查询脚本后,输入以下SQL语句,单击运行。
SELECT * FROM default_catalog.order_dw_sr.orders order by order_id;
SELECT * FROM default_catalog.order_dw_sr.orders_pay order by pay_id;
SELECT * FROM default_catalog.order_dw_sr.product_catalog order by product_id;
在命令下方查看同步结果。
您会看到StarRocks中已存在和MySQL数据库中相同名称的表及数据。
相关文档
Flink CDC数据摄入作业开发步骤详情,请参见Flink CDC数据摄入作业开发(公测中)。
Flink CDC数据摄入作业中source、sink、transform和route模块的详细内容请参见Flink CDC数据摄入作业开发参考。