cloud-init是一款开源初始化工具,能够为Linux操作系统提供初始化密码、设置主机名、执行自定义脚本等初始化配置能力。如果您本地制作的自定义镜像未安装cloud-init且需要迁移上云,需要手动安装cloud-init,否则使用该自定义镜像创建的ECS实例将无法自动执行设置主机名、配置网络等初始化任务,进而影响实例的自动化部署与配置效率。本文介绍如何在Linux操作系统中安装cloud-init。
关于cloud-init的更多信息,请参见cloud-init官方文档。
操作场景
阿里云所有公共镜像已默认安装cloud-init,为了保证使用您本地自定义镜像创建的ECS实例能自动初始化系统配置,建议您结合实际情况,参考以下相关建议并执行相应操作。
准备迁移上云但未安装cloud-init的Linux服务器
如果您的服务器计划迁移到阿里云,但目前尚未安装cloud-init,您应当在迁移前安装cloud-init,以确保新创建的ECS实例能够在启动时自动执行初始化任务。
说明不准备迁移上云的服务器,安装cloud-init可能引入不必要的复杂性或资源占用,请您根据实际环境选择是否安装。
已安装cloud-init但版本低于0.7.9的Linux服务器
cloud-init的新版本通常包含了更多的功能和修复,以保证与最新云平台特性的兼容性。如果您的服务器上cloud-init版本较低,建议升级至更高版本,以确保最佳的兼容性和安全性。
已在阿里云运行但未安装cloud-init的ECS实例
如果您的ECS实例缺少cloud-init,建议在实例内部手动安装cloud-init,以确保ECS实例能成功完成初始化配置。
步骤一:检查是否需要升级安装cloud-init
登录源服务器。
运行以下命令检查是否已安装cloud-init。
CentOS系列
rpm -qa | grep -i cloud-init pip list | grep -i cloud-initUbuntu系列
dpkg -l | grep -i cloud-init pip list | grep -i cloud-init若无任何输出或版本低于0.7.9版本:您需要步骤二:安装cloud-init。
重要0.7.9版本是初期的社区版cloud-init,不适用于初始化ECS实例,必须升级至较高版本。
若版本为18或更高版本:无需安装cloud-init,但是cloud-init在实例初始化过程中能够自动配置网络。如果默认配置未能满足您的需求,您可以选择禁用网络初始化功能。有关更多操作,请参见禁用阿里云自动配置网络初始化。
若版本为19.1.21:建议您升级安装阿里云版cloud-init 23.2.2。阿里云版cloud-init 23.2.2版本相对于阿里云版cloud-init 19.1.21版本有一些新的改进和特性:
如果实例的cloud-init版本为23.2.2,则该实例支持通过加固模式访问元数据。关于实例元数据的更多说明,请参考实例元数据。
其他功能增强、性能改进、错误修复和社区贡献的变化。更多信息,请参见ChangeLog文件。
其他:无需再安装cloud-init,可直接执行后续步骤。
为避免安装cloud-init误操作导致数据丢失,建议您先备份源服务器数据(例如创建快照)。
步骤二:安装cloud-init
阿里云版cloud-init 23.2.2:推荐,依赖Python 3.6及以上版本,数据源为
Aliyun。阿里云版cloud-init 19.1.21:依赖Python 3.6及以上版本,数据源为
Aliyun。阿里云版cloud-init 0.7.6a17:部分低版本操作系统(例如CentOS 6、Debian 9及SUSE Linux Enterprise Server 12等),需要安装该版本,依赖Python 2.7版本,数据源为
Aliyun。重要由于Python社区已停止对Python 2.7的技术支持,建议您尽量使用高版本的cloud-init,避免依赖库的潜在问题。
社区版本cloud-init:社区版cloud-init由社区维护。阿里云版cloud-init的最新版本为23.2.2,如果您需要使用更高版本的cloud-init,可以安装社区版本的cloud-init。更多版本信息,请参见cloud-init官方网站。
社区版的cloud-init是cloud-init项目的官方版本,而阿里云版的cloud-init是针对阿里云平台进行优化的版本,可以更好地支持阿里云的平台服务,因此推荐您使用阿里云版cloud-init。请您根据实际需要选择安装cloud-init。
(推荐)阿里云版cloud-init 23.2.2
阿里云cloud-init的最新版本为23.2.2,该版本已变为软件包维护方式,您可以选择适合自己操作系统版本的软件包进行安装,也可以选择使用源码包进行安装。
以下操作分别以Debian 12和CentOS Stream 9系统下载安装二进制软件包为例,介绍如何安装cloud-init。
Debian 12
运行以下命令,下载cloud-init软件包。
wget https://ecs-image-tools.oss-cn-hangzhou.aliyuncs.com/cloudinit/debian12/cloud-init_23.2.2-5_all.deb运行以下命令,安装软件包。
sudo apt-get install -y ./cloud-init_23.2.2-5_all.deb(可选)为了避免后期软件包更新或升级到开源更高版本,建议您运行以下命令,固化cloud-init的软件包版本。
sudo apt-mark hold cloud-init运行以下命令,查看cloud-init的版本信息是否符合预期。
cloud-init --version
CentOS Stream 9
运行以下命令,下载cloud-init软件包。
wget https://ecs-image-tools.oss-cn-hangzhou.aliyuncs.com/cloudinit/centosstream9/cloud-init-23.2.2-5.el9.noarch.rpm运行以下命令,安装软件包。
sudo yum install -y ./cloud-init-23.2.2-5.el9.noarch.rpm(可选)为了避免后期软件包更新或升级到开源更高版本,建议您运行以下命令,固定cloud-init的软件包版本。
sudo sh -c 'echo "exclude=cloud-init" >> /etc/dnf/dnf.conf'运行以下命令,查看cloud-init的版本信息是否符合预期。
cloud-init --version
阿里云cloud-init 23.2.2版本默认不再在/etc/hosts文件中做hostname到private-ipv4的映射,如果您的业务需要该配置,请自行配置。高版本操作系统通过nss-myhostname组件实现自身与hostname的连通性,该组件由systemd-libs软件包(Red Hat系列)或libnss-myhostname软件包(Debian系列)提供,并通过/etc/nsswitch.conf配置文件来启用此功能。更多信息,请参见nss-myhostname手册。
阿里云版cloud-init 19.1.21
确保源服务器已安装Python PIP依赖库。
以安装Python3-pip依赖库为例,Linux部分发行版的安装命令如下。
CentOS/Red Hat Enterprise Linux
sudo yum -y install python3-pipUbuntu/Debian
sudo apt-get -y install python3-pipOpenSUSE/SUSE
sudo zypper -n install python3-pip运行以下命令下载阿里云版cloud-init。
wget https://ecs-image-tools.oss-cn-hangzhou.aliyuncs.com/cloudinit/cloud-init-19.1.21.tgz运行以下命令解压cloud-init安装包到当前目录。
tar -zxvf cloud-init-19.1.21.tgz进入cloud-init目录下,并安装依赖库。
cd ./cloud-init-19.1.21 pip3 install -r ./requirements.txt进入cloud-init的tools目录。
cd ./tools运行以下命令执行安装cloud-init的脚本deploy.sh。
sudo bash ./deploy.sh <issue> <major_version>deploy.sh脚本的参数说明和取值示例如下:
参数
说明
示例
<issue>
操作系统平台类型。取值范围:centos | redhat |rhel | debian | ubuntu | opensuse | sles。参数取值均大小写敏感,其中sles表示SUSE/SLES。
说明如果操作系统是CentOS Stream,操作系统平台类型选择centos。
centos
<major_version>
操作系统平台的主要版本号。
说明Ubuntu 14不支持安装阿里云版cloud-init 19.1.21。
CentOS 7.6的主要版本号为7
例如,您当前的操作系统为CentOS 7,则需要运行的命令为
sudo bash ./deploy.sh centos 7。确认cloud-init是否安装成功。
若返回
"description": "success",表示安装成功。
运行以下命令,查看cloud-init的版本信息是否符合预期。
cloud-init --version
不同Linux发行平台安装阿里云cloud-init的Shell脚本示例如下,供您参考。实际安装时,请根据您的操作系统适当调整脚本。
CentOS 7/8
# 检查安装python3-pip
if ! python3 -c 'import setuptools' >& /dev/null; then
  yum -y install python3-pip
fi
# 备份旧版cloud-init
test -d /etc/cloud && mv /etc/cloud /etc/cloud-old
# 下载并解压阿里云版cloud-init
wget https://ecs-image-tools.oss-cn-hangzhou.aliyuncs.com/cloudinit/cloud-init-19.1.21.tgz
tar -zxvf ./cloud-init-19.1.21.tgz
# 安装cloud-init
issue_major=$( cat /etc/redhat-release | grep -Eo '[0-9]+\.?[0-9]+' | head -1 | awk -F'.' '{printf $1}')
bash ./cloud-init-*/tools/deploy.sh centos "$issue_major"
Red Hat Enterprise Linux 7/8
# 检查安装python3-pip
if ! python3 -c 'import setuptools' >& /dev/null; then
  yum -y install python3-pip
fi
# 备份旧版cloud-init
test -d /etc/cloud && mv /etc/cloud /etc/cloud-old
# 下载并解压阿里云版cloud-init
wget https://ecs-image-tools.oss-cn-hangzhou.aliyuncs.com/cloudinit/cloud-init-19.1.21.tgz
tar -zxvf ./cloud-init-19.1.21.tgz
# 安装cloud-init
issue_major=$( cat /etc/os-release | grep VERSION_ID | grep -Eo '[0-9]+\.?[0-9]+' | head -1 | awk -F'.' '{printf $1}')
bash ./cloud-init-*/tools/deploy.sh rhel "$issue_major"
Ubuntu 16/18/20
# 检查安装python3-pip
if ! python3 -c 'import setuptools' >& /dev/null; then
  apt-get install python36 python3-pip -y
fi
# 备份旧版cloud-init
test -d /etc/cloud && mv /etc/cloud /etc/cloud-old
# 下载并解压阿里云版cloud-init
wget https://ecs-image-tools.oss-cn-hangzhou.aliyuncs.com/cloudinit/cloud-init-19.1.21.tgz
tar -zxvf ./cloud-init-19.1.21.tgz
# 安装cloud-init
issue_major=$( cat /etc/os-release | grep VERSION_ID | grep -Eo '[0-9]+\.?[0-9]+' | head -1 | awk -F'.' '{printf $1}')
bash ./cloud-init-*/tools/deploy.sh ubuntu "$issue_major"
Debian 9/10
# 检查安装python3-pip
if ! python3 -c 'import setuptools' >& /dev/null; then
  apt-get -y install python3-pip
fi
# 备份旧版cloud-init
test -d /etc/cloud && mv /etc/cloud /etc/cloud-old
# 下载并解压阿里云版cloud-init
wget https://ecs-image-tools.oss-cn-hangzhou.aliyuncs.com/cloudinit/cloud-init-19.1.21.tgz
tar -zxvf ./cloud-init-19.1.21.tgz
# 安装cloud-init
issue_major=$( cat /etc/os-release | grep VERSION_ID | grep -Eo '[0-9]+\.?[0-9]+' | head -1 | awk -F'.' '{printf $1}')
bash ./cloud-init-*/tools/deploy.sh debian "$issue_major"
SUSE 12/15
# 检查安装python3-pip
if ! python3 -c 'import setuptools'>& /dev/null; then
  zypper -n install python3-pip
fi
# 备份旧版cloud-init
test -d /etc/cloud && mv /etc/cloud /etc/cloud-old
# 下载并解压阿里云版cloud-init
wget https://ecs-image-tools.oss-cn-hangzhou.aliyuncs.com/cloudinit/cloud-init-19.1.21.tgz
tar -zxvf ./cloud-init-19.1.21.tgz
# 安装cloud-init
issue_major=$( cat /etc/os-release | grep VERSION_ID | grep -Eo '[0-9]+\.?[0-9]+' | head -1 | awk -F'.' '{printf $1}')
bash ./cloud-init-*/tools/deploy.sh sles "$issue_major"
OpenSUSE 15
# 检查安装python3-pip
if ! python3 -c 'import setuptools'>& /dev/null; then
  zypper -n install python3-pip
fi
# 备份旧版cloud-init
test -d /etc/cloud && mv /etc/cloud/etc/cloud-old
# 下载并解压阿里云版cloud-init
wget https://ecs-image-tools.oss-cn-hangzhou.aliyuncs.com/cloudinit/cloud-init-19.1.21.tgz
tar -zxvf ./cloud-init-19.1.21.tgz
# 安装cloud-init
issue_major=$( cat /etc/os-release | grep VERSION_ID | grep -Eo '[0-9]+\.?[0-9]+' | head -1 | awk -F'.' '{printf $1}')
bash ./cloud-init-*/tools/deploy.sh opensuse "$issue_major"阿里云版cloud-init 0.7.6a17
阿里云公共镜像CentOS 6、Debian 9及SUSE Linux Enterprise Server 12默认已安装cloud-init-0.7.6a17。如果您需要进行测试,请先运行sudo mv /etc/cloud/cloud.cfg /etc/cloud/cloud.cfg_bak命令备份配置文件。
运行以下命令,检查操作系统的版本为CentOS 6、Debian 9及SUSE Linux Enterprise Server 12。
cat /etc/issue确保源服务器已安装Python PIP依赖库。
以安装Python2-pip依赖库为例,安装命令如下。
CentOS 6/SUSE Linux Enterprise Server 12
sudo yum -y install python2-pipDebian 9
sudo apt-get -y install python2-pip运行以下命令,下载并解压阿里云版cloud-init 0.7.6a17。
wget https://ecs-image-tools.oss-cn-hangzhou.aliyuncs.com/cloud-init-0.7.6a17.tgz tar -zxvf cloud-init-0.7.6a17.tgz进入cloud-init的tools目录。
cd cloud-init-0.7.6a17/tools/运行以下命令。安装cloud-init。
sudo bash ./deploy.sh <issue> <major_version>例如,您当前的操作系统为CentOS 6,则需要运行的命令为
sudo bash ./deploy.sh centos 6。deploy.sh脚本的参数说明和取值示例如下:
参数
说明
示例
<issue>
操作系统平台类型。取值范围:centos | debian | sles。参数取值均大小写敏感,其中sles表示SUSE/SLES。
centos
<major_version>
操作系统平台的主要版本号。
CentOS 6.5的主要版本号为6
运行以下命令,查看cloud-init的版本信息是否符合预期。
cloud-init --version
社区版cloud-init
确保源服务器已安装Git、Python和Python PIP依赖库。
以安装Git、Python 3.6和Python3-pip依赖库为例,Linux部分发行版的安装命令如下。
CentOS/Red Hat Enterprise Linux
sudo yum -y install git python36 python3-pipUbuntu/Debian
sudo apt-get -y install git python36 python3-pipOpenSUSE/SUSE
sudo zypper -n install git python36 python3-pip运行以下命令使用Git下载cloud-init源码包。
git clone https://git.launchpad.net/cloud-init进入cloud-init目录。
cd ./cloud-init运行以下命令安装所有依赖库。
sudo pip3 install -r ./requirements.txt运行以下命令安装cloud-init。
python3 setup.py install修改配置文件cloud.cfg。
打开配置文件。
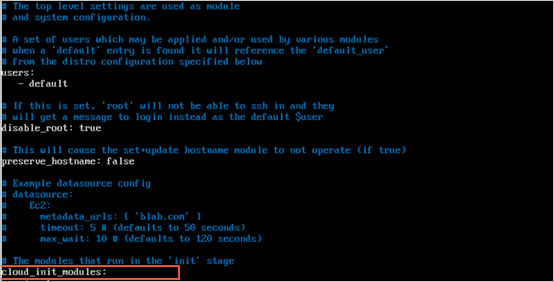
sudo vi /etc/cloud/cloud.cfg
将
cloud_init_modules:之前的配置修改为以下内容。# Example datasource config # The top level settings are used as module # and system configuration. # A set of users which may be applied and/or used by various modules # when a 'default' entry is found it will reference the 'default_user' # from the distro configuration specified below users: - default user: name: root lock_passwd: False # If this is set, 'root' will not be able to ssh in and they # will get a message to login instead as the above $user disable_root: false # This will cause the set+update hostname module to not operate (if true) preserve_hostname: false syslog_fix_perms: root:root datasource_list: [ AliYun ] # Example datasource config datasource: AliYun: support_xen: false timeout: 5 # (defaults to 50 seconds) max_wait: 60 # (defaults to 120 seconds) # metadata_urls: [ 'blah.com' ] # The modules that run in the 'init' stage cloud_init_modules:
运行以下命令,查看cloud-init的版本信息是否符合预期。
cloud-init --version
(可选)步骤三:配置cloud-init
禁用阿里云自动配置网络初始化
如果您的cloud-init版本为18或更高版本,会自动完成网络的初始化配置,自动配置的网络为BOOTPROTO=dhcp DEVICE=eth0 ONBOOT=yes STARTMODE=auto TYPE=Ethernet USERCTL=no。如果系统默认的网络配置不符合您的业务需求,可以参考以下操作修改cloud-init的配置文件,以实现自定义网络配置。
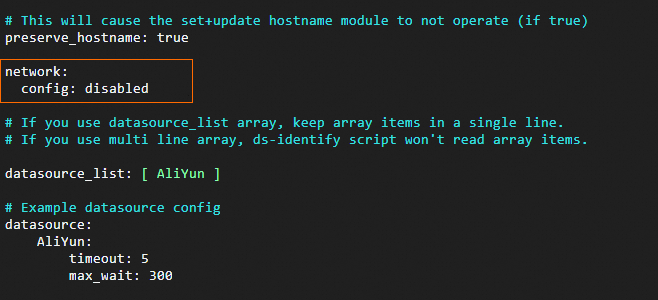
运行以下命令,以打开cloud-init的默认配置文件,按
i进入插入模式。sudo vim /etc/cloud/cloud.cfg在
Example datasource config之前增加disabled配置,禁用cloud-init的网络自动配置功能。network: config: disabled
增加该配置之后,cloud-init不会再管理/etc/sysconfig/network-scripts/目录下的网络配置文件(例如
ifcfg-eth0),需要您自行管理。按
Esc键,输入:wq,按Enter键关闭并保存配置文件。根据需求自定义/etc/sysconfig/network-scripts/目录下的网络配置,例如IP地址、子网掩码、网关等。
禁用阿里云自动设置主机名
默认情况下,cloud-init会在实例启动时自动设置主机名并更新/etc/hostname文件。如果您不希望修改,可以参考以下操作修改cloud-init的配置文件。
运行以下命令,以打开cloud-init的默认配置文件,按
i进入编辑模式。sudo vim /etc/cloud/cloud.cfg将配置文件中的
preserve_hostname: false修改为preserve_hostname: true。
按
Esc键,输入:wq,按Enter键关闭并保存配置文件。
后续步骤
对于准备迁移上云的Linux服务器,您可以使用服务器迁移中心SMC进行迁移。具体操作,请参见服务器迁移至云服务器ECS。
对于已在阿里云上运行Linux自定义镜像的ECS实例,您可以重启系统验证结果。如果系统自动配置了主机名、网络和NTP等配置,则表示已成功安装cloud-init。 例如运行如下命令查看网络配置文件:
sudo reboot cat /etc/sysconfig/network-scripts/ifcfg-eth0查看结果如下,表明系统已通过cloud-init自动配置DHCP协议、网络设备及设备类型等网络配置。
BOOTPROTO=dhcp
DEVICE=eth0
ONBOOT=yes
STARTMODE=auto
TYPE=Ethernet
USERCTL=no

