
随着AI生成内容(AIGC)在多个领域广泛应用,StableDiffusion模型和生态正在迅速发展。作为计算能力中心和各种需求的交汇点,PAI不仅深入探究AIGC的基础能力和预训练模型,还积极应对各类垂直行业内容生成的挑战。本文以服饰领域为例介绍如何基于PAI的基础能力快速搭建端到端的虚拟上装解决方案。
背景信息
您可以参考快速上手实现虚拟上装来快速体验虚拟上装效果,或者参考端到端操作实现虚拟上装来完成全流程操作。
目前PAI端到端虚拟上装解决方案提供以下两种使用方式:
Lora(Low-Rank Adaptive Relational Attention)是一种在图像生成领域广泛应用的算法。该算法可以通过添加少量的可微调参数和使用少量的数据集,快速进行模型的微调,从而为模特、动作、背景等提供广泛的生成空间。但这种训练方式无法完全确保服饰的细节和原始图像完全一致。
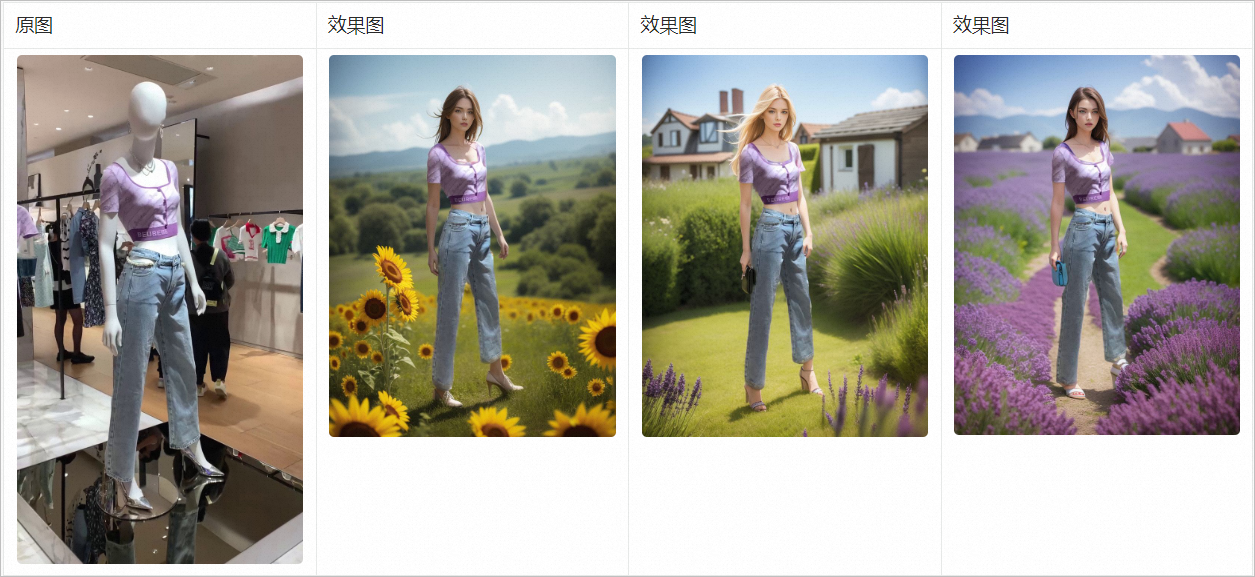
效果展示图如下:

在SDWebUI中,您可以同时利用多个ControlNet来完成图像生成中的部分内容编辑。这意味着您可以在完整保留原始图像衣物的细节后,对其余细节部分进行创意生成,例如对人物和背景进行重绘。
PAI利用提供的原始图像和需要保留的衣物掩模图,通过结合Canny和OpenPose的ControlNet,可以在完全保留衣物细节的同时,进行背景风格的重绘,从而达到展示效果图中的结果。
快速上手实现虚拟上装
您可以基于ControlNet模型、chilloutmix模型及训练好的服饰LoRA模型快速体验虚拟上装效果,具体操作步骤如下:
步骤一:部署服务
打开部署服务页面,具体操作请参见控制台上传部署。
在对应配置编辑区域,单击JSON独立部署。并在编辑框中配置以下内容。
{ "cloud": { "computing": { "instance_type": "ecs.gn6v-c8g1.2xlarge" } }, "containers": [ { "image": "eas-registry-vpc.${region}.cr.aliyuncs.com/pai-eas/stable-diffusion-webui:3.1", "port": 8000, "script": "./webui.sh --listen --port=8000 --api" } ], "features": { "eas.aliyun.com/extra-ephemeral-storage": "100Gi" }, "metadata": { "cpu": 8, "enable_webservice": true, "gpu": 1, "instance": 1, "memory": 32000, "name": "tryon_sdwebui" }, "storage": [ { "mount_path": "/code/stable-diffusion-webui/models/ControlNet/", "oss": { "path": "oss://pai-quickstart-${region}/aigclib/models/controlnet/official/", "readOnly": true }, "properties": { "resource_type": "model" } }, { "mount_path": "/code/stable-diffusion-webui/models/annotator/openpose/", "oss": { "path": "oss://pai-quickstart-${region}/aigclib/models/controlnet/openpose/", "readOnly": true }, "properties": { "resource_type": "model" } }, { "mount_path": "/code/stable-diffusion-webui/models/Stable-diffusion/", "oss": { "path": "oss://pai-quickstart-${region}/aigclib/models/custom_civitai_models/chilloutmix/", "readOnly": true }, "properties": { "resource_type": "model" } }, { "mount_path": "/code/stable-diffusion-webui/models/Lora/", "oss": { "path": "oss://pai-quickstart-${region}/aigclib/models/lora_models/tryon/", "readOnly": true }, "properties": { "resource_type": "model" } } ] }上述配置中分别挂载了ControlNet模型、chilloutmix模型及训练好的服饰LoRA模型。其中:
单击部署,当服务状态变为运行中时,表明服务部署成功。
说明如果部署按钮置灰,请检查复制的JSON文本格式是否有问题。
服务部署成功后,单击服务名称进入服务详情页面,单击查看调用信息获取SDWebUI服务的访问地址和Token,并保存到本地。
步骤二:调用服务
方案一:使用Lora模型实现虚拟上装
支持使用以下两种方式调用服务:
Web应用方式
服务部署成功后,单击服务方式列下的查看WEB应用,进入WebUI界面,即可开始调试服务。
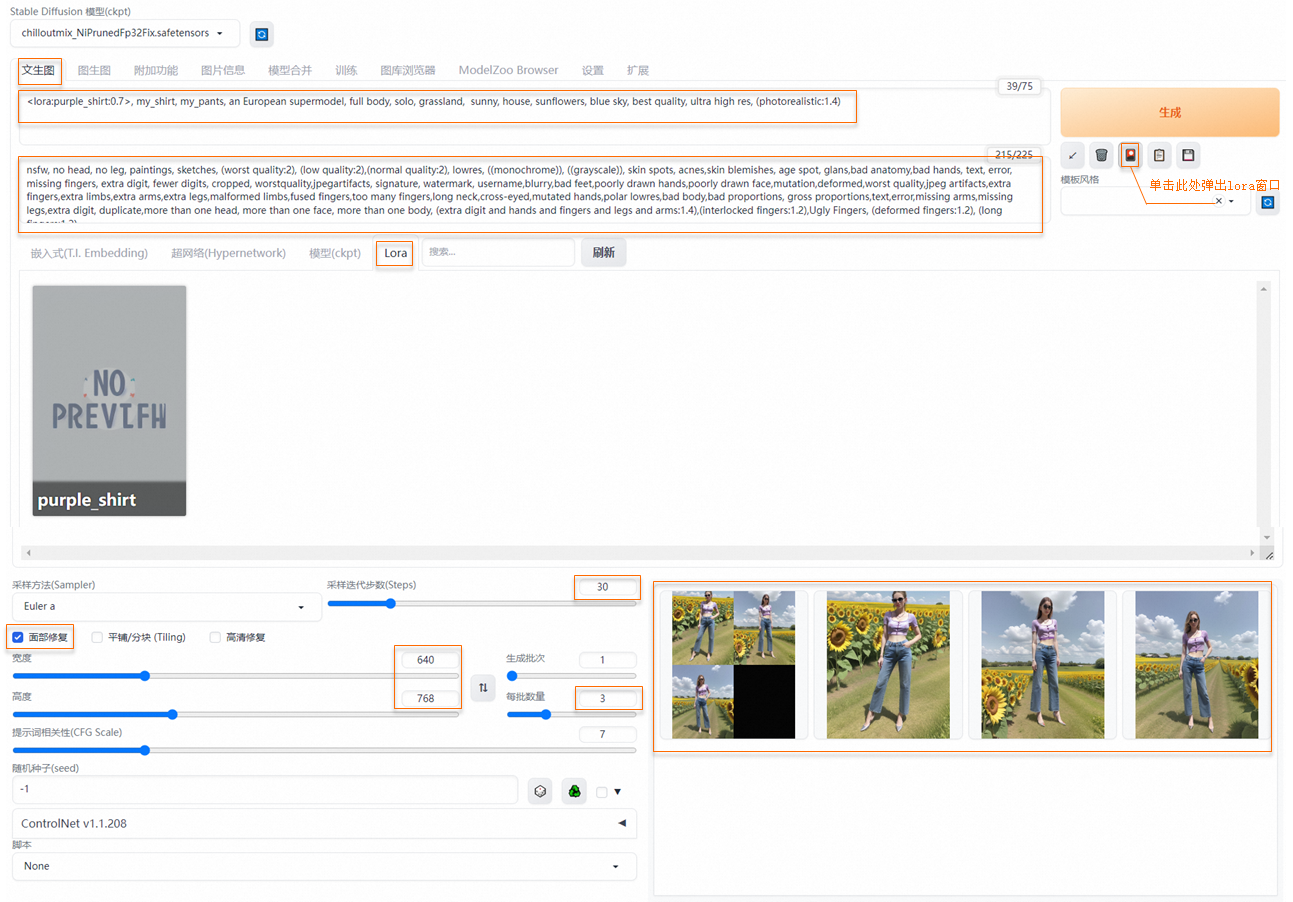
在文生图页签配置以下参数,并单击生成。
参数
示例值
提示词(Prompt)
<lora:purple_shirt:0.7>, my_shirt, my_pants, an European supermodel, full body, solo, grassland, sunny, house, sunflowers, blue sky, best quality, ultra high res, (photorealistic:1.4)说明my_shirt、my_pants是服饰tag必须添加到Prompt,lora权重推荐配置0.7-0.8。
反向提示词(Negative prompt)
nsfw, no head, no leg, paintings, sketches, (worst quality:2), (low quality:2),(normal quality:2), lowres, ((monochrome)), ((grayscale)), skin spots, acnes,skin blemishes, age spot, glans,bad anatomy,bad hands, text, error, missing fingers, extra digit, fewer digits, cropped, worstquality,jpegartifacts, signature, watermark, username,blurry,bad feet,poorly drawn hands,poorly drawn face,mutation,deformed,worst quality,jpeg artifacts,extra fingers,extra limbs,extra arms,extra legs,malformed limbs,fused fingers,too many fingers,long neck,cross-eyed,mutated hands,polar lowres,bad body,bad proportions, gross proportions,text,error,missing arms,missing legs,extra digit, duplicate,more than one head, more than one face, more than one body, (extra digit and hands and fingers and legs and arms:1.4),(interlocked fingers:1.2),Ugly Fingers, (deformed fingers:1.2), (long fingers:1.2)面部修复
选中面部修复;宽度和高度分别配置为768×1024或640×768;
采样迭代步数(Steps)
建议配置30,或使用默认配置。
参照下图配置参数,生成如图效果图,您的效果图以实际为准。
API调用方式
参考以下Python脚本通过API调用服务:
import os import io import base64 import requests import copy import numpy as np from PIL import Image def get_payload(prompt, negative_prompt, steps, width=512, height=512, batch_size=1, seed=-1): print(f'width: {width}, height: {height}') res = { 'prompt': prompt, 'negative_prompt': negative_prompt, 'seed': seed, 'batch_size': batch_size, 'n_iter': 1, 'steps': steps, 'cfg_scale': 7.0, 'image_cfg_scale': 1.5, 'width': width, 'height': height, 'restore_faces': True, 'override_settings_restore_afterwards': True } return res if __name__ == '__main__': sdwebui_url = "<service_URL>" sdwebui_token = "<service_Token>" save_dir = 'lora_outputs' prompt = '<lora:purple_shirt:0.75>, my_shirt, my_pants, an European supermodel, solo, grassland, sunny, house, sunflowers, blue sky, best quality, ultra high res, (photorealistic:1.4)' negative_prompt = 'nfsw, no head, no leg, no feet, paintings, sketches, (worst quality:2), (low quality:2),\ (normal quality:2), lowres, ((monochrome)), ((grayscale)), skin spots, acnes,\ skin blemishes, age spot, glans,bad anatomy,bad hands, text, error, missing fingers,\ extra digit, fewer digits, cropped, worstquality,jpegartifacts,\ signature, watermark, username,blurry,bad feet,poorly drawn hands,poorly drawn face,\ mutation,deformed,worst quality,jpeg artifacts,\ extra fingers,extra limbs,extra arms,extra legs,malformed limbs,fused fingers,\ too many fingers,long neck,cross-eyed,mutated hands,polar lowres,bad body,bad proportions,\ gross proportions,text,error,missing arms,missing legs,extra digit, duplicate,\ more than one head, more than one face, more than one body,\ (extra digit and hands and fingers and legs and arms:1.4),(interlocked fingers:1.2),\ Ugly Fingers, (deformed fingers:1.2), (long fingers:1.2)' steps = 30 batch_size = 4 headers = {"Authorization": sdwebui_token} payload = get_payload(prompt, negative_prompt, steps=steps, width=768, height=1024, batch_size=batch_size) response = requests.post(url=f'{sdwebui_url}/sdapi/v1/txt2img', headers=headers, json=payload) if response.status_code != 200: raise RuntimeError(response.status_code, response.text) r = response.json() os.makedirs(save_dir, exist_ok=True) images = [Image.open(io.BytesIO(base64.b64decode(i))) for i in r['images']] for i, img in enumerate(images): img.save(os.path.join(save_dir, f'image_{i}.jpg'))其中:<service_URL>替换为步骤一中查询的服务访问地址;<service_Token>替换为步骤一中查询的服务Token。
服务调用成功后,如下效果图生成到
lora_outputs目录。您的效果图以实际为准。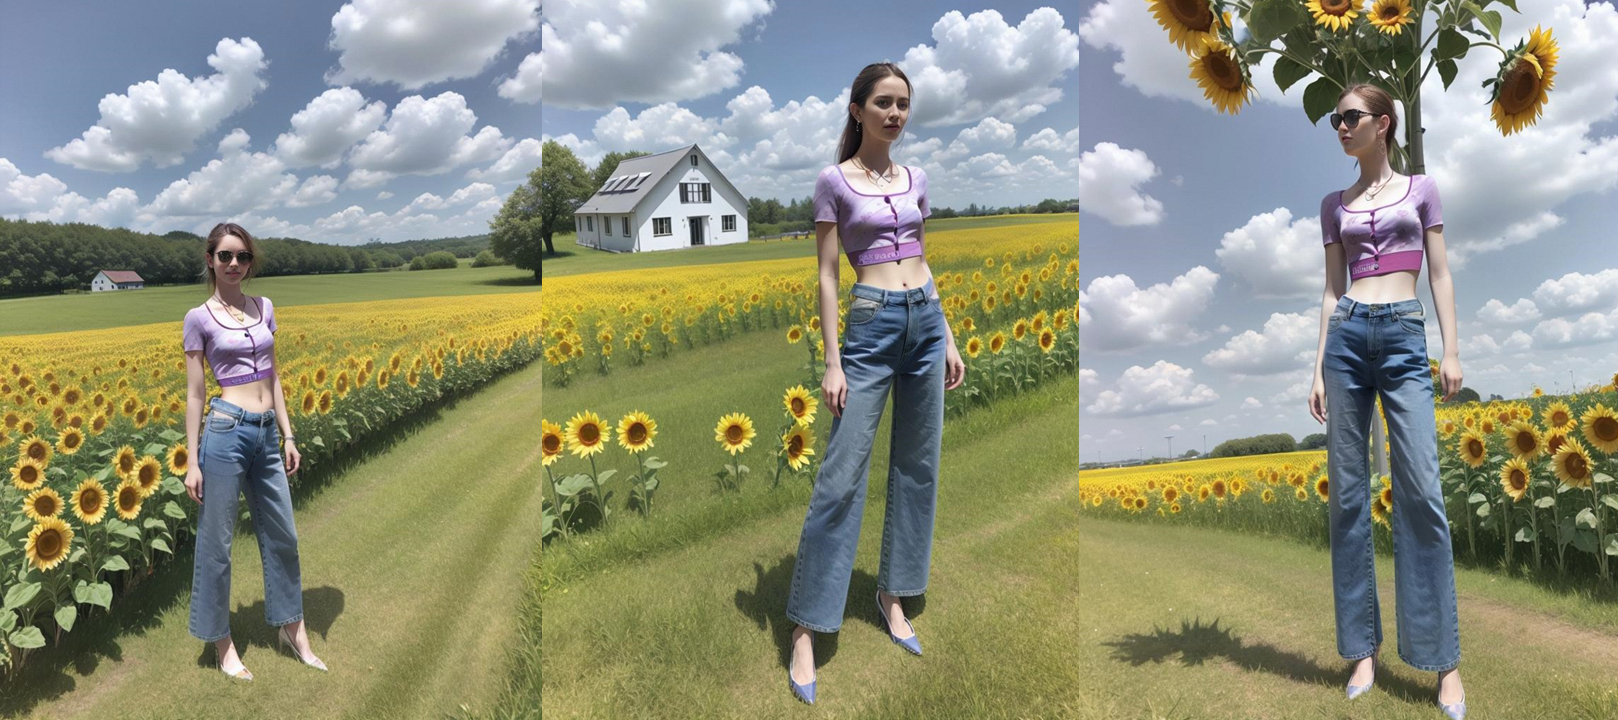
方案二:基于ControlNet实现人台重绘
Web应用方式
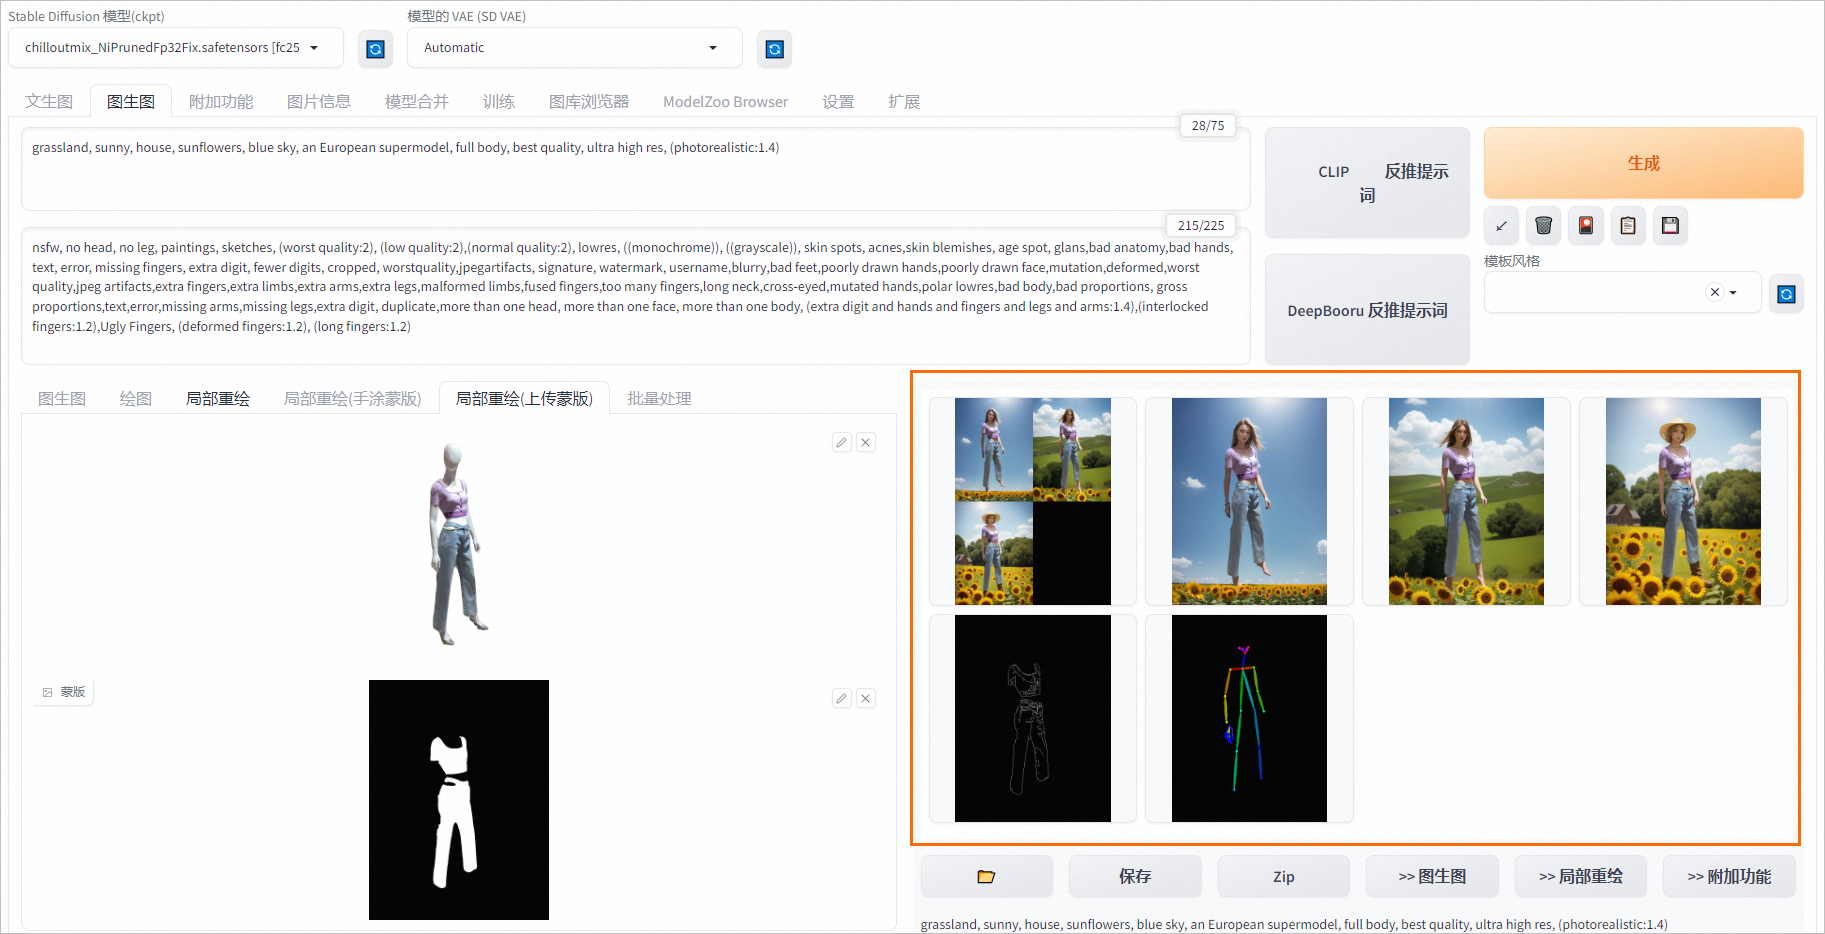
以抠好的服饰Mask图为例进行演示。单击服务方式列下的查看Web应用启动WebUI,在WebUI界面图生图页签配置以下参数。
基础配置如下:
提示词(Prompt):
grassland, sunny, house, sunflowers, blue sky, an European supermodel, full body, best quality, ultra high res, (photorealistic:1.4)。反向提示词(Negative prompt):
nsfw, no head, no leg, paintings, sketches, (worst quality:2), (low quality:2),(normal quality:2), lowres, ((monochrome)), ((grayscale)), skin spots, acnes,skin blemishes, age spot, glans,bad anatomy,bad hands, text, error, missing fingers, extra digit, fewer digits, cropped, worstquality,jpegartifacts, signature, watermark, username,blurry,bad feet,poorly drawn hands,poorly drawn face,mutation,deformed,worst quality,jpeg artifacts,extra fingers,extra limbs,extra arms,extra legs,malformed limbs,fused fingers,too many fingers,long neck,cross-eyed,mutated hands,polar lowres,bad body,bad proportions, gross proportions,text,error,missing arms,missing legs,extra digit, duplicate,more than one head, more than one face, more than one body, (extra digit and hands and fingers and legs and arms:1.4),(interlocked fingers:1.2),Ugly Fingers, (deformed fingers:1.2), (long fingers:1.2)。蒙版模式选择重绘非蒙版内容。
蒙版蒙住的内容选择填充。
采样迭代步数(Steps):建议配置为30,或使用默认配置。
选择面部修复,宽度设置为768;高度设置为1024;重绘幅度(Denoising)配置为1。

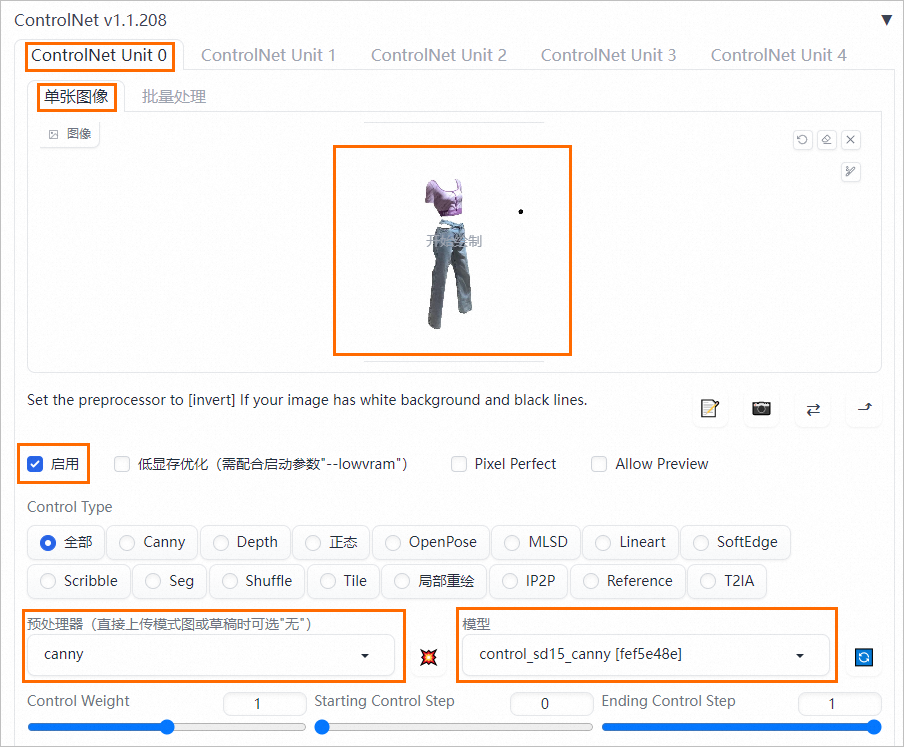
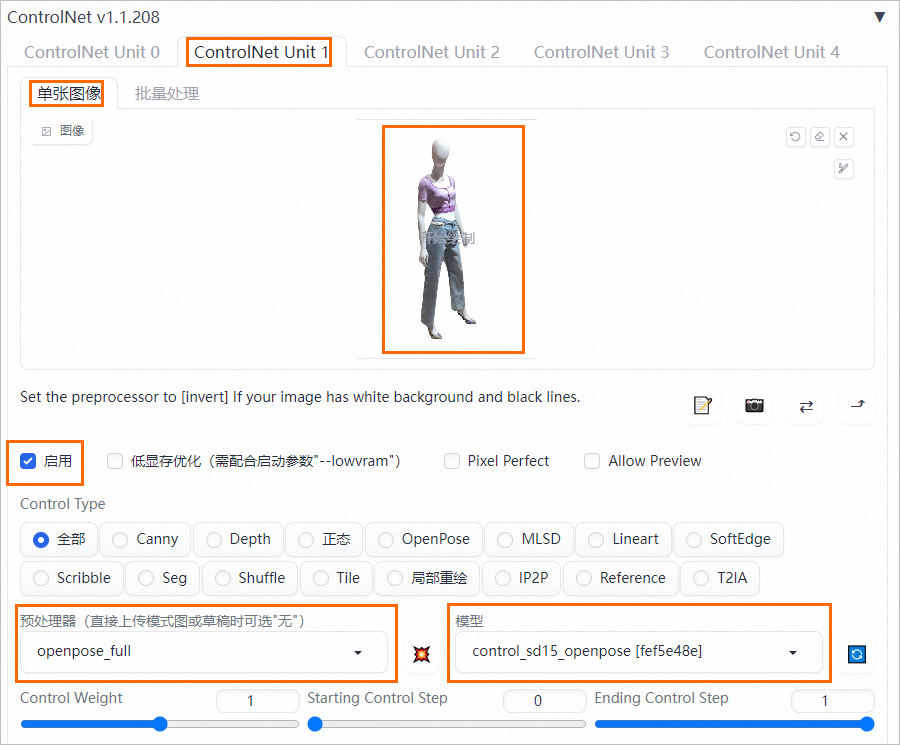
单击ControlNet Unit0,在单张图像页签上传服务抠图,并参照下图配置参数。
单击ControlNet Unit1,在单张图像页签上传原图,并参照下图配置参数。
并单击生成,生成如下效果图:
API调用方式
在下载demo数据的当前目录,参考以下Python脚本通过API调用服务:
import os import io import base64 import requests from PIL import Image def sdwebui_b64_img(image: Image): buffered = io.BytesIO() image.save(buffered, format="PNG") img_base64 = 'data:image/png;base64,' + str(base64.b64encode(buffered.getvalue()), 'utf-8') return img_base64 def get_payload(human_pil, cloth_mask, cloth_pil, prompt, negative_prompt, steps, batch_size=1, seed=-1): input_image = sdwebui_b64_img(human_pil) mask_image = sdwebui_b64_img(cloth_mask) width = human_pil.size[0] height = human_pil.size[1] print(f'width: {width}, height: {height}') res = { 'init_images': [input_image], 'mask': mask_image, 'resize_mode':0, 'denoising_strength': 1.0, 'mask_blur': 4, 'inpainting_fill': 0, 'inpaint_full_res': False, 'inpaint_full_res_padding': 0, 'inpainting_mask_invert': 1, 'initial_noise_multiplier': 1, 'prompt': prompt, 'negative_prompt': negative_prompt, 'seed': seed, 'batch_size': batch_size, 'n_iter': 1, 'steps': steps, 'cfg_scale': 7.0, 'image_cfg_scale': 1.5, 'width': width, 'height': height, 'restore_faces': True, 'tiling': False, 'override_settings_restore_afterwards': True, 'sampler_name': 'Euler a', 'sampler_index': 'Euler a', "save_images": False, 'alwayson_scripts': { 'ControlNet': { 'args': [ { 'input_image': sdwebui_b64_img(cloth_pil), 'module': 'canny', 'model': 'control_sd15_canny [fef5e48e]', 'weight': 1.0, 'resize_mode': 'Scale to Fit (Inner Fit)', 'guidance': 1.0 }, { 'input_image': input_image, 'module': 'openpose_full', 'model': 'control_sd15_openpose [fef5e48e]', 'weight': 1.0, 'resize_mode': 'Scale to Fit (Inner Fit)', 'guidance': 1.0 } ] } } } return res if __name__ == '__main__': sdwebui_url = "<service_URL>" sdwebui_token = "<service_Token>" raw_image_path = '1.png' # 原图 cloth_path = 'cloth_pil.jpg' # 服饰抠图 cloth_mask_path = 'cloth_mask.png' # 服饰mask steps = 30 batch_size = 4 prompt = 'grassland, sunny, house, sunflowers, blue sky, an European supermodel, full body, best quality, ultra high res, (photorealistic:1.4)' negative_prompt = 'nfsw, no head, no leg, no feet, paintings, sketches, (worst quality:2), (low quality:2),\ (normal quality:2), lowres, ((monochrome)), ((grayscale)), skin spots, acnes,\ skin blemishes, age spot, glans,bad anatomy,bad hands, text, error, missing fingers,\ extra digit, fewer digits, cropped, worstquality,jpegartifacts,\ signature, watermark, username,blurry,bad feet,poorly drawn hands,poorly drawn face,\ mutation,deformed,worst quality,jpeg artifacts,\ extra fingers,extra limbs,extra arms,extra legs,malformed limbs,fused fingers,\ too many fingers,long neck,cross-eyed,mutated hands,polar lowres,bad body,bad proportions,\ gross proportions,text,error,missing arms,missing legs,extra digit, duplicate,\ more than one head, more than one face, more than one body,\ (extra digit and hands and fingers and legs and arms:1.4),(interlocked fingers:1.2),\ Ugly Fingers, (deformed fingers:1.2), (long fingers:1.2)' save_dir = 'repaint_outputs' os.makedirs(save_dir, exist_ok=True) headers = {"Authorization": sdwebui_token} human_pil = Image.open(raw_image_path) cloth_mask_pil = Image.open(cloth_mask_path) cloth_pil = Image.open(cloth_path) payload = get_payload(human_pil, cloth_mask_pil, cloth_pil, prompt, negative_prompt, steps=steps, batch_size=batch_size) response = requests.post(url=f'{sdwebui_url}/sdapi/v1/img2img', headers=headers, json=payload) if response.status_code != 200: raise RuntimeError(response.status_code, response.text) r = response.json() images = [Image.open(io.BytesIO(base64.b64decode(i))) for i in r['images']] for i, img in enumerate(images): img.save(os.path.join(save_dir, f'image_{i}.jpg'))其中:<service_URL>替换为步骤一中查询的服务访问地址;<service_Token>替换为步骤一中查询的服务Token。
服务调用成功后,如下效果图生成到当前目录下的
repaint_outputs目录。您的效果图以实际为准。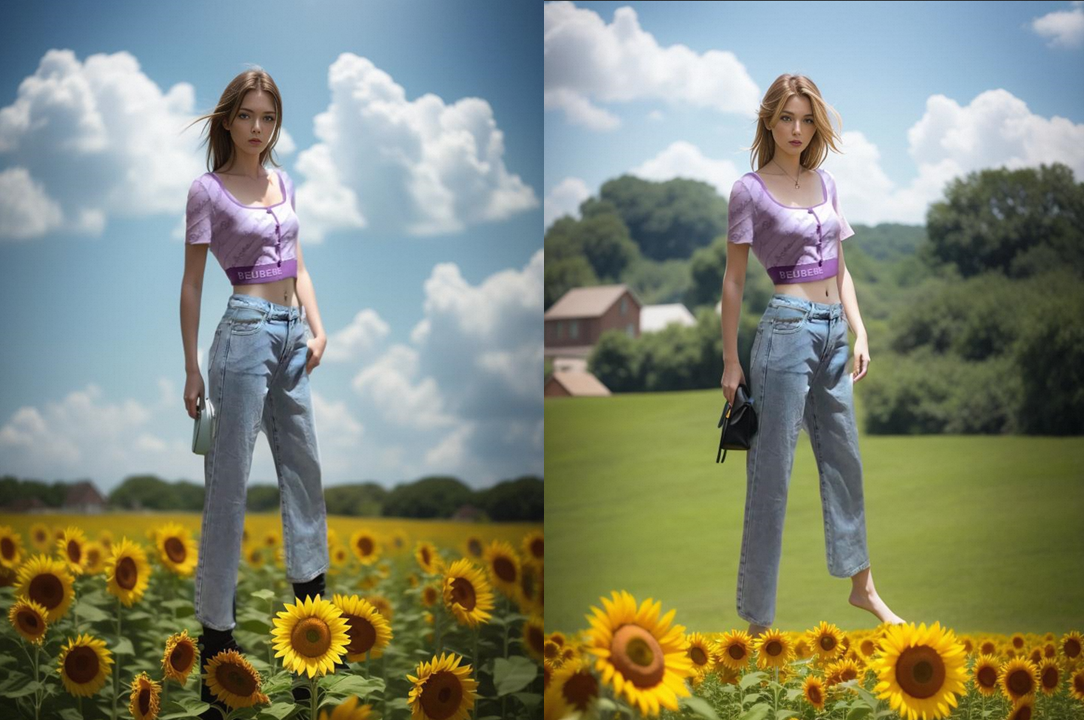
端到端操作实现虚拟上装
方式一:使用Lora进行服饰训练和可控生成
以下是训练自有服装Lora模型的端到端操作步骤:
下载数据集。
准备训练模型需要的服饰数据(大约10~20张图片),您可以自行准备训练数据,也可以下载demo数据。数据格式可以参考demo数据,以下内容以demo数据为例。
在JupyterLab中使用以下命令下载并解压数据集:
# 安装unzip解压工具 !sudo apt-get update && sudo apt-get install unzip #下载并解压数据集 !wget http://pai-vision-data-hz.oss-cn-zhangjiakou.aliyuncs.com/projects/tryon/data/data.zip && unzip data.zip部署并调用SAM服务,来实现图像抠图。
Segment Anything Model(SAM)是由META提出的分割大模型,它可以为图像中的所有对象生成掩码(mask)。SAM模型将用于获取人体区域Mask,去除背景区域,让模型更专注于学习服饰的特征,提升Lora模型的训练效果。
打开部署服务页面,具体操作请参见控制台上传部署。
在对应配置编辑区域,单击JSON独立部署。并在编辑框中配置以下内容。
{
    "cloud": {
        "computing": {
            "instance_type": "ecs.gn6v-c8g1.2xlarge"
        }
    },
    "containers": [
        {
            "command": "python api.py --port 8000",
            "image": "eas-registry-vpc.${region}.cr.aliyuncs.com/pai-eas/pai-quickstart:pytorch1.13.1_cuda11.6_grounded_sam_0.1",
            "port": 8000
        }
    ],
    "features": {
        "eas.aliyun.com/extra-ephemeral-storage": "100Gi"
    },
    "metadata": {
        "cpu": 8,
        "gpu": 1,
        "instance": 1,
        "memory": 32000,
        "name": "grounded_sam_api",
        "rpc": {
            "keepalive": 500000
        }
    },
    "name": "grounded_sam_api"
}
其中:
name:自定义服务名称,同地域内唯一。
containers.image:将
${region}替换为当前地域ID,例如:华东2(上海)为cn-shanghai,其他地域ID,请参见地域和可用区。
单击部署,当服务状态变为运行中时,表明服务部署成功。
说明如果部署按钮置灰,请检查复制的JSON文本格式是否有问题。
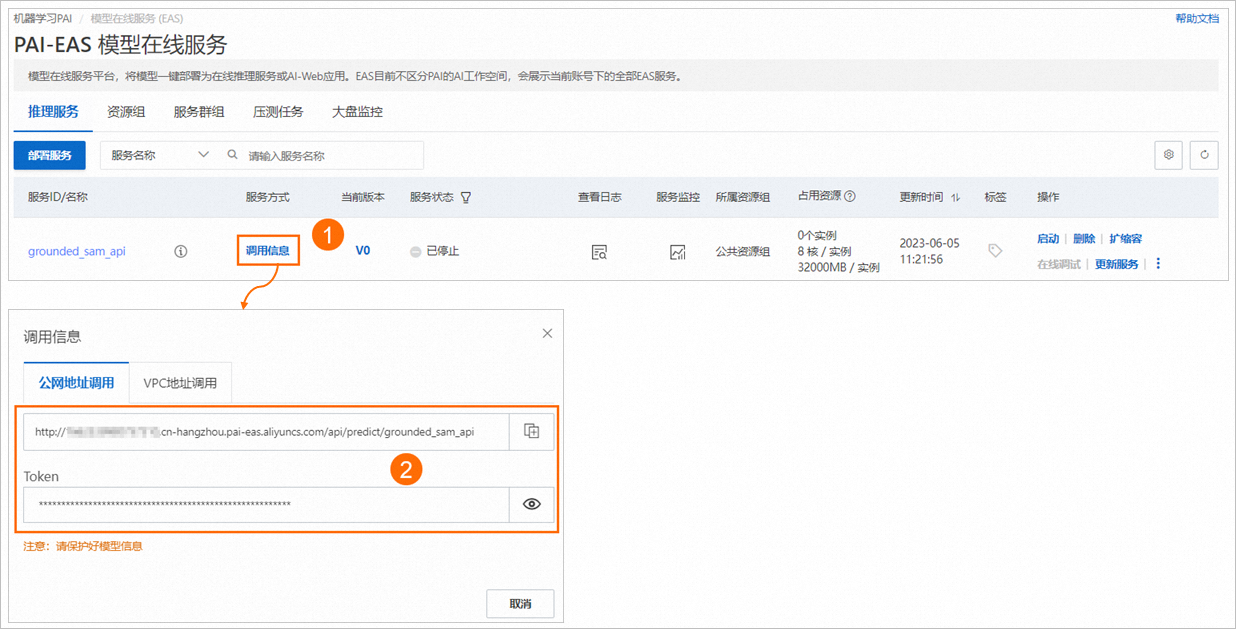
单击服务方式列下的调用信息,查看服务访问地址和Token,并保存到本地。
在下载demo数据集的当前目录,使用以下代码调用服务生成Mask图,以下载的
data目录下的demo数据为例,生成的Mask图保存到crop_data目录。import os import io import copy import glob import requests import json import base64 import cv2 from PIL import Image import numpy as np url = "<service_url>" token = "<service_token>" image_dir = 'data/' save_dir = 'crop_data/' def extract_masked_part(mask, image, bg_value=255): """Extract masked part from original image. """ h, w = mask.shape[-2:] mask_image = (1 - mask.reshape(h, w, 1)) * bg_value + mask.reshape( h, w, 1) * image mask_image = mask_image.astype(np.uint8) return mask_image def encode_file_to_base64(f): with open(f, "rb") as file: encoded_string = base64.b64encode(file.read()) base64_str = str(encoded_string, "utf-8") return base64_str def post(image_path, url, token): base64_string = encode_file_to_base64(image_path) request_body = { "img_path": base64_string, "text_prompt": "people", "box_threshold": 0.75, "text_threshold": 0.7 } headers = {"Authorization": token} resp = requests.post(url=url + "/grounded_sam", headers=headers, json=request_body) print("sam status code:", resp.status_code) if resp.status_code != 200: raise RuntimeError(f'sam status code: {resp.status_code}', resp.text, \ "Please try to lower the `box_threshold` or `text_threshold`, maybe it's too high and detect nothing.") return base64.b64decode(resp.text) mask_save_dir = "masks" os.makedirs(save_dir, exist_ok=True) os.makedirs(mask_save_dir, exist_ok=True) imgs_list = glob.glob(os.path.join(image_dir, '*.jpg')) for image_path in imgs_list: mask_result = post(image_path, url, token) mask = np.array(Image.open(io.BytesIO(mask_result))) mask_0_255 = copy.deepcopy(mask) mask_0_255[mask_0_255==1] = 255 mask_save_path = os.path.join(mask_save_dir, os.path.basename(image_path)) Image.fromarray(mask_0_255).save(mask_save_path) img_rgb = np.array(Image.open(image_path)) human_pil = Image.fromarray(extract_masked_part(mask, img_rgb)) save_path = os.path.join(save_dir, os.path.basename(image_path)) human_pil.save(save_path) print(f'successfully save image: {save_path}')其中:<service_url>替换为实际查询的服务访问地址;<service_token>替换为实际查询的服务Token。
标注数据。
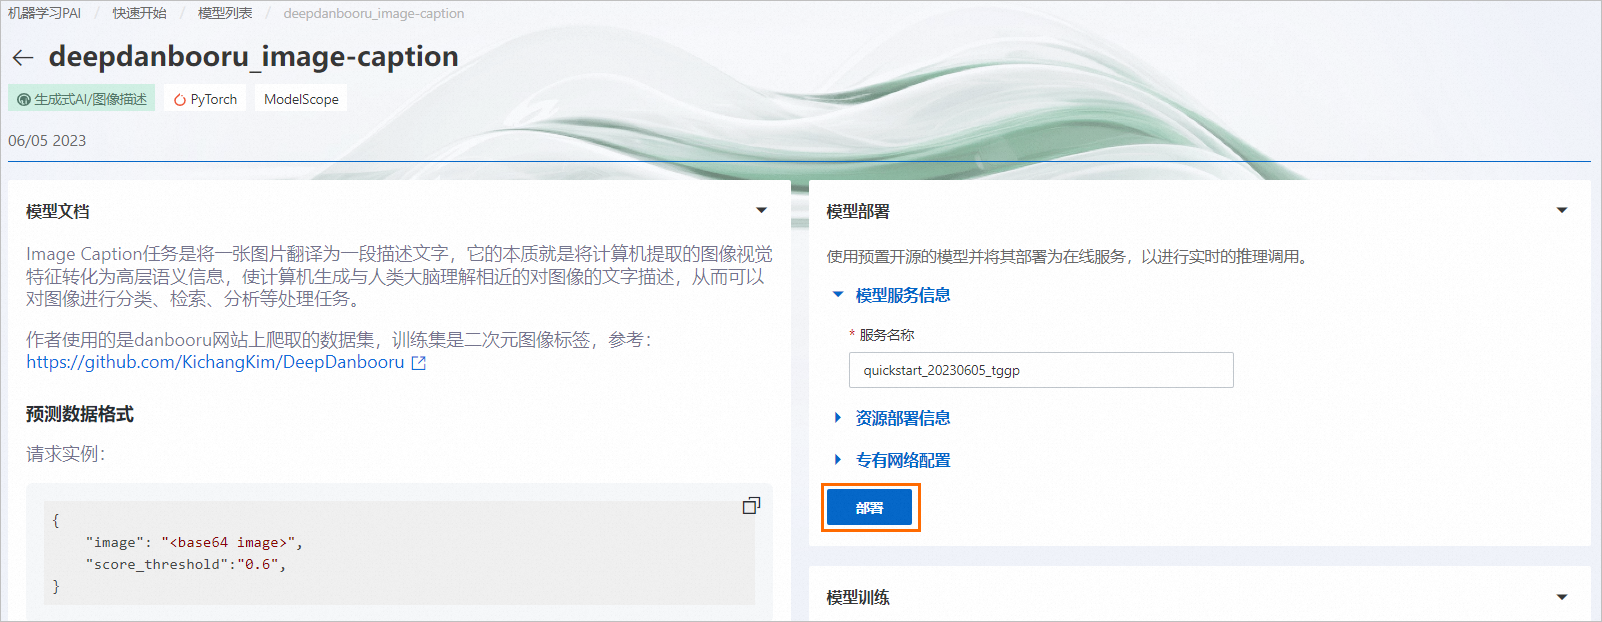
使用快速开始中的deepdanbooru_image-caption模型对
crop_data目录图像进行标注,并将标注文件输出到crop_data目录。具体操作步骤如下:在快速开始首页搜索模型deepdanbooru_image-caption,并单击模型进入模型详情页面,具体操作,请参见查找适合业务的模型。
在模型详情页面,单击部署,并在弹出的计费提醒对话框中单击确定。
页面自动跳转到服务详情页面。当服务状态变为运行中时,表明服务部署成功。
在服务详情页面资源信息区域,单击查看调用信息,查看服务的访问地址和Token,并保存到本地。
在下载demo数据集的当前目录,使用以下代码调用服务,对生成的Mask图进行数据标注。
import os import json import glob import base64 import requests url = "<service_url>" token = "<service_Token>" # image_dir = 'data/' image_dir = 'crop_data/' def encode_file_to_base64(f): with open(f, "rb") as file: encoded_string = base64.b64encode(file.read()) base64_str = str(encoded_string, "utf-8") return base64_str def post(image_path, url, token): base64_string = encode_file_to_base64(image_path) request_body = { "image": base64_string, 'score_threshold': 0.6 } headers = {"Authorization": token} resp = requests.post(url=url, headers=headers, json=request_body) results = json.loads(resp.content.decode('utf-8')) print("image caption status code:", resp.status_code) return results imgs_list = glob.glob(os.path.join(image_dir, '*.jpg')) for image_path in imgs_list: results = post(image_path, url, token) print(f'text results: {results}') img_name = os.path.basename(image_path) txt_path = os.path.join(image_dir, os.path.splitext(img_name)[0] + '.txt') with open(txt_path, 'w') as f: f.write(', '.join(results))其中:<service_url>替换为实际查询的服务访问地址;<service_token>替换为实际查询的服务Token。
生成的数据格式如下:
│───crop_data │ │───img_0.jpg │ │───img_0.txt │ │───img_1.jpg │ │───img_1.txt │ │───...说明您可以手动优化标注文件文本内容,将单件服饰的多个描述词合并为一个Tag,这样可以使模型更加专注于学习一个明确的标签,可以提升模型的效果。
训练并部署Lora模型。
将标注好的数据(即crop_data目录下的数据)上传到OSS路径中,假设OSS路径为:
oss://{your bucket}/tryon/data/。如何上传数据,请参见控制台上传文件。在快速开始首页搜索模型custom_civitai_models,并单击模型进入模型详情页面,具体操作,请参见查找适合业务的模型。
在模型训练区域,配置以下关键参数,其他参数保持默认即可,并单击训练。
参数
描述
训练数据集
在下拉列表中选择OSS文件或目录,并选择步骤a标注数据传入的OSS路径。
自定义模型
在下拉列表中选择OSS文件或目录,并输入模板路径:
oss://pai-quickstart-${region}.oss-${region}-internal.aliyuncs.com/aigclib/models/custom_civitai_models/chilloutmix/。其中${region}需要替换为当前地域ID,例如:华东2(上海)为cn-shanghai,其他地域ID,请参见地域和可用区。超参数配置
可以调整以下参数配置:
max_epochs:200。
height:768。
width:640。
lora_attn_rank:32。
模型输出路径
选择OSS Bucket路径,用来保存训练生成的模型文件。
页面自动跳转到任务详情页面,训练过程大约持续1~2个小时。
Lora训练完成后,在模型部署区域直接单击部署,并在弹出的计费提醒对话框中单击确定,即可完成模型部署。当服务状态变为运行中,表明服务部署成功。
在服务详情页面资源信息区域,单击查看调用信息,查看服务的访问地址和Token,并保存到本地。
调试模型。
Lora模型服务部署成功后,在服务详情页面右侧单击查看WEB应用,进入WebUI界面,即可开始调试服务。
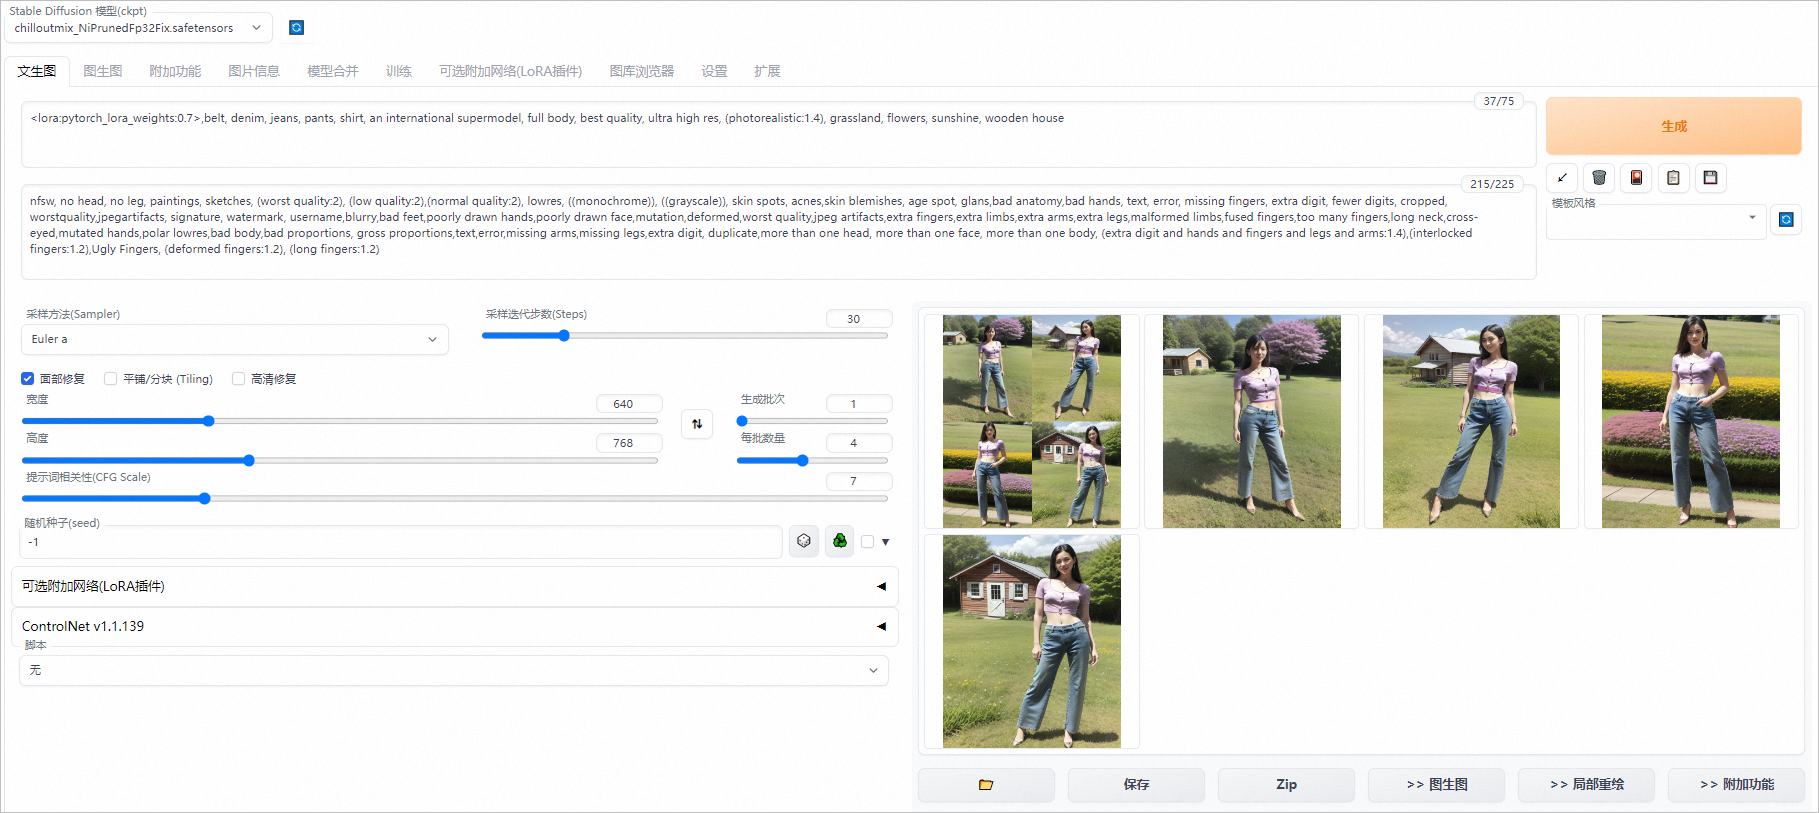
在文生图页签配置以下参数,并单击生成。
参数
示例值
提示词(Prompt)
<lora:pytorch_lora_weights:0.7>,belt, denim, jeans, pants, shirt, an international supermodel, full body, best quality, ultra high res, (photorealistic:1.4), grassland, flowers, sunshine, wooden house说明将调用deepdanbooru_image-caption服务生成的txt文本中关于服饰的描述词拷贝进提示词中,其他背景人物等相关词请自行填写。
反向提示词(Negztive prompt)
nfsw, no head, no leg, paintings, sketches, (worst quality:2), (low quality:2),(normal quality:2), lowres, ((monochrome)), ((grayscale)), skin spots, acnes,skin blemishes, age spot, glans,bad anatomy,bad hands, text, error, missing fingers, extra digit, fewer digits, cropped, worstquality,jpegartifacts, signature, watermark, username,blurry,bad feet,poorly drawn hands,poorly drawn face,mutation,deformed,worst quality,jpeg artifacts,extra fingers,extra limbs,extra arms,extra legs,malformed limbs,fused fingers,too many fingers,long neck,cross-eyed,mutated hands,polar lowres,bad body,bad proportions, gross proportions,text,error,missing arms,missing legs,extra digit, duplicate,more than one head, more than one face, more than one body, (extra digit and hands and fingers and legs and arms:1.4),(interlocked fingers:1.2),Ugly Fingers, (deformed fingers:1.2), (long fingers:1.2)采样迭代步数(Steps)
30
面部修复
选中面部修复,并将宽度配置为640;高度配置为768;每批数量配置为4。
输出如下效果图,您的效果图以实际为准。
方式二:基于SAM和ControlNet的人台重绘技术
部署服务。
部署SDWebUI服务并查看访问地址和Token,具体操作请参见步骤一:部署服务。
部署SAM服务并查看访问地址和Token,具体操作请参见部署并调用SAM服务,来实现图像抠图。
通过API调用服务,端到端实现抠图和重绘功能。
下载测试数据到本地:test.png。
在下载测试数据的当前目录执行以下代码,使用API调用服务,生成效果图至
outputs目录。import os import io import glob import base64 import requests import copy import numpy as np from PIL import Image import matplotlib.pyplot as plt def extract_masked_part(mask, image, bg_value=255): """Extract masked part from original image. mask is 0, 1 value. """ h, w = mask.shape[-2:] mask_image = (1 - mask.reshape(h, w, 1)) * bg_value + mask.reshape(h, w, 1) * image mask_image = mask_image.astype(np.uint8) return mask_image def sdwebui_b64_img(image: Image): buffered = io.BytesIO() image.save(buffered, format="PNG") img_base64 = 'data:image/png;base64,' + str(base64.b64encode(buffered.getvalue()), 'utf-8') return img_base64 def sam_b64_img(img_path): with open(img_path, "rb") as file: encoded_string = base64.b64encode(file.read()) base64_str = str(encoded_string, "utf-8") return base64_str def post_sam(url, token, image_path, text_prompt, box_threshold=0.6, text_threshold=0.3): base64_string = sam_b64_img(image_path) request_body = { "img_path": base64_string, "text_prompt": text_prompt, "box_threshold": box_threshold, "text_threshold": text_threshold } headers = {"Authorization": token} resp = requests.post(url=url + "/grounded_sam", headers=headers, json=request_body) print("sam status code:", resp.status_code) if resp.status_code != 200: raise RuntimeError(f'sam status code: {resp.status_code}', resp.text, \ "Please try to lower the `box_threshold` or `text_threshold`, maybe it's too high and detect nothing.") return base64.b64decode(resp.text) def get_sam_results(url, token, image_path, save_dir='./outputs'): # get human mask, remove background mask_result = post_sam(url, token, image_path, text_prompt='human', box_threshold=0.6, text_threshold=0.3) img_rgb = np.array(Image.open(image_path)) mask = np.array(Image.open(io.BytesIO(mask_result))) mask_0_255 = copy.deepcopy(mask) mask_0_255[mask_0_255==1] = 255 mask_save_path = os.path.join(save_dir, 'human_mask.png') Image.fromarray(mask_0_255).save(mask_save_path) human_pil = Image.fromarray(extract_masked_part(mask, img_rgb)) human_pil_path = os.path.join(save_dir, 'human_pil.jpg') human_pil.save(human_pil_path) # get cloth mask,这里适用于上下装的场景 cloth_mask_shirt = post_sam(url, token, human_pil_path, text_prompt='shirt', box_threshold=0.3, text_threshold=0.2) cloth_mask_pants = post_sam(url, token, human_pil_path, text_prompt='pants', box_threshold=0.3, text_threshold=0.2) cloth_mask = np.array(Image.open(io.BytesIO(cloth_mask_shirt))) + np.array(Image.open(io.BytesIO(cloth_mask_pants))) # 单件衣服 # cloth_mask_results = post_sam(url, token, human_pil_path, text_prompt='cloth', box_threshold=0.3, text_threshold=0.2) # cloth_mask = np.array(Image.open(io.BytesIO(cloth_mask_results))) cloth_mask_save_path = os.path.join(save_dir, 'cloth_mask.png') cloth_mask_0_255 = copy.deepcopy(cloth_mask) cloth_mask_0_255[cloth_mask_0_255==1] = 255 Image.fromarray(cloth_mask_0_255).save(cloth_mask_save_path) cloth_pil = Image.fromarray(extract_masked_part(cloth_mask, img_rgb)) cloth_pil.save(os.path.join(save_dir, 'cloth_pil.jpg')) return human_pil, Image.fromarray(cloth_mask_0_255), cloth_pil def get_payload(human_pil, cloth_mask, cloth_pil, prompt, negative_prompt, steps, batch_size=1, seed=-1): input_image = sdwebui_b64_img(human_pil) mask_image = sdwebui_b64_img(cloth_mask) width = human_pil.size[0] height = human_pil.size[1] print(f'width: {width}, height: {height}') res = { 'init_images': [input_image], 'mask': mask_image, 'resize_mode':0, 'denoising_strength': 1.0, 'mask_blur': 4, 'inpainting_fill': 0, 'inpaint_full_res': False, 'inpaint_full_res_padding': 0, 'inpainting_mask_invert': 1, 'initial_noise_multiplier': 1, 'prompt': prompt, 'negative_prompt': negative_prompt, 'seed': seed, 'batch_size': batch_size, 'n_iter': 1, 'steps': steps, 'cfg_scale': 7.0, 'image_cfg_scale': 1.5, 'width': width, 'height': height, 'restore_faces': True, 'tiling': False, 'override_settings_restore_afterwards': True, 'sampler_name': 'Euler a', 'sampler_index': 'Euler a', "save_images": False, 'alwayson_scripts': { 'ControlNet': { 'args': [ { 'input_image': sdwebui_b64_img(cloth_pil), 'module': 'canny', 'model': 'control_sd15_canny [fef5e48e]', 'weight': 1.0, 'resize_mode': 'Scale to Fit (Inner Fit)', 'guidance': 1.0 }, { 'input_image': input_image, 'module': 'openpose_full', 'model': 'control_sd15_openpose [fef5e48e]', 'weight': 1.0, 'resize_mode': 'Scale to Fit (Inner Fit)', 'guidance': 1.0 } ] } } } return res if __name__ == '__main__': sam_url = "<sam_service_URL>" sam_token = "<sam_service_Token>" sdwebui_url = "<sdwebui_service_URL>" sdwebui_token = "<sdwebui_service_Token>" save_dir = './outputs' image_path = 'test.png' os.makedirs(save_dir, exist_ok=True) prompt = 'grassland, sunny, house, sunflowers, blue sky, an European supermodel, full body, best quality, ultra high res, (photorealistic:1.4)' negative_prompt = 'nfsw, no head, no leg, no feet, paintings, sketches, (worst quality:2), (low quality:2),\ (normal quality:2), lowres, ((monochrome)), ((grayscale)), skin spots, acnes,\ skin blemishes, age spot, glans,bad anatomy,bad hands, text, error, missing fingers,\ extra digit, fewer digits, cropped, worstquality,jpegartifacts,\ signature, watermark, username,blurry,bad feet,poorly drawn hands,poorly drawn face,\ mutation,deformed,worst quality,jpeg artifacts,\ extra fingers,extra limbs,extra arms,extra legs,malformed limbs,fused fingers,\ too many fingers,long neck,cross-eyed,mutated hands,polar lowres,bad body,bad proportions,\ gross proportions,text,error,missing arms,missing legs,extra digit, duplicate,\ more than one head, more than one face, more than one body,\ (extra digit and hands and fingers and legs and arms:1.4),(interlocked fingers:1.2),\ Ugly Fingers, (deformed fingers:1.2), (long fingers:1.2)' steps = 30 batch_size = 2 headers = {"Authorization": sdwebui_token} human_pil, cloth_mask_pil, cloth_pil = get_sam_results(sam_url, sam_token, image_path, save_dir) payload = get_payload(human_pil, cloth_mask_pil, cloth_pil, prompt, negative_prompt, steps=steps, batch_size=batch_size) response = requests.post(url=f'{sdwebui_url}/sdapi/v1/img2img', headers=headers, json=payload) if response.status_code != 200: raise RuntimeError(response.status_code, response.text) r = response.json() images = [Image.open(io.BytesIO(base64.b64decode(i))) for i in r['images']] for i, img in enumerate(images): img.save(os.path.join(save_dir, f'image_{i}.jpg')) # 显示效果图 imgs_list = glob.glob(os.path.join(save_dir, "*.jpg")) N=1 M=len(imgs_list) for i, img_path in enumerate(imgs_list): img = plt.imread(img_path) plt.subplot(N, M, i+1) plt.imshow(img) plt.xticks([]) plt.yticks([]) plt.show()其中:<sam_service_URL>替换为SAM服务的访问地址;<sam_service_Token>替换为SAM服务的Token;<sdwebui_service_URL>替换为SDWebUI服务的访问地址;<sdwebui_service_Token>替换为SDWebUI服务的Token。